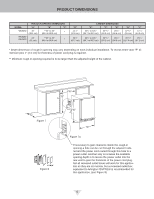
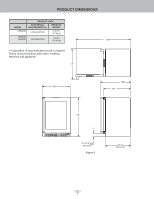
Viking VBUI Installation Instructions - Page 9
Temperature Sensor Error Codes, Temperature mode, Control lock, Adjusting the temperature
 |
View all Viking VBUI manuals
Add to My Manuals
Save this manual to your list of manuals |
Page 9 highlights
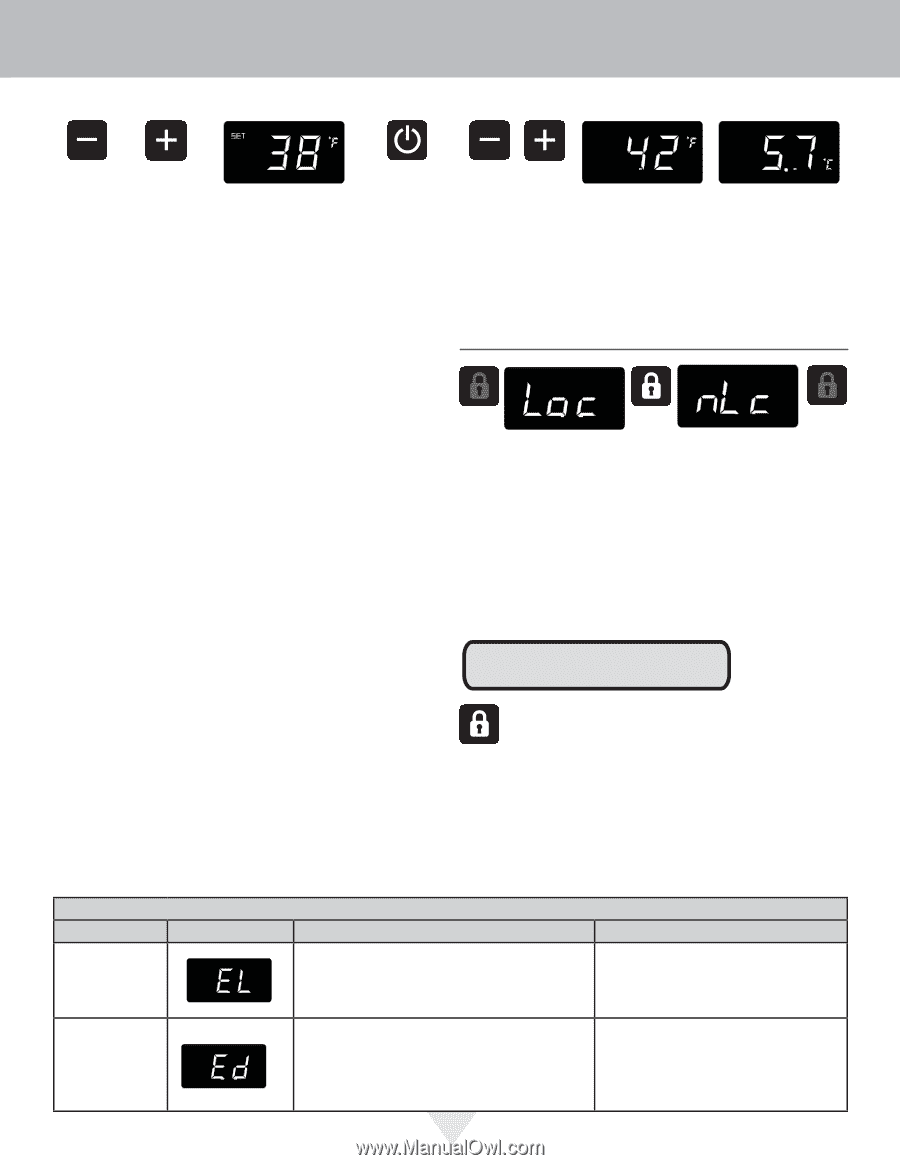
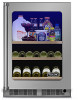
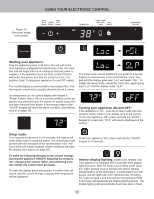
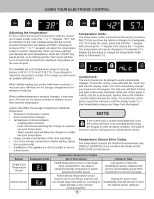
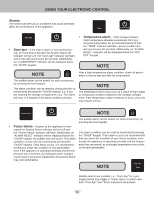
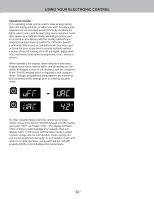
USING YOUR ELECTRONIC CONTROL Adjusting the temperature: To set or check the set-point temperature (with the control out of sleep mode), press the "-" or "+" keypads. "SET" will be indicated on the user interface panel and the current set-point temperature will display and flash. Subsequent presses of the "-" or "+" keypads will adjust the temperature colder or warmer respectively. When you have reached your desired set-point temperature, press the "On/Off" keypad to accept, or do nothing and the "Set" mode will timeout in 10-seconds accepting the displayed temperature as the new set-point. Temperature mode: The temperature mode is preset from the factory in Fahrenheit (°F) but you have the option to change it to Centigrade (°C). To change the mode, press and hold the "-" keypad, while pressing the "+" keypad, then release the "-" keypad. The temperature will now be displayed in Centigrade (°C). Repeat the procedure to change the temperature mode back to Fahrenheit (°F). The available set-point temperature range for your appliance is 34°F (1.2°C) to 42°F (5.7°C). If you attempt to adjust the temperature outside of this range you will receive an audible notification. When initially loading your product with warm contents, it may take up to 48-hours for the storage compartment temperature to stabilize. When making temperature set-point changes, it may take up to 24-hours for the stored contents to stabilize at your new set-point temperature. Factors that affect the storage compartment stabilized temperature: • Changes to temperature setting. • Room temperature changes. • Temperature of stored contents. - Loading warm contents. - Cold content load will delay the change to a warmer set-point temperature. - Warm content load will delay the change to a colder set-point temperature. • Usage, (number and duration of the door openings). • Use of the storage compartment display lighting, (glass door product only). • Installation of the appliance in direct sunlight or next to a heat source. Control lock: The control panel can be locked to avoid unintentional changes. To lock the control, press and hold the "Lock" keypad until the display reads "Loc" then immediately release your finger from the keypad. The lock icon will flash 3-times and then continuously illuminate. When the control panel is locked, only the Lock keypad, System Status OK indicator , and the Alarm indicator are active. To un-lock the control panel, repeat this instruction until the display reads "nLc", then immediately release your finger from the keypad. NOTE If the control lock is active (illuminated lock icon) the control will have to be unlocked before using the keypad to reset an alarm condition. See page 9 (Control Lock) for instructions for unlocking the control. Temperature Sensor Error Codes The temperature sensors are monitored continuously. Any OPEN or SHORTED circuit condition will initiate an ERROR CODE as listed below: Sensor Single Zone Temperature Sensor Defrost Sensor Displayed Code Temperature Sensor Error Codes Error Description Failed temperature sensor in the single zone compartment. Can lead to unwanted storage temperatures and/or spoiled perishable goods. Failed defrost temperature sensor. Causes unit to not defrost properly and can create large frost build-up. Can lead to water damage to the unit and surrounding floor. 9 Action to Take Call service to have the temperature sensor replaced and remove all perishable goods from compartment to prevent spoilage. Unplug the power cord immediately and call service to have the defrost sensor replaced.
-
 1
1 -
2
-
3
-
 4
4 -
 5
5 -
 6
6 -
 7
7 -
 8
8 -
 9
9 -
 10
10 -
 11
11 -
 12
12 -
 13
13 -
 14
14 -
15
-
16
-
17
-
18
-
19
-
20
-
21
-
22
-
23
-
24
-
25
-
26
-
27
-
28
-
29
-
30
-
31
-
32
-
33
-
34
-
35
-
36
-
37
-
38
-
39
-
40
-
41
-
42
-
43
-
44
-
45
-
46
-
47
-
48
-
49
-
50
-
51
-
52
-
53
-
54
-
55
-
56
-
57
-
58
-
59
-
60
 |
 |