Viking VDSC536T Quick Reference Guide - Page 1
Viking VDSC536T Manual
 |
View all Viking VDSC536T manuals
Add to My Manuals
Save this manual to your list of manuals |
Page 1 highlights
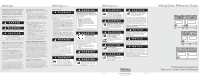
Surface Operation Setting the Clock Lighting the Burners All burners are ignited by electric ignition. There are no open-flame, "standing" pilots. VariSimmer™ Simmering is a cooking technique in which foods are cooked in hot liquids kept at or just barely below the boiling point of water. Simmering ensures gentler treatment than boiling to prevent food from toughening and/or breaking up. The size of the pan and the volume of food can have a significant effect on how high or low a flame is needed for simmering. For this reason, Viking range and rangetop burners are engineered with a VariSimmer setting. The VariSimmer setting is not just one simmer setting, but provides a variable range of simmer settings. This variable range of simmer settings allows you to adjust the flame height to achieve the best simmer depending on the type and quantity of food being simmered. It is this ability that makes the VariSimmer setting the most accurate and trustworthy simmer on the market. TruPower Plus™ Burner (where applicable) Certain model ranges are equipped with a TruPower Plus 18,500 BTU burner in the front right burner position. This burner is designed to provide extra high heat output, especially when using large pans, and should be used for boiling large quantities or if you need to bring something to a boil quickly. While TruPower Plus burner has the extra power needed to bring large quantities of liquid to a boil rapidly, it is also able to be turned down low enough to provide a very low and delicate simmer making this burner the most versatile on the market. Griddle/Simmer Plate (where applicable) The optional 15,000 BTU griddle is constructed of machined steel with a blanchard finish and is uniquely designed to offer excellent cooking performance as well as easy clean up. The griddle is equipped with an electronic thermostat to maintain an even temperature across the griddle once the desired temperature has been set. The griddle has a power "ON" indicator light which glows when the griddle thermostat has been turned on. This will cycle on and off as needed to indicate the thermostat is maintaining the selected temperature. Before the griddle is used, it is important to season the griddle. See instructions in the Use & Care for steps on seasoning the griddle. Char-Grill (where applicable) The optional 18,000 BTU char-grill is equipped with a single piece, heavy-duty porcelainized cast-iron grill grate for easy movement of grilling items. Beneath the grill grate are two slotted porcelainized flavor generator plates which are designed to catch drippings and circulate a smoke flavor back into the food. Beneath the flavor generator plates is a two piece drip pan which catches any drippings that might pass beyond the flavor generator plates. This unique grilling system is designed to provide outdoor quality grilling indoors. Clock Display (General) When AC power is applied (including after a power loss), CLOCK display shows a flashing "12:00" and begins incremental time. Once set, clock is "ON" or "OFF" based on user's last setting. To turn "ON": If time is off, any key press will turn on TIME display. When range is turned "ON" following the selection of FUNCTION or TEMPERATURE, TIME display turns "ON". To turn "OFF": Turn the range "OFF". If TIME is on display, a second press of "OFF" button will turn off TIME display. Programming Clock (Clock defaults to 12:00 and flashes when first powered up or if power is interrupted.) 1. Press "CLOCK/PROBE" button. The clock display will flash. Clock Display SET HR MIN 12:00 AM PM STOP TIMER NO PROBE COOK TIME ON DELAY 2. Toggle "SELECTOR" right to increase or left to decrease to set desired time. Time will scroll in 1 minute increments per individual toggle. If "SELECTOR" is held in either right or left position, time will increase or decrease in 10 minute 00000000 increments until desired time is reached. Clock automatically rolls from AM to PM. 3. Push in "SELECTOR" to accept time and 888°8 CLOCK/ PROBE OVEN FUNC start timer or after 5 MIN/SEC TIMER OVEN TEMP seconds, time will COOK TIME OFF auto-accept. STOP TIME (When clock is set CLEAN/ SETTINGS and needs to be changed, press "CLOCK/PROBE" button and follow the two steps above. CLOCK display will flash when activated.) Oven Controls Oven Functions and Settings Left Rear Burner Control Knob (15,000 BTU) Left Front Burner Control Knob (15,000 BTU) Left Oven Selector Control Knob Left Oven Temperature Control Knob Grill Control Knob Griddle Control Knob Left Display (Clock & Time) SET HR MIN AM PM STOP TIMER NO PROBE COOK TIME ON DELAY CLOCK/ PROBE MIN/SEC TIMER COOK TIME STOP TIME OVEN FUNC OVEN TEMP OFF CLEAN/ SETTINGS SET HR MIN 88:88 AM PM STOP TIMER NO PROBE COOK TIME ON DELAY CLOCK/ PROBE MIN/SEC TIMER COOK TIME STOP TIME Self-Clean Left Oven Indicator Oven Temperature Light Indicator light Griddle Indicator Light Right Display Right Rear Burner Right Front Burner (Function & Temp.) Control Knob Control Knob (15,000 BTU) (15,000 BTU) OVEN FUNC OVEN TEMP OFF CLEAN/ SETTINGS 00000000 888°8 BAKE (Two- BAKE Element Bake) Full power heat is radiated from the bake element in the bottom of the oven cavity and supplemental heat is radiated from the two-element bake broil element. This function is recommended for single rack baking. Many cookbooks contain recipes to be cooked in the conventional manner. Conventional baking/roasting is particularly suitable for dishes that require a high temperature. Use this setting for baking, roasting, and casseroles. TruConvec™ element (behind baffle) Broil element Right Oven Selector Controls SET HR MIN AM PM STOP TIMER NO PROBE COOK TIME ON DELAY CLOCK/ PROBE MIN/SEC TIMER COOK TIME STOP TIME Two tilt-proof racks OVEN FUNC OVEN TEMP OFF CLEAN/ SETTINGS SET HR MIN 88:88 AM PM STOP TIMER NO PROBE COOK TIME ON DELAY CLOCK/ PROBE MIN/SEC TIMER COOK TIME STOP TIME OVEN FUNC OVEN TEMP OFF CLEAN/ SETTINGS 00000000 888°8 Oven light One TruGlide™ rack Concealed bake element Note: VDSC548T4GQ model range shown here. Oven light Clock/Probe Button 6 Allows clock to be set to desired time. 5 When probe is connected, use this button 4 3 to set desired temperature 2 1 Min/Sec Timer Button Allows timer to be set to desired time. Cook Time Button Set a specific amount of time and a specific cooking function to be performed. Griddle/Simmer Plate Operation/Settings • Turn the griddle control knob to desired temperature setting. • ALWAYS turn off when not in use, or lower the heat between cooking loads. Stop Time Button Set a delay bake time, giving an amount of time before baking begins and an amount of time for the duration of baking. Grill Operation/Settings *Note: These keys have added importance. • Turn on ventilator (separate product). • Turn control knob to HI. • Preheat on HI for 5 to 10 minutes. • Place food on grill, cook as desired. Oven Function Button Set the appropriate oven function including: Bake, Convection Bake, TruConvec™, Broil, Convection Broil, Convection Roast, Auto Roast, Defrost, Dehydrate, Proof, and Self-Clean. Oven Temp Button Allows appropriate oven temperature to be set. Off Button* First press turns oven off. Second press turns off time display. Activates Control Lock if pressed in conjunction with Clear/Settings button. Clear/Settings Button* Press Clear to acknowledge an expired timer. Press Clear to cancel a function. When setting a function, time etc., press the Clear key to revert to previous setting. CONV BAKE CONV BAKE (Convection Bake) The bottom element operates at full power, and the top broil element operates at supplemental power. convection bake The heated air is circulated by the motorized fan in the rear of the oven providing a more even heat distribution. This even circulation of air equalizes the temperature throughout the oven cavity and eliminates the hot and cold spots found in conventional ovens. A major benefit of convection baking is the ability to prepare food in quantity using multiple racks-a feature not possible in a standard oven. TRU CONV TRU CONV (TruConvec™) The rear element only operates at full power. There is no direct heat from the bottom or top elements. The motorized fan in the rear of the oven TruConvec™ circulates air in the oven cavity for even heating. Use this setting for foods that require gentle cooking such as pastries, souffles, yeast breads, quick breads and cakes. Breads, cookies, and other baked goods come out evenly textured with golden crusts. No special bakeware is required. Use this function for single rack baking, multiple rack baking, roasting, and preparation of complete meals. This setting is also recommended when baking large quantities of baked goods at one time. CONV ROAST (Convection Roast) CONV ROAST The convection element runs in conjunction with the inner and outer broil elements. The reversible convection roast convection fan runs at a higher speed in each direction. This transfer of heat (mainly from the convection element) seals moisture inside of large roasts. A time savings is gained over existing, single fan convection roast modes. Use this setting for whole turkeys, whole chickens, hams, etc. AUTO ROAST (Auto Roast) Use this function to simplify roasting by automatically searing the outside of roasts. When Set Auto Roast Temperature is reached, one long beep will sound and the display will show "SEARING." The oven will remain at searing temperature (set temperature plus 100ºF) for 30 minutes. If set, Cook Time timer will begin. CONV BROIL (Convection Broil) CNV BRL The top element operates at full power. This function is exactly the same as regular broiling with the additional convection broil benefit of air circulation by the motorized fan in the rear of the oven. Smoke is reduced since the airflow also reduces peak temperatures on the food. Use this setting for broiling thick cuts of meats. HI BROIL BROIL HI Heat radiates from both broil elements, located in the top of the oven cavity, at full power. The distance between the foods and the broil elements high broil determines broiling speed. For fast broiling, food may be as close as 2 inches (5 cm) to the broil element or on the top rack. Fast broiling is best for meats where rare to medium doneness is desired. Use this setting for broiling small and average cuts of meat. MED BROIL BROIL MED Inner and outer broil elements pulse on and off to produce less heat for slow broiling. Allow about 4 inches (10 cm) between the top medium broil surface of the food and the broil element. Slow broiling is best for chicken and ham in order to broil food without over- browning it. Use this setting for broiling small and average cuts of meat. LOW BROIL BROIL LOW This mode uses only a fraction of the available power to the inner broil element for delicate top- browning. The inner broil element low broil is on for only part of the time. Use this setting to gently brown meringue on racks 3 or 4 in 3-4 minutes. DEHYDRATE (Convection Dehydrate) This oven is designed not only to cook, but also to dehydrate fruits and vegetables by removing water DEFR0ST (Convection Defrost) Use this function to defrost foods. PROOF Use this setting to allow yeast dough to rise. Temperature can be set between 90º and 110ºF (32º to 44ºC). SELF CLEAN Use this function to clean oven.
-
 1
1 -
 2
2
 |
 |
