Viking VESO5302SS Quick Reference Guide - Page 1
Viking VESO5302SS Manual
 |
View all Viking VESO5302SS manuals
Add to My Manuals
Save this manual to your list of manuals |
Page 1 highlights
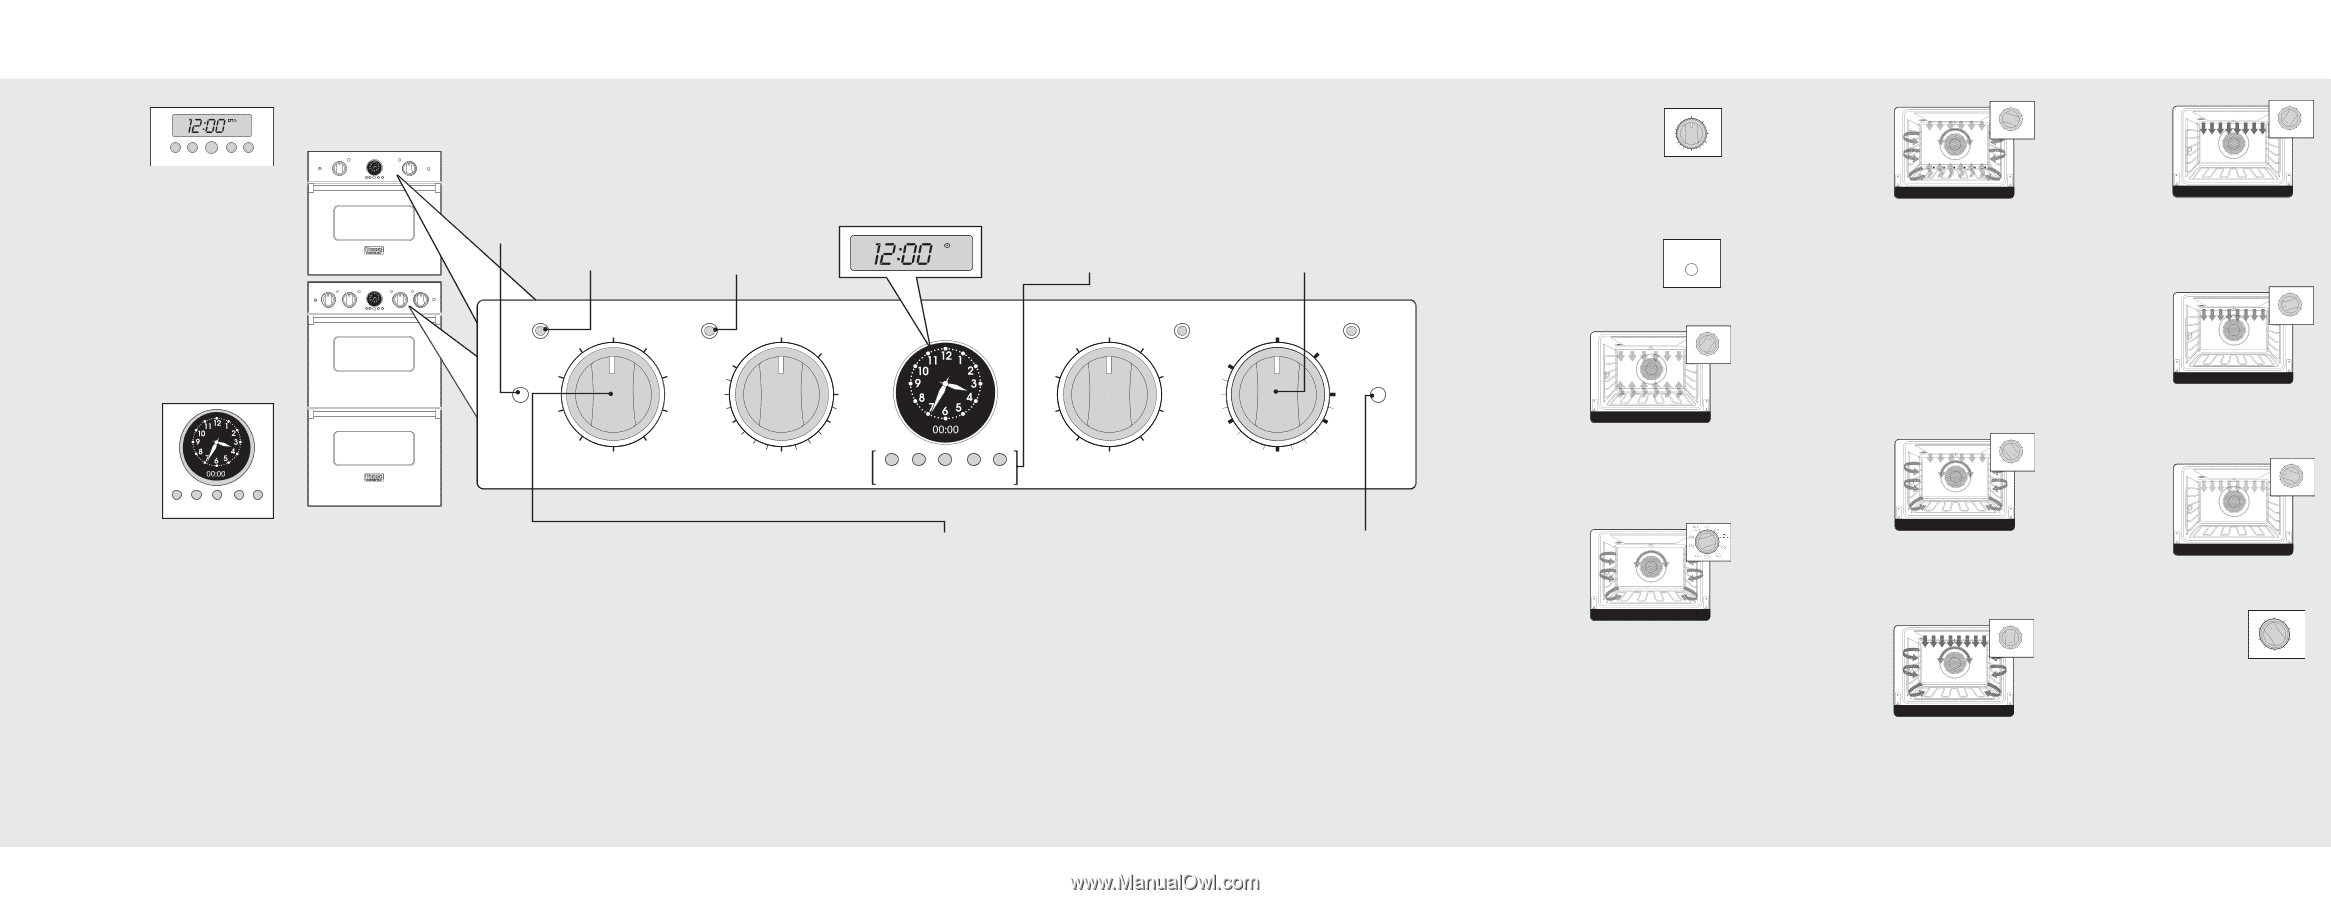
Setting the Clock Oven Controls Digital Display (Select Models) SET The time-of-day must be set before any other program can be used. CLOCK MIN/SEC TIMER SET BAKE TIME START TIME When your oven is first connected to the power in your home, the timer display will show --:--. To program the time-of-day: 1. Press the "CLOCK" button. 12:00 will be displayed with the word SET in the upper right corner. 2. Turn the "SET" knob until the correct time-of-day is displayed. AM and PM are not indicated. 3. Press the "CLOCK" button again. The word SET will disappear and the correct time is now set into the timer. The time-of-day can be changed by following steps 1 through 3. It cannot be changed while there is a Bake Time or Start Time cycle programmed into the timer. Analog Display (Premiere Models) Synchronizing the analog and digital clocks: NOTE: It It is important to always synchronize the analog and digital clocks before setting the time-ofday. 1. Press and release the "start time" button. NOTE: This is only necessary after a power outage or for the first time to set the clock. MIN/SEC BAKE SET TIMER TIME START PROBE TIME TEMP 2. Press and hold the "min/sec timer" and start time buttons simultaneously. 3. Turn the "Set" knob to move the hands on the analog clock to 30 minutes ahead of the current time. Release hold from "start time" and "min/sec timer" buttons. 4. After several seconds, the display will blink. Press and hold the "min/sec timer" button and turn the "Set" knob to set the digital clock so that it matches exactly with the analog clock. The clocks are now synched and you can now set the time of day. The time-of-day must be set before any other program can be used. Setting the time-of-day: 1. Push and hold the "min/sec timer" and "bake time" buttons simultaneously. 2. Turn the "Set" knob until correct time is displayed on the digital clock. 3. Release hold from "min/sec timer" and "bake time" buttons. The analog clock's time will automatically set to match the digital clock. Interior Oven Light Switch Self-Clean Indicator Light Off/On Indicator Light Digital Clock (Select Models) SET Electronic Timing Center The Electronic Timing Center is used to program and control all timing functions. IMPORTANT: The Time-of-day must be set before any other program can be used. Temperature Control Each oven has a separate temperature control dial. The controls can be set at any temperature from 200˚F to 550˚F. There are separate settings for broiling and self-cleaning. CLEAN SELF CLEAN OVEN LOW LIGHT BROIL OFF BAKE OVEN 200 CONV. BAKE MED BROIL TRU CONVEC 300 HI BROIL CONV. BROIL CONV. ROAST OVEN FUNCTION UPPER OVEN OFF CLEAN BROIL 500 400 TEMPERATURE MIN/SEC BAKE SET TIMER TIME START PROBE TIME TEMP SELF CLEAN LOW BROIL CLEAN OFF BAKE 200 CONV. BAKE MED BROIL TRU CONVEC 300 HI BROIL CONV. BROIL CONV. ROAST OVEN FUNCTION LOWER OVEN OFF OVEN CLEAN BROIL 500 UPPER TIMED MANUAL LOWER TIMED 400 TEMPERATURE Bake Conventional, single rack baking (breads, cakes, cookies, pastry, pies, entrees, vegetables) Convection Bake Multi-rack baking for heavier or frozen foods (e.g., 4 frozen pies, pizzas, entrees, vegetables) TruConvecTM Multi-rack baking for breads, cakes, cookies (up to 6 racks of cookies at once) Oven Function Selector High-Broil Dark meats at 1" thickness or less where rare or medium doneness is desired Medium-Broil White meats such as chicken or meats greater than 1" thick that would be over-browned in high broil Low-Broil Delicate broiling such as meringue Convection Broil Thicker meats, faster than regular broil & with less smoke generation Timed Bake Knob (Premier Models) Convection Roast Whole turkeys, whole chickens, hams, etc. Self-Clean A pyrolytic self-cleaning cycle where the oven reaches elevated temperatures in order to burn off soils and deposits *Note: This is a Professional Premiere Control Panel. Oven Settings and Functions Temperature Control Each oven has a separate temperature control dial and a separate oven function selector. The controls can be selfclean co2n0v0 . roast conv. broil 300 low broil OoFfFf med 4b0r0oil bake CLEAN conv. bake BROIL tru. convec. 500 high broil set at any temperature from 200°F (93.3°C) to 550°F (287.8°C). There are separate settings for broiling and self-cleaning. ALWAYS be sure the controls are in the OFF position when the ovens are not in use. Interior Oven Light Control OVEN The upper and lower ovens have LIGHT interior oven lights that are controlled by one switch on the control panel. Push the switch to turn the interior oven lights on and off. Two-Element Bake Full power heat is SELF CLEAN LOW BROIL OFF BAKE TRU CONVEC MED BROIL HI BROIL CONV. BROIL CONV. BAKE CONV. ROAST radiated from the bake element in the bottom of the oven cavity and supplemental heat is two-element bake radiated from the broil element. This function is recommended for single rack baking. Many cookbooks contain recipes to be cooked in the conventional manner. Conventional baking/ roasting is particularly suitable for dishes that require a high temperature. Use this setting for baking, roasting, and casseroles. TruConvec™ The rear element only operates at full power. SELF CLEAN LOW BROIL OFF BAKE TRU CONVEC MED BROIL CONV. BAKE HI BROIL CONV. BROIL CONV. ROAST There is no direct heat from the bottom or top elements. The motorized fan in the TruConvecTM rear of the oven circulates air in the oven cavity for even heating. Use this setting for foods that require gentle cooking such as pastries, souffles, yeast breads, quick breads and cakes. Breads, cookies, and other baked goods come out evenly textured with golden crusts. No special bakeware is required. Use this function for single rack baking, multiple rack baking, roasting, and preparation of complete meals. This setting is also recommended when baking large quantities of baked goods at one time. Convection Bake SELF CLEAN LOW BROIL OFF BAKE TRU CONVEC The bottom element operates at full power, MED BROIL HI BROIL CONV. BROIL CONV. BAKE CONV. ROAST and the top broil element operates at supplemental power. The heated air is convection bake circulated by the motorized fan in the rear of the oven providing a more even heat distribution. This even circulation of air equalizes the temperature throughout the oven cavity and eliminates the hot and cold spots found in conventional ovens. A major benefit of convection baking is the ability to prepare food in quantity using multiple racks-a feature not possible in a standard oven. When roasting, cool air is quickly replaced, searing meats on the outside and retaining more juices and natural flavor on the inside with less shrinkage. With this heating method, foods can be baked and roasted at the same time with minimal taste transfer, even when different dishes are involved, such as cakes, fish or meat. The hot air system is especially economical when thawing frozen food. Use this setting for baking and roasting. Convection Roast* The convection element SELF CLEAN LOW BROIL OFF BAKE TRU CONVEC MED BROIL HI BROIL CONV. BROIL CONV. BAKE CONV. ROAST runs in conjuction with the inner and outer broil elements. The reversible convection fan runs at a convection roast higher speed in each direction. This transfer of heat (mainly from the convection element) seals moisture inside of large roasts. A time savings is gained over existing, single fan convection roast modes. Use this setting for whole turkeys, whole chickens, hams, etc. Convection Broil* SELF CLEAN LOW BROIL OFF BAKE TRU CONVEC The top element operates at full power. MED BROIL HI BROIL CONV. BROIL CONV. BAKE CONV. ROAST This function is exactly the same as regular broiling with the additional benefit of air convection broil circulation by the motorized fan in the rear of the oven. Smoke is reduced since the airflow also reduces peak temperatures on the food. Use this setting for broiling thick cuts of meat. *This function uses a high-speed convection fan for optimum cooking performance. Some noise may be noticed from this highfan speed. This is normal. High-Broil Heat radiates from both broil elements, SELF CLEAN LOW BROIL OFF BAKE TRU CONVEC MED BROIL HI BROIL CONV. BROIL CONV. BAKE CONV. ROAST located in the top of the oven cavity, at full power. The distance between the foods high-broil and the broil elements determines broiling speed. For "fast" broiling, food may be as close as 2 inches to the broil element or on the top rack. "Fast" broiling is best for meats where "rare to medium" doneness is desired. Use this setting for broiling small and average cuts of meat. Medium-Broil SELF CLEAN LOW BROIL OFF BAKE TRU CONVEC Inner and outer broil elements pulse on and MED BROIL HI BROIL CONV. BROIL CONV. BAKE CONV. ROAST off to produce less heat for "slow" broiling. Allow about 4 inches between the medium-broil top surface of the food and the broil element. "Slow" broiling is best for chicken and ham in order to broil food without over- browning it. Use this setting for broiling small and average cuts of meat. Low-Broil This mode uses only a fraction of the SELF CLEAN LOW BROIL OFF BAKE TRU CONVEC MED BROIL HI BROIL CONV. BROIL CONV. BAKE CONV. ROAST available power to the inner broil element for delicate top-browning. The inner broil low-broil element is on for only part of the time. Use this setting to gently brown meringue on racks 3 or 4 in 3-4 minutes. Self-Clean The pyrolytic self-cleaning cycle is designed to eliminate the need for scrubbing and scouring food baked SsEeLlFfCLEAN clean LcOoWnv. BRroOaILst OoFfFf BAbKaEke coTnRvU. CbOaNkVeEC BcMRboEOrDnoILvil . low BbRrHoOI iIlL CBORmbONreoVIL.dil coCtBnrOAuvNKe. VEc. . high CbOrNoVil. ROAST onto the oven interior. During this cycle, the oven reaches elevated temperatures in order to burn off soils and deposits. An integral smoke eliminator reduces odors associated with the soil burn-off. A powder ash residue is left in the bottom of the oven after completion of the self-clean cycle. When the oven has cooled, remove any ash from oven surfaces with a damp sponge or cloth.
-
 1
1 -
 2
2
 |
 |