Viking VEWD530SS Use and Care Manual - Page 9
Cleaning and Maintenance
 |
View all Viking VEWD530SS manuals
Add to My Manuals
Save this manual to your list of manuals |
Page 9 highlights
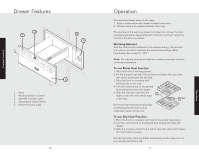
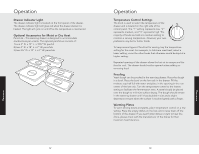
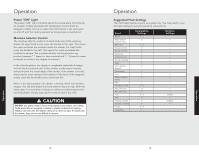
Product Care Cleaning and Maintenance Any piece of equipment works better and lasts longer when maintained properly and kept clean. Cooking equipment is no exception. Your warming drawer must be kept clean and maintained properly. Make sure all controls are in the "OFF" position. 1. Allow warming drawer to cool completely. 2. It is important to keep the slide rails clear and free from debris. Periodic cleaning of slide rails and other adjoining parts is necessary to assure smooth drawer operation. 3. If needed, the warming drawer pan support can be removed for cleaning. Pull the warming drawer out until fully extended. Slide finger along right and left side rail until you reach hand latches (located at the front of rails). Pull up on both right and left latches. Pull drawer support completely out. 4. When installed outdoors, annually inspect the silicon seal around the flange of the appliance. Re-seal as needed to assure this seam is waterproof. Control Knobs MAKE SURE ALL CONTROL KNOBS POINT TO THE "OFF" POSITION BEFORE REMOVING. Pull the knobs straight off. Wash in detergent and warm water. Dry completely and replace by pushing firmly onto stem. Stainless Steel Parts All stainless steel body parts should be wiped regularly with hot soapy water at the end of each cooling period and with a liquid cleaner designed for that material when soapy water will not do the job. DO NOT use steel wool, abrasive cloths, cleansers, or powders. If necessary, scrape stainless steel to remove encrusted materials, soak the area with hot towels to loosen the material, then use a wooden or nylon spatula or scraper. DO NOT use a metal knife, spatula, or any other metal tool to scrape stainless steel. DO NOT permit citrus or tomato juice to remain on stainless steel surface, as citric acid will permanently discolor stainless steel. Wipe up any spills immediately. 16 Cleaning and Maintenance CAUTION To avoid the risk of property damage, DO NOT USE BRASS CLEANERS OR ABRASIVE CLEANERS ON ANY BRASS PARTS. All brass body parts should be wiped regularly with hot, soapy water and a soft, clean cloth. When hot, soapy water will not do the job, use every day household cleaners that are not abrasive. Brass Parts All special ordered brass parts are coated with an epoxy coating. CAUTION DO NOT use any cleaning agent with chlorine or chlorine compounds on stainless steel finish. Chlorine and chlorine compounds are corrosive to stainless steel. Cleaning Chart Material/Problem Stainless steel/ Enamels Cleaning Products Mild cleaners Hard water spots and scales Vinegar and water Directions Sponge with cloth, then rinse with clear water and wipe dry. Satisfactory for use on all finishes. Swab or wipe with cloth. Rinse with clear water and dry. Satisfactory for use on all finishes. Plastic (Control knob) Soft, non-abrasive cleaners Apply with damp sponge or cloth. Satisfactory for use on all finishes if rubbing is light. Rub in direction of the polish lines. Soap and water Pull off knob. Wash but DO NOT soak. Rinse with water, dry and replace on control. 17 Product Care
-
 1
1 -
2
-
3
-
 4
4 -
 5
5 -
 6
6 -
 7
7 -
 8
8 -
 9
9 -
 10
10 -
 11
11 -
 12
12
 |
 |