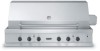
Viking VGBQ5304RE2NSS Installation Instructions - Page 12
LP/Propane Fixed Piping Connection, Natural Fixed Piping Connection
 |
View all Viking VGBQ5304RE2NSS manuals
Add to My Manuals
Save this manual to your list of manuals |
Page 12 highlights
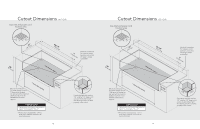
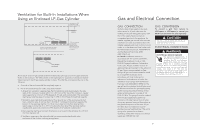
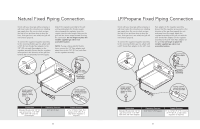
Natural Fixed Piping Connection Check with your local gas utility company or with local codes for instructions on installing gas supply lines. Be sure to check on type and size of run and how deep to bury the lines. If the gas line is too small, the grill will not function properly. To connect the supplied regulator assembly to the incoming flexible gas line, attach with a 7/8" (2.2 cm) female flare adapter to the 7/8" (2.2 cm) male flare adapter on the regulator assembly. Ensure that the regulator arrow points in the direction of the gas flow towards the unit and away from the supply. Male coupler Attach the regulator assembly to the grill unit by pulling back the female coupler sleeve towards the regulator. Insert the coupler into the male coupler fitting on the grill until the sleeve snaps forward securing the connection. Do not forget to place the installer supplied gas valve in an accessible location. NOTE: If using a Viking GSH12 flexible hose, remove the 1/2" flare adapter and attach hose to the 7/8" (2.2 cm) male flare on the regulator assembly. female coupler 7/8" male flare adapter Regulator assembly Installer supplied flexible gas line with 1/2" female adapter or Viking GHS12 Installer supplied shut-off valve must be easily accessible Connection Standard Residential 1/2" ID gas service line - 1/2" NPT male with 7/8" (2.2 cm) flare adapter. Operating Pressure 4.0" W.C.P. Nat. Supply Pressure 6" to 10"W.C.P. Nat. If in excess of 10" W.C.P., a step-down regulator is required. 22 LP/Propane Fixed Piping Connection Check with your local gas utility company or with local codes for instructions on installing gas supply lines. Be sure to check on type and size of run and how deep to bury the lines. If the gas line is too small, the grill will not function properly. To connect the supplied regulator assembly to the incoming flexible gas line, attach with a 3/8" female flare adapter to the 3/8" male flare adapter to the regulator assembly. Ensure that the regulator arrow points in the direction of the gas flow towards the unit and away from the supply. Attach the regulator assembly to the grill unit with the 3/8" female flare adapter on the regulator assembly to the 3/8" male flare adapter on the grill. Do not forget to place the installer supplied gas valve in an accessible location. 3/8" male flare dadapapteter r 3/8" female flare adapter 3/8" male flare adapter Regulator assembly Installer supplied flexible gas line with 3/8" female adapter or Viking GHS12 Installer supplied shut-off valve must be easily accessible Connection Standard Residential 1/2" ID gas service line - 1/2" NPT male with 3/8" flare adapter. Operating Pressure 10.0" W.C.P. LP/Propane. Supply Pressure 11" to 14"W.C.P. LP If in excess of 14" W.C.P., a step-down regulator is required. 23
-
 1
1 -
2
-
3
-
4
-
5
-
6
-
 7
7 -
 8
8 -
 9
9 -
 10
10 -
 11
11 -
 12
12 -
 13
13 -
 14
14 -
 15
15 -
 16
16 -
 17
17 -
18
 |
 |
