Viking VGIQ5323RE2NSS Quick Reference Guide - Page 1
Viking VGIQ5323RE2NSS Manual
 |
View all Viking VGIQ5323RE2NSS manuals
Add to My Manuals
Save this manual to your list of manuals |
Page 1 highlights
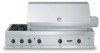
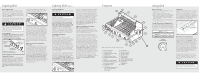
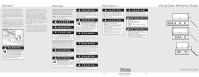
Lighting Grill Before Lighting Grill Prior to turning on the gas, inspect the gas supply tubing or hose. Look for evidence of abrasion, cuts, wear and tear, or other damage which could require replacement prior to use. Make sure all burner control knobs are off. DO NOT attempt to light the burners if the smell of gas is present. Check the connection with a soap and water solution after attaching the hose. Make sure there is gas in the tank and the tank is upright. CAUTION Wait at least five minutes before relighting a hot grill to allow any accumulated gas to dissipate. Keep a spray bottle of soapy water near the gas supply valve and check the connections for gas leaks before each use. T-Series Models When lighting a burner, ALWAYS pay close attention to what you are doing. Be certain you are pressing the battery ignition button (T-Series only) corresponding to the burner you are lighting. Electronic ignitor Side burner control knob Grill burner control knob Rotisserie control knob Note: Control locations will vary according to model. Lighting Grill Burners Open the hood or remove covers. Push and turn the control knob until the "HIGH" position on the knob aligns with the indicator line on the control panel. Press the electronic ignition button corresponding to the burner being lit. You will hear a clicking sound. Turn the control knob to the desired setting. If the burner does not light in 4 seconds, turn the knob to "OFF" and wait 5 minutes before trying again. This will allow accumulated gas to dissipate. After several failed attempts, the burner can be lit with a paper book match using the flash tubes. Flash tube If you have just attempted to light the burner with the igniter, allow 5 minutes for any accumulated gas to dissipate. Place the lit match through the grid next to the flash tube of the burner being lit. Keep your face as far away from the grill as possible. Make sure the match is adjacent to the flash tube. Push and turn the control knob until the "HIGH" position on the knob aligns with the indicator line on the control panel. Make sure you are turning the control knob that corresponds with the burner being lit. If the burner does not light in 4 seconds, turn the knob to "OFF," wait 5 minutes, and try again. If the burner will not light after several attempts, see the Troubleshooting section. Lighting TruSear™ Infrared Burner (If Applicable) Before lighting the burner, remove the stainless steel cover. Push in and turn the TruSear™ infrared control knob until the "HIGH" position on the knob aligns with the indicator line on the control panel. Press the electronic ignition button that corresponds to the control knob. You will hear a clicking sound. Once lit, turn the control knob to the desired setting. If the burner does not light within 4 seconds, release and turn the control knob to "OFF." Wait 5 minutes for any accumulated gas to dissipate and try again. After several failed attempts, the burner may be lit by turning the control knob to "HIGH" and dropping a match on the face of the burner. If the burner does not immediately ignite, turn the knob to "OFF", wait 5 minutes and try again. Lighting Grill (cont.) Lighting Side Burners First, remove the burner cover or any cooking utensil from the burner grate. CAUTION The side burner cover may be hot if the grill burners are in operation. Push and turn the control knob until the "HIGH" position aligns with the indicator line on the control panel. Immediately press the electronic ignition button corresponding to the burner(s) being lit until the burner is lit or until 4 seconds pass. If the burner does not light after several attempts, wait five minutes to allow any accumulated gas to dissipate. If the burner will not light after several attempts, then the burner can be lit by holding a lit match next to the burner ports. Push and turn the control knob until the "HIGH" position on the knob aligns with the indicator line on the control panel. Lighting the Grill Burners (E-Series Models) Make sure the unit is plugged into a properly grounded receptacle. Turn the appropriate control knob counter-clockwise to any position. This control is both a gas valve and an electric switch. Burners will ignite at any "ON" position with the automatic recognition system. If the flame goes out for any reason, the burners will automatically reignite if the gas is still flowing. When gas is permitted to flow to the burners, the electric igniters start sparking. On all surface igniters, you should hear a clicking sound. If you do not, turn off the control and check that the unit is plugged in and that the fuse or circuit breaker is not blown or tripped. Within a few moments, enough gas will have traveled to the burner to be able to light. When the burner lights, turn the burner control to any position to adjust the flame size. If the burner does not light in 4 seconds, turn the knob to "OFF" and wait 5 minutes before trying again. This will allow accumulated gas to dissipate. After several failed attempts the burner can be lit with a paper book match using the flash tubes. If you have just attempted to light the burner with the ignitor, allow 5 minutes for any accumulated gas to dissipate. Place the lit match through the grid next to the flash tube of the burner being lit. Keep your face as far away from the grill as possible. Make sure the match is adjacent to the flash tube. Push and turn the control knob until the "HIGH" position on the knob aligns with the indicator line on the control panel. Make sure you are turning the control knob that corresponds with the burner being lit. If the burner does not light in 4 seconds, turn the knob to "OFF," wait 5 minutes, and try again. If the burner will not light after several attempts, see the Troubleshooting section. Lighting Infrared Rotisserie Burner (T-Series and E-Series Models) The location of the infrared burner makes it more susceptible to strong wind conditions-more so than the protected grill burners. For this reason you should avoid using it during windy conditions. Open the canopy. Push in and turn the rotisserie control knob until the "HIGH" position on the knob aligns with the indicator line on the control panel and continue to hold in the knob. Press the electronic ignition button which corresponds to the rotisserie control knob. You will hear a clicking sound. After the burner lights, hold the rotisserie control knob in about 5 seconds longer or until the burner remains lit. Once lit, turn the control knob to the desired setting. If the burner does not light within 4 seconds, release and turn the control knob to "OFF". Wait 5 minutes for any accumulated gas to dissipate. If the burner does not light after several attempts, then the burner can be lit by holding a lit match to the burner (with the control knob pushed in at the light position). Push and turn the control knob until the "HIGH" position on the knob aligns with the indicator line on the control panel. Make sure you are turning the control knob that corresponds with the burner being lit. If relighting a hot burner, wait 5 minutes. NEVER leave the rotisserie control knob at "ON" if rotisserie is not in use. Flash tube Features 17 18 16 15 14 1 13 2 3 4 5 6 12 11 10 7 9 8 Note: Control locations will vary according to model. 1. Electronic ignition 2. Pull out drip tray 3. Side burner control knobs (if applicable) 4. Rotisserie control knob 5. 9V battery-behind control panel 6. Grill burner control knobs 7. 9V battery-behind control panel (some models) 8. Interior light switch (E-Series) 9. Porcelain grids w/stainless steel flavor generators underneath 10. Smoker box 11. Rotisserie bracket 12. Rotisserie motor 13. Spit rod w/forks 14. Warming rack (if applicable) 15. Infrared rotisserie burner 16. Interior lights (E-Series) 17. Side burner (if applicable) 18. Canopy Using Grill Before You Begin • Before each use, turn the control knob to "HIGH" and preheat for 5-7 minutes. • Check to be certain the drip tray is in place. • Light the grill burners using the lighting instructions. • Place the food on the grill and cook to the desired doneness. Adjust heat setting, if necessary. The control knob may be set to any position between "HIGH" and "LOW." • Allow grill to cool before cleaning. (Drip tray should be cleaned after each use.) Canopy Thermometers (If Applicable) Your outdoor grill is equipped with a thermometer on the canopy. The thermometer is designed to aide in the preheating of the grill and closed canopy grilling. The estimated cooking temperatures with the canopy closed are: WARM 150˚F (65˚C) COLD SMOKE 150˚F - 200˚F (65˚C - 93˚C) SMOKE 200˚F - 300˚F (93˚C - 149˚C) GRILL 300˚F - 750˚F (149˚C - 399˚C) Canopy thermometer 450 400 350 300 250 500 550 600 650 200 150 700 750 °F Smoker Box Using the smoker box feature intensifies the flavor by adding smoke to the grilling process. The additional smoke creates a "cloud" around the food which permeates meats and vegetables for added smoky flavor. In order to use the smoker box, remove the last set of porcelain grids on the right hand side of the grill. Set the smoker box in the opening so that the front and rear tabs rest on the grill frame. Smoker box Wood Chip Use in Smoker Box There are many wood chips available and selection is based on personal taste. The most common chips used are mesquite or hickory. ALWAYS soak the chips in water prior to putting them into the box. Use the "HIGH" position to start the chips smoking, then reduce the heat to a lower level to prevent them from drying out and flaming. If the wood chips do flame up, add a small amount of water to extinguish the flame. Use caution when adding water to a hot box to avoid steam burns. This tray may also be filled with water to produce steam. Whether smoking or steaming, the grill should remain closed as much as possible to maximize the effect. During extended roasting periods, it is normal to add fresh wood chips and water to the box several times. Limit the amount of times the canopy is opened-each peek adds about 15 minutes to the cooking time. CAUTION Handle the smoker box with care. The cover becomes extremely hot when being used. Use sturdy, properly insulated gloves or dry potholders.
-
 1
1 -
 2
2
 |
 |
