Viking VGSU5366BSS Use and Care Manual - Page 8
Cleaning and Maintenance
 |
View all Viking VGSU5366BSS manuals
Add to My Manuals
Save this manual to your list of manuals |
Page 8 highlights
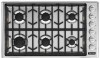
Cleaning and Maintenance Any piece of equipment works better and lasts longer when maintained properly and kept clean. Cooking equipment is no exception. Your cooktop must be kept clean and maintained properly. Before cleaning, make sure all controls are in the "OFF" position. *Note: When replacing burner head, carefully align the tab underneath the cap with the slot in the burner base. Wipe up spill-overs as soon as possible after they occur and before they get a chance to burn in and cook solid. In the event of a spill-over, follow these steps: • Allow the burner and grate to cool to a safe temperature level. • Lift off the burner grate. Wash in warm soapy water. • Remove the burner cap and burner head and clean. Burner Caps The surface burner caps should be routinely removed and cleaned. ALWAYS clean the burner caps after a spill-over. Keeping the burner caps clean will prevent improper ignition and uneven flames. To clean, pull burner cap straight up from the burner base. Wipe off surface burner caps with warm, soapy water and a soft cloth after each use. Use a non-abrasive cleanser such as Bon Ami™ and a soft brush or soft Scotch Brite™ pad for cooked-on foods. Dry thoroughly after cleaning. For best cleaning and to avoid possible rusting, DO NOT clean in dishwasher or self-cleaning oven. Burner Head If ports on burner head are clogged, clean with a straight pin. DO NOT enlarge or distort the ports. DO NOT use a toothpick to clean the ports. When replacing burner head, carefully align the 2 tabs underneath the burner head with the outside edge of burner base. Make sure the tabs are not aligned with the igniter and the burner cap is level. Note: For stubborn stains, use a non abrasive cleanser such as Bon Ami™ and a soft brush or soft Scotch Brite™ pad. Cleaning Tip: For difficult to clean burner caps and heads, place parts in a zip seal bag with ammonia. Burner Base The base should be wiped regularly with hot soapy water at the end of each cooling period. DO NOT use steel wool, abrasive cloths, cleanser, or powders. To remove encrusted materials, soak the area with a hot towel to loosen the material, then use a wooden nylon spatula. DO NOT use a metal knife, spatula, or any other metal tool to scrape the aluminum base. • Wipe up any spills which remain on the sealed top surface. • Replace burner cap, burner head, and grates after drying thoroughly. Cooktop Surfaces Several different finishes have been used in your cooktop. Cleaning instructions for each surface are given below. NEVER USE AMMONIA, STEEL WOOL PADS OR ANY ABRASIVE CLOTHS AND MATERIALS SUCH AS CLEANSERS, OVEN CLEANERS, OR ABRASIVE POWDERS. THEY CAN PERMANENTLY DAMAGE YOUR COOKTOP. Control Panel DO NOT use any cleaners containing ammonia, abrasives, or stainless steel cleaners on any surface that contains graphics. They could remove the graphics from the control panel. Use hot, soapy water and a soft clean cloth. DO NOT spray liquids directly onto control panel. Control Knobs MAKE SURE ALL THE CONTROL KNOBS POINT TO THE "OFF" POSITION BEFORE REMOVING. Pull the knobs straight off. Wash in detergent and warm water. Dry completely and replace by pushing firmly onto stem. DO NOT use any cleaners containing ammonia or abrasives. 8 Product Care
-
 1
1 -
2
-
 3
3 -
 4
4 -
 5
5 -
 6
6 -
 7
7 -
 8
8 -
 9
9 -
 10
10 -
 11
11 -
 12
12
 |
 |
