Viper 4104 Owner Manual - Page 29
Battery Information
 |
View all Viper 4104 manuals
Add to My Manuals
Save this manual to your list of manuals |
Page 29 highlights
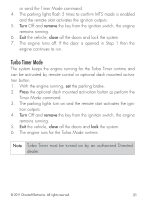
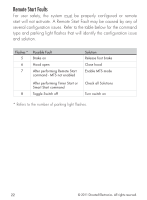
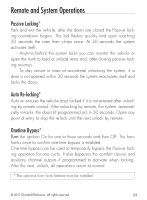
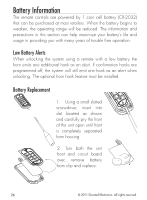
Battery Information The remote controls are powered by 1 coin cell battery (CR-2032) that can be purchased at most retailers. When the battery begins to weaken, the operating range will be reduced. The information and precautions in this section can help maximize your battery's life and usage in providing you with many years of trouble free operation. Low Battery Alerts When unlocking the system using a remote with a low battery the horn emits one additional honk as an alert. If confirmation honks are programmed off, the system will still emit one honk as an alert when unlocking. The optional horn honk feature must be installed. Battery Replacement 1. Using a small slotted screwdriver, insert into slot located as shown and carefully pry the front of the unit open until front is completely separated from housing. 2. Turn both the unit front and circuit board + over, remove battery + from clip and replace. 26 © 2011 Directed Electronics. All rights reserved.
-
 1
1 -
2
-
3
-
4
-
5
-
6
-
7
-
8
-
9
-
10
-
11
-
12
-
13
-
14
-
15
-
16
-
17
-
18
-
19
-
20
-
21
-
22
-
23
-
 24
24 -
 25
25 -
 26
26 -
 27
27 -
 28
28 -
 29
29 -
 30
30 -
 31
31 -
 32
32 -
 33
33 -
 34
34 -
35
-
36
-
37
 |
 |
