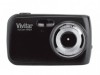
Vivitar 9112 (version 1) Camera Manual - Page 22
Face Detect Menu
 |
View all Vivitar 9112 manuals
Add to My Manuals
Save this manual to your list of manuals |
Page 22 highlights
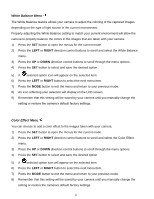
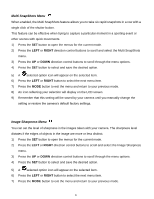
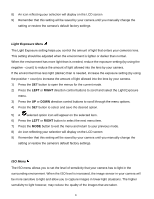
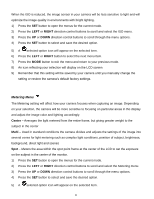
Face Detect Menu The Face Detect feature when set to „On‟ allows the camera to use a subject‟s face as the basis for balancing the other colors and focus in the camera‟s display. This feature is meant to ensure that the color and focus of your pictures will be consistently sharp and high-quality. Note: To properly use the Face Detect option, please ensure the following: MACRO Mode OFF - Face Detect will not work if the camera is in Macro mode. To turn MACRO Mode OFF: Push the Macro Switch on the side of the camera down for the mountain icon to appear on the LCD. Anti-Shake - Ensure that the Anti-Shake option is set to „On‟. The Anti-Shake option is „On‟ by default when you start using your camera and assists you in properly focusing the image. Distance from the camera - The subject‟s face must be no further than 8 to 9 feet (3.5 meters) from the camera and the face must cover at least 20% (1/5th) of the picture as seen on the LCD screen. Facing the camera - The face of the subject(s) you are photographing must be facing the camera and must hold the pose for at least 4 to 5 seconds until the green square(s) appears around the subject‟s face. Face Detect will not work with a side shot of the subject‟s head. 1) Press the SET button to open the menus for the current mode. 2) Press the LEFT or RIGHT direction control buttons to scroll and select the Face Detect menu. 3) Press the UP or DOWN direction control buttons to scroll through the menu options. 4) Press the SET button to select and save the desired option. 5) A selected option icon will appear on the selected item. 6) Press the LEFT or RIGHT button to select the next menu item. 7) Press the MODE button to exit the menu and return to your previous mode. 8) An icon reflecting your selection will display on the LCD screen. 9) Remember that this setting will be saved by your camera until you manually change the setting or restore the camera‟s default factory settings. 21
-
 1
1 -
2
-
3
-
4
-
5
-
6
-
7
-
8
-
9
-
10
-
11
-
12
-
13
-
14
-
15
-
16
-
 17
17 -
 18
18 -
 19
19 -
 20
20 -
 21
21 -
 22
22 -
 23
23 -
 24
24 -
 25
25 -
 26
26 -
 27
27 -
28
-
29
-
30
-
31
-
32
-
33
-
34
-
35
-
36
-
37
-
38
-
39
-
40
-
41
-
42
-
43
-
44
-
45
-
46
-
47
-
48
-
49
-
50
-
51
-
52
-
53
-
54
-
55
-
56
-
57
-
58
-
59
-
60
-
61
-
62
-
63
 |
 |
