Vivitar DVR 740HD Camera Manual - Page 15
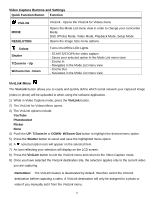
Playback Mode, ViviLink, Resolution, T/Zoom In, W/Zoom Out, Shutter, DELETE
 |
View all Vivitar DVR 740HD manuals
Add to My Manuals
Save this manual to your list of manuals |
Page 15 highlights
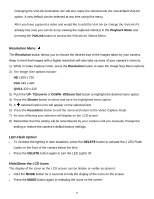
After you have captured a photo and would like to add the ViviLink (or change the ViviLink if it already has one) you can do so by viewing the captured photo(s) in the Playback Mode and pressing the ViviLink button to access the ViviLink for Photos Menu. Resolution Menu The Resolution button allows you to choose the desired size of the images taken by your camera. Keep in mind that images with a higher resolution will also take up more of your camera‟s memory. 1) While in Photo Capture mode, press the Resolution button to open the Image Resolution Menu options. 2) The Image Resolution options include: 1.3M 1280 x 1024 VGA 640 x 480 3) Push the UP- T/Zoom In or DOWN- W/Zoom Out button to highlight the desired menu option. 4) Press the Shutter button to select and save the highlighted menu option. 5) A selected option icon will appear on the selected item. 6) Press the Resolution button to exit the menu and return to the Photo Capture mode. 7) An icon reflecting your selection will display on the LCD screen. 8) Remember that this setting will be remembered by your camera until you manually change the setting or restore the camera‟s default factory settings. LED Flash Option To increase the lighting in dark situations, press the DELETE button to activate the 2 LED Flash Lights on the front of the camera below the lens. Press the DELETE button again to turn the LED Lights off. Hide/Show the LCD Icons The display of the icons on the LCD screen can be hidden or visible as desired. Hold the MODE button for 2 seconds to hide the display of the icons on the screen. Press the MODE button again to redisplay the icons on the screen 14
-
 1
1 -
2
-
3
-
4
-
5
-
6
-
7
-
8
-
9
-
 10
10 -
 11
11 -
 12
12 -
 13
13 -
 14
14 -
 15
15 -
 16
16 -
 17
17 -
 18
18 -
 19
19 -
 20
20 -
21
-
22
-
23
-
24
-
25
-
26
-
27
-
28
-
29
-
30
 |
 |
