Vizio M550SV M420SV User Manual - Page 26
Using the PIP Picture-In-Picture Feature, Using the Network Connection Menu
 |
View all Vizio M550SV manuals
Add to My Manuals
Save this manual to your list of manuals |
Page 26 highlights
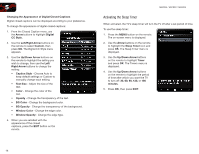
5 M420SV / M470SV / M550SV Using the PIP (Picture-In-Picture) Feature The PIP feature on your TV allows you to view content from two different inputs at once. When PIP is on, a second input will display in an inset window, and the main input will display on the full screen. When POP is on, the two inputs will be displayed side-by-side. To adjust the PIP settings: 1. Press the MENU button on the remote. The on-screen menu is displayed. 2. Use the Arrow buttons on the remote to highlight PIP and press OK. The PIP menu is displayed. 3. Use the Arrow and OK buttons on the remote to adjust each of the PIP settings: • PIP Mode - Use this setting to enable or disable PIP. Select Off, PIP, or POP. • Source - Select the input source to be displayed in the PIP window. • Position - Choose the screen position of the PIP window. Select Top Right, Top Left, Bottom Right, or Bottom Left. • Size - Choose the size of the PIP window. Select Small, Medium, or Large. • Audio - Choose which audio source you want to hear on the TV speakers. Using the Network Connection Menu Your TV is internet-ready, featuring both an ethernet port and built-in high-speed 802.11n. Connecting to a Wireless Network To connect to a wireless network whose network name (SSID) is being broadcast: 1. Press the MENU button on the remote. The on-screen menu is displayed. 2. Use the Arrow buttons on the remote to highlight the Network icon and press OK. The Network Connection menu is displayed. 3. Highlight the name of your wireless network (this is the network's SSID) and press OK. 4. Using the QWERTY Keypad on the remote, enter your network's password, then highlight Connect and press OK. (If you would like to use the on-screen keyboard instead, highlight Show Keyboard and press OK.) 5. Press the EXIT button on the remote. 18
-
 1
1 -
2
-
3
-
4
-
5
-
6
-
7
-
8
-
9
-
10
-
11
-
12
-
13
-
14
-
15
-
16
-
17
-
18
-
19
-
20
-
 21
21 -
 22
22 -
 23
23 -
 24
24 -
 25
25 -
 26
26 -
 27
27 -
 28
28 -
 29
29 -
 30
30 -
 31
31 -
32
-
33
-
34
-
35
-
36
-
37
-
38
-
39
-
40
-
41
-
42
-
43
-
44
-
45
-
46
-
47
-
48
-
49
-
50
-
51
-
52
-
53
 |
 |
