Vizio SV470XVT1A SV470XVT HDTV User Manual
Vizio SV470XVT1A - 47" LCD TV Manual
 |
UPC - 857380001413
View all Vizio SV470XVT1A manuals
Add to My Manuals
Save this manual to your list of manuals |
Vizio SV470XVT1A manual content summary:
- Vizio SV470XVT1A | SV470XVT HDTV User Manual - Page 1
VIZIO SV470XVT1A User Manual Dear VIZIO Customer, Congratulations on your new VIZIO SV470XVT1A LCD Television purchase. Thank you for your support. For maximum benefit of your set, please read these instructions before making any adjustments, and retain them for future reference. We hope you will - Vizio SV470XVT1A | SV470XVT HDTV User Manual - Page 2
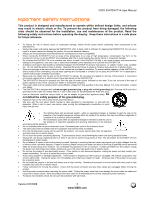
instructions before operating the display. Keep these instructions in a safe place for future reference. • To reduce the risk of electric shock or component damage, switch off the power before connecting other components to the SV470XVT1A. • Unplug the power cord before cleaning the SV470XVT1A LCD - Vizio SV470XVT1A | SV470XVT HDTV User Manual - Page 3
VIZIO SV470XVT1A User Manual • Insert batteries in accordance with instructions. Incorrect polarities may cause damage and leakage of the batteries, operator injury and contamination the remote controller. • If any of the following occurs please contact the dealer: o The power connector fails or - Vizio SV470XVT1A | SV470XVT HDTV User Manual - Page 4
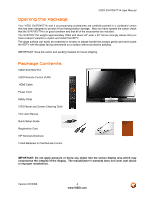
VIZIO Remote Control VUR9 HDMI Cable Power Cord Safety Strap VIZIO Bezel and Screen Cleaning Cloth This User Manual Quick Setup Guide Registration Card VIP Services Brochure 2 AAA Batteries for the Remote Control IMPORTANT: Do not apply pressure or throw any object into the screen display area - Vizio SV470XVT1A | SV470XVT HDTV User Manual - Page 5
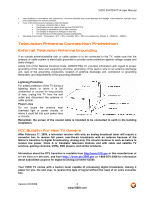
free at 888-VIZIOCE (888-849-4623) Installation Preparation Please read this user manual carefully before installing your VIZIO HDTV. The power consumption of the TV is about 400W; please use the power cord designated for TV. When an extension cord is required, use one with the correct power rating - Vizio SV470XVT1A | SV470XVT HDTV User Manual - Page 6
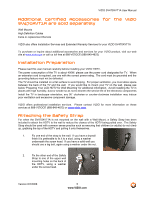
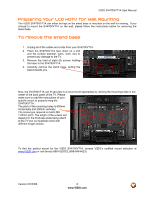
SV470XVT1A User Manual Preparing Your LCD HDTV for Wall Mounting The VIZIO SV470XVT1A can either be kept on the stand base or mounted on the wall for viewing. If you choose to mount the SV470XVT1A on the wall, please follow the instructions below for removing the stand base. To remove the stand base - Vizio SV470XVT1A | SV470XVT HDTV User Manual - Page 7
Basic LCD HDTV Start Up ...32 3.2 Watching a TV Program ...36 3.3 Adjusting Basic HDTV Settings ...37 3.4 Program Information...38 Chapter 4 Advanced Adjustment of HDTV 39 4.1 Using the On Screen Display (OSD) ...39 4.2 DTV / TV Input Picture Adjustment...40 4.2.1 Picture Mode ...40 4.2.2 Backlight - Vizio SV470XVT1A | SV470XVT HDTV User Manual - Page 8
Codes ...76 4.18 Using a Cable or Satellite Remote ...76 Chapter 5 Maintenance and Troubleshooting 77 5.1 Maintenance...77 5.2 Troubleshooting Guide ...77 5.3 Wireless Speakers System and TV Pairing...79 5.4 Telephone & Technical Support ...79 5.5 Compliance ...80 Version 6/2/2008 8 www.VIZIO - Vizio SV470XVT1A | SV470XVT HDTV User Manual - Page 9
VIZIO SV470XVT1A User Manual 5.6 FCC Class B Radio Interference Statement...80 Chapter 6 Miscellaneous Information 81 6.1 Specifications ...81 6.2 Glossary - Standard Definitions ...82 6.3 Index ...83 Component Program Codes...89 Version 6/2/2008 9 www.VIZIO.com - Vizio SV470XVT1A | SV470XVT HDTV User Manual - Page 10
directly at this window for the best response to the remote signal. 1.2 Right Side Panel Controls POWER ( ) - Switch the SV470XVT1A on by pressing the button once. Press the button again to turn the SV470XVT1A off. MENU - This button activates the On Screen Display (OSD). If a submenu is active - Vizio SV470XVT1A | SV470XVT HDTV User Manual - Page 11
VIZIO SV470XVT1A User Manual 1.3 Rear Panel Connections 1 2 5 6 9 3 4 7 8 10 1. AC IN - Plug-in the supplied AC Power Cord here. 2. SERVICE - This custom communication port is for factory service only. Use of this input for any purpose other than factory authorized service will void - Vizio SV470XVT1A | SV470XVT HDTV User Manual - Page 12
VIZIO SV470XVT1A User Manual 1.4 Right-Side Panel Connection 1. AV2 - Connect the secondary source for composite video devices, such as a VCR or video game. Use the white and red connectors to connect the external audio from the same source, and then use 1 the yellow connector to connect the - Vizio SV470XVT1A | SV470XVT HDTV User Manual - Page 13
sequence 2 8 DASH 2. NOTE: This is a programmable remote supporting up to 4 devices (see TV, VCR, CABLE, DVD buttons at the top of the remote). If the remote is not working with your VIZIO TV, press the TV button on the remote to set the functions back to TV. Version 6/2/2008 13 www.VIZIO.com - Vizio SV470XVT1A | SV470XVT HDTV User Manual - Page 14
VIZIO SV470XVT1A User Manual Use this button for the On-Screen Display (OSD) menus. LAST - This button recalls the previously viewed channel. Use the Navigation Wheel to operate the On-Screen Display (OSD) after it has been activated by pressing the MENU button. Use the button to select your - Vizio SV470XVT1A | SV470XVT HDTV User Manual - Page 15
VIZIO SV470XVT1A User Manual When CABLE is selected and the code to match your Cable (or Satellite) Box has been entered, this button will operate the Cable (or Satellite) Box the same as this button on your Cable (or Satellite) Remote. When TV is selected, this button activates Picture-in-Picture - Vizio SV470XVT1A | SV470XVT HDTV User Manual - Page 16
VIZIO SV470XVT1A User Manual 1.5.1 Insertion of Batteries in the Remote Control Open battery compartment by sliding cover in the direction of the arrow and insert two AAA batteries into the remote control. Make sure that you match the (+) and (-) symbols on the batteries with the (+) and (-) symbols - Vizio SV470XVT1A | SV470XVT HDTV User Manual - Page 17
Should I Use? The VIZIO SV470XVT1A has six different ways to connect your video equipment from a basic connection to the most advanced for digital displays. Connection Quality (type) Connector Rear Panel Color Codes Description Best (digital) White and Side of TV HDMI (High-Definition - Vizio SV470XVT1A | SV470XVT HDTV User Manual - Page 18
of the LCD HDTV. 3. Turn on the power to the LCD HDTV and HDTV Set-Top Box. 4. Select HDMI using the INPUT button on the remote or side of the LCD HDTV, or directly by pressing the HDMI button on the Remote Control. Note: a) b) c) The HDMI input on the LCD TV supports High-bandwidth Digital - Vizio SV470XVT1A | SV470XVT HDTV User Manual - Page 19
VIZIO SV470XVT1A User Manual For Cable or Satellite Boxes with DVI: 1. Turn off the power to the LCD HDTV and HDTV Set-Top Box. 2. Using a HDMI-DVI cable, connect the DVI end to your HDTV Set-Top Box and the HDMI end to the HDMI2 Input (white color area) at the rear of the LCD HDTV. 3. Using - Vizio SV470XVT1A | SV470XVT HDTV User Manual - Page 20
VIZIO SV470XVT1A User Manual 2.2.2 Using Component Video Connecting your Cable or Satellite Box (Better) 1. Turn off the power to the LCD HDTV and HDTV Set-Top Box. 2. Connect the Y (green color) connector on your HDTV Set-Top Box to the corresponding Y (green color) connector in the Component - Vizio SV470XVT1A | SV470XVT HDTV User Manual - Page 21
VIZIO SV470XVT1A User Manual 2.3 Connecting Coaxial (RF) 2.3.1 Using Your Antenna or Digital Cable for DTV 1. Turn off the power to the LCD HDTV. 2. Connect the coaxial (RF) connector from your antenna or digital cable to the DTV/TV CABLE/ANTENNA connector at the rear of the LCD HDTV. 3. Turn - Vizio SV470XVT1A | SV470XVT HDTV User Manual - Page 22
VIZIO SV470XVT1A User Manual 2.3.2 Using Your Antenna or Cable for TV 1. Turn off the power to the LCD HDTV. 2. Connect the coaxial (RF) connector from your antenna or cable to the DTV/TV CABLE/ANTENNA connector at the rear of the LCD HDTV 3. Turn on the power to the LCD HDTV. 4. Select TV - Vizio SV470XVT1A | SV470XVT HDTV User Manual - Page 23
the VIZIO SV470XVT1A for optimal results. Note: To maintain the display quality, use a VIZIO certified HDMI cable. Length is available up to 10 meters. See www.VIZIO.com or call 1-888-VIZIOCE (1-888-849-4623) for details. Connecting your DVD Player (Best): 1. Turn off the power to the LCD HDTV and - Vizio SV470XVT1A | SV470XVT HDTV User Manual - Page 24
For DVD Players with DVI: VIZIO SV470XVT1A User Manual 1. Turn off the power to the LCD HDTV and DVD player. 2. Using a HDMI-DVI cable, connect the DVI end to your DVD player and the HDMI end to the HDMI2 Input (white color area) at the rear of the LCD HDTV. 3. Using an audio cable (white - Vizio SV470XVT1A | SV470XVT HDTV User Manual - Page 25
SV470XVT1A User Manual 2.4.2 Using Component Video Connecting your DVD Player (Better): 1. Turn off the power to the LCD HDTV and DVD player. 2. Connect the Y (green color) connector on your DVD player to the corresponding Y (green color) connector in the Component 1 group (green color area - Vizio SV470XVT1A | SV470XVT HDTV User Manual - Page 26
player. 5. Select AV1 using the INPUT button on the remote or side of the LCD HDTV, or directly by pressing the AV button on the Remote Control. Note: Refer to your DVD player user manual for more information about the video output requirements of the product. Version 6/2/2008 26 www.VIZIO.com - Vizio SV470XVT1A | SV470XVT HDTV User Manual - Page 27
color area) row of connectors at the rear of the LCD HDTV. 4. Turn on the power to the LCD HDTV and DVD Player. 5. Select AV1 using the INPUT button on the remote or side of the LCD HDTV, or directly by pressing the AV button on the Remote Control. Note: Refer to your DVD player user manual - Vizio SV470XVT1A | SV470XVT HDTV User Manual - Page 28
color area) at the rear of the LCD HDTV. 4. Turn on the power to the LCD HDTV and VCR or Video Camera. 5. Select AV1 using the INPUT button on the remote or side of the LCD HDTV, or directly by pressing the AV button on the Remote Control. Note: Refer to your VCR or Video Camera user manual - Vizio SV470XVT1A | SV470XVT HDTV User Manual - Page 29
to the ANALOG OUT (white area) audio connectors at the rear of the LCD HDTV. 3. Turn on the power to the LCD HDTV and Receiver/Amp. 4. Then press the MENU button on the remote control to open the On-Screen Display (OSD) menu. 5. Press ▼ button on the remote control to select the Audio menu - Vizio SV470XVT1A | SV470XVT HDTV User Manual - Page 30
using the INPUT button on the remote or side of the LCD HDTV. For a better picture quality when connecting a pc computer through RGB PC, set your pc computer timing mode to VESA 1366x768 at 60Hz. For the best picture quality, please refer to the pc or graphic card's user guide to find out if it is - Vizio SV470XVT1A | SV470XVT HDTV User Manual - Page 31
VIZIO SV470XVT1A User Manual 2.7.1 Preset PC Resolutions If connecting to a PC through the RGB PC input, set the TV timing mode to VESA 1360x768 at 60Hz for better picture quality (refer to the graphic card's user guide for questions on how to set this timing mode). Please see the table below for - Vizio SV470XVT1A | SV470XVT HDTV User Manual - Page 32
on the side of the HDTV, or press the Power ON (Red) button on the remote control. 4. Initial Setup After powering on the TV set, the Initial Setup screen will come up; please press the button on the remote control. The Language choice screen will be displayed; the default English option is - Vizio SV470XVT1A | SV470XVT HDTV User Manual - Page 33
Press the button on the remote to go to the next screen. VIZIO SV470XVT1A User Manual b. The Channel Scan screen will be displayed; default choice is Scan. Press the button on the remote control to commence the search for available channels to be stored into memory. If you do not want to - Vizio SV470XVT1A | SV470XVT HDTV User Manual - Page 34
VIZIO SV470XVT1A User Manual d. When finished, the Complete screen will be displayed to inform you that the HDTV has completed the Initial Setup. Press the button on the remote control to exit and begin watching TV. 5. Select Input Source Select the Input Source for the HDTV by pressing the INPUT - Vizio SV470XVT1A | SV470XVT HDTV User Manual - Page 35
Time Zone of your area. Press the EXIT key once to return to your program if task has been completed. Your new TV set is now ready to automatically reproduce the best picture quality out of the input signal which is been fed into it. Enjoy your TV watching!! Version 6/2/2008 35 www.VIZIO.com - Vizio SV470XVT1A | SV470XVT HDTV User Manual - Page 36
VIZIO SV470XVT1A User Manual 3.2 Watching a TV Program Before you start watching TV, please make sure that any cable, satellite or off-air antenna connections are secure. Also, verify that the power cord is plugged into a correctly grounded electrical outlet or surge protector. 1. Press the power - Vizio SV470XVT1A | SV470XVT HDTV User Manual - Page 37
VIZIO SV470XVT1A User Manual 3.3 Adjusting Basic HDTV Settings Volume To adjust the volume, press and hold the VOL+ or VOL- button on the side of the LCD HDTV or remote control until the desired level is reached. TV Channels To step up or down through the available TV channels, press the CH+ or - Vizio SV470XVT1A | SV470XVT HDTV User Manual - Page 38
VIZIO SV470XVT1A User Manual 3.4 Program Information Press the GUIDE button once on the remote, and the following screen will be displayed; showing the information of the channel being viewed: The following is an explanation of the different sections of the above banner: Program Information: - Vizio SV470XVT1A | SV470XVT HDTV User Manual - Page 39
VIZIO SV470XVT1A User Manual Chapter 4 Advanced Adjustment of HDTV 4.1 Using the On Screen Display (OSD) The remote control or the control buttons on the right hand side of the TV can control all the function settings. The On Screen Display (OSD) allows you to adjust the save contrast, brightness - Vizio SV470XVT1A | SV470XVT HDTV User Manual - Page 40
VIZIO SV470XVT1A User Manual 4.2 DTV / TV Input Picture Adjustment 4.2.1 Picture Mode When the MENU button is pressed, the On Screen Display (OSD) appears on the PICTURE adjustment page. Press the button to select the Picture Mode selection. Use the ◄ or ► button to choose from Custom, Standard, - Vizio SV470XVT1A | SV470XVT HDTV User Manual - Page 41
VIZIO SV470XVT1A User Manual 4.2.4 Contrast Press the ▼ button to highlight the Contrast selection. Use the ◄ or ► button to adjust the level. The Contrast adjusts the white levels in the picture. If the contrast is too low the picture parts of a picture. the picture. The easiest way to set tint - Vizio SV470XVT1A | SV470XVT HDTV User Manual - Page 42
this feature to increase the picture reproduction performance of the picture. Press the ◄ or ► button to choose from Off, Normal, Rich Color, Green/Flesh and Green/Blue setting. Once the adjustments are completed press the EXIT button to exit the OSD completely. Version 6/2/2008 42 www.VIZIO.com - Vizio SV470XVT1A | SV470XVT HDTV User Manual - Page 43
VIZIO SV470XVT1A User Manual Advanced Adaptive Luma Press the ▼ button to highlight Advanced Adaptive Luma. Large areas of darkness in a picture will result in a lower Average Picture Level (APL) and the overall picture will look too dark; activation of this feature will raise the APL to counteract - Vizio SV470XVT1A | SV470XVT HDTV User Manual - Page 44
VIZIO SV470XVT1A User Manual Smooth Motion Effect The Smooth Motion option is a switch option which controls the intensity or levels of intensity of the video (Smooth and Precision) features incorporated in this TV model increasing the quality of the picture as far as to motion 2008 44 www.VIZIO.com - Vizio SV470XVT1A | SV470XVT HDTV User Manual - Page 45
VIZIO SV470XVT1A User Manual 4.2.9 Reset Picture Mode Press the ▼ button to highlight the option for Reset Picture Mode selection Press ► button to return the Picture settings to factory default. A screen : Only settings under the Picture adjustments will be reset. Version 6/2/2008 45 www.VIZIO.com - Vizio SV470XVT1A | SV470XVT HDTV User Manual - Page 46
VIZIO SV470XVT1A User Manual 4.3 DTV / TV Audio Adjustment 4.3.1 Audio Mode When the MENU button is pressed, the On Screen Display (OSD) appears on the PICTURE adjustment page. Press the ► button to display the AUDIO ADJUST page. Press the ▼ button to highlight the Audio Mode selection. Use the ◄ or - Vizio SV470XVT1A | SV470XVT HDTV User Manual - Page 47
VIZIO SV470XVT1A User Manual 4.3.4 Digital Audio Out This feature uses the SPDIF (Optical connector) audio adjustment. Press either the MENU key once to return to the previous screen or the EXIT key to return to your program if task has been completed. Version 6/2/2008 47 www.VIZIO.com - Vizio SV470XVT1A | SV470XVT HDTV User Manual - Page 48
VIZIO SV470XVT1A User Manual Added Audio (Sound) Features Even though; the SV470XVT1A comes equipped with SRS (TruSurroundXT) digital audio, your TV has a built-in enhancement feature called Wireless Speaker which allows you to upgrade the audio to Dolby Digital 5.1 surround sound; through the - Vizio SV470XVT1A | SV470XVT HDTV User Manual - Page 49
VIZIO SV470XVT1A User Manual Speakers Distance The range of the wireless system is up to 35 feet for the subwoofer and each satellite speaker (Rear Left and Rear Right) comes with a 15 feet of speaker wire. Adjusting this option will allow you to take advantage of setting the TV set to set the - Vizio SV470XVT1A | SV470XVT HDTV User Manual - Page 50
carrying a Dolby Digital 5.1 signal; is supplied to the TV, a LED (red 5.1) indicator displaying such signal can be seen on the bottom right hand side of the center speaker. 4.3.11 Sound Effect As it was previously mentioned your TV comes with a factory setting of SRS (TruSurroundXT) digital audio - Vizio SV470XVT1A | SV470XVT HDTV User Manual - Page 51
VIZIO SV470XVT1A User Manual 4.3.12 DRC (Dynamic Range Compression) This option allows adjusting the dynamic range compression of the audio encoded in a Dolby Prologic II signal input into the TV. Press the ▼ button to highlight the DRC option. Press either ◄ or ► to select the desired setting. The - Vizio SV470XVT1A | SV470XVT HDTV User Manual - Page 52
VIZIO SV470XVT1A User Manual 4.4 DTV / TV Tuner Setup When you first used your HDTV you will have setup your TV for DTV / TV channels using the Initial Setup screens. If you did not do this or if your setup has changed, you can do this from the TV TUNER SETUP menu. Once the adjustments are completed - Vizio SV470XVT1A | SV470XVT HDTV User Manual - Page 53
the TV TUNER SETUP menu. Press the ▼ button to highlight SKIP CHANNEL. Press the ► button to select this channel to be skipped when using the CH+ or CH- button. You will still be able to select this channel using the number buttons on the remote control. 4.4.5 MTS This feature allows you, the user - Vizio SV470XVT1A | SV470XVT HDTV User Manual - Page 54
VIZIO SV470XVT1A User Manual 4.4.6 Time Zone Setting the correct Time Zone for your area will ensure that the correct program times are shown after pressing the GUIDE button on the remote control. Press the ▼ button to highlight the Time Zone selection. Press the ► button to select your area. Once - Vizio SV470XVT1A | SV470XVT HDTV User Manual - Page 55
VIZIO SV470XVT1A User Manual 4.5 DTV / TV Input Setup 4.5.1 Language When the MENU button is pressed, the On Screen Display (OSD) appears on the PICTURE adjustment page. Press the ► button until the SETUP page is displayed. Press the ▼ button to highlight the Language selection. The default is - Vizio SV470XVT1A | SV470XVT HDTV User Manual - Page 56
VIZIO SV470XVT1A User Manual PIP Source When PIP or POP is selected, Press the ▼ button to highlight the PIP input selection. Press the ◄ or ► button to choose the input source for the sub screen. The input sources available will vary according to which input is used for the main screen; see the - Vizio SV470XVT1A | SV470XVT HDTV User Manual - Page 57
VIZIO SV470XVT1A User Manual 4.5.3 Sleep Timer Press the ▼ button to highlight the Sleep Timer selection. Press the ► button to select the timer to turn-off the TV in 30, 60, 90 or 120 minutes. Once the adjustments are completed press the EXIT button to exit the OSD completely. 4.5.4 Wide The Wide - Vizio SV470XVT1A | SV470XVT HDTV User Manual - Page 58
VIZIO SV470XVT1A User Manual 4.5.5 Input Naming This feature has been added to facilitate you, the user in identifying or label the input and Press the key to accept the name of the input or the EXIT key to cancel the setting. . Press the MENU key when you have finished to go to the previous menu. - Vizio SV470XVT1A | SV470XVT HDTV User Manual - Page 59
VIZIO SV470XVT1A User Manual 4.5.6 CC (Closed Caption) Press the ▼ button to highlight the CC (Closed Caption) selection. Press the ► button. A separate menu will appear with the following CC settings CC When watching regular analog (NTSC) TV, the CC feature is available in the Setup menu. Press the - Vizio SV470XVT1A | SV470XVT HDTV User Manual - Page 60
VIZIO SV470XVT1A User Manual 4.5.7 H/V Position Press the ▼ button to highlight the H/V Position selection. Press the ►button. A separate menu will appear with the following H/V Position settings H - Position Press the ▼ button to highlight the Horizontal Shift selection. Use the ◄ or ► button to - Vizio SV470XVT1A | SV470XVT HDTV User Manual - Page 61
VIZIO SV470XVT1A User Manual 4.5.8 DTV / TV Input Parental Control If you want to restrict certain channel and program viewing, you can do this by turning on the Parental Control. Selected programs, movies and channels can then be made available only after an authorized password has been entered and - Vizio SV470XVT1A | SV470XVT HDTV User Manual - Page 62
completely. 4.5.10 US TV Rating Follow the procedure in the previous section to display the Parental Control menu and then press the ▼ button to highlight the US TV Rating selection. Press the ► button and the Block TV Rating panel will be displayed. In the Block TV Rating panel you can customize - Vizio SV470XVT1A | SV470XVT HDTV User Manual - Page 63
VIZIO SV470XVT1A User Manual 4.5.11 US Movie Rating (For US) Press the ▼ button to highlight the US Movie Rating selection. Press the ► button and the Block Movie Rating panel will be displayed. In the Block Movie Rating panel you can customize the program blocking of the following Movie ratings - Vizio SV470XVT1A | SV470XVT HDTV User Manual - Page 64
VIZIO SV470XVT1A User Manual 4.5.13 Canadian French Rating Press the ▼ button to highlight the Canadian French Rating selection. Press the ► button and the Block Canadian French Rating panel will be displayed. In the Block Canadian French Rating panel you can customize the program blocking of - Vizio SV470XVT1A | SV470XVT HDTV User Manual - Page 65
VIZIO SV470XVT1A User Manual 4.5.15 Blocked Unrated Programming Follow the procedure in the previous section 4.5.8 to display the Parental Control menu and then press the ▼ button to highlight the Block Unrated TV selection. Press the ► button to turn-on or turn-off the blocking of programming that - Vizio SV470XVT1A | SV470XVT HDTV User Manual - Page 66
VIZIO SV470XVT1A User Manual 4.5.17 Reset All Settings Press the ▼ button to highlight the Reset All Settings selection. Press the ► button to reset the TV to the default factory settings. The screen will display a message to confirm that you want to reset the values to factory settings. Use the ◄ - Vizio SV470XVT1A | SV470XVT HDTV User Manual - Page 67
VIZIO SV470XVT1A User Manual 4.6 HDMI Input Picture Adjustment The Picture Adjust menu operates in the same way for the HDMI Input as for the DTV / TV input in section 4.2. Once the adjustments are completed press the EXIT button to exit the OSD completely. 4.7 HDMI Input Audio Adjustment The Audio - Vizio SV470XVT1A | SV470XVT HDTV User Manual - Page 68
VIZIO SV470XVT1A User Manual 4.9 Video Input Picture Adjustment The Picture Adjust menu operates in the same way for Video Inputs (Component and AV) as for the DTV / TV input in section 4.2. The menu difference is that there is no icon along the top for DTV / TV adjustments. 4.10 Video Input Audio - Vizio SV470XVT1A | SV470XVT HDTV User Manual - Page 69
VIZIO SV470XVT1A User Manual 4.12 Auto Phase (for Component input) Press the ▼ button to highlight the H/V Position. Press the ► button and the new H/V Position submenu will be displayed. Press the ▼ button to highlight Auto Phase. Press the ► button to execute this option. The TV will automatically - Vizio SV470XVT1A | SV470XVT HDTV User Manual - Page 70
VIZIO SV470XVT1A User Manual 4.14 PC Input Picture Adjustment The Picture Adjust menu operates in the same way for the PC Input as for the DTV / TV input in section 4.2 for Backlight, Contrast, Brightness and Color Temperature. 4.14.1 Auto Adjust When the MENU button is pressed, the On Screen - Vizio SV470XVT1A | SV470XVT HDTV User Manual - Page 71
VIZIO SV470XVT1A User Manual 4.14.4 H-SIZE Press the ▼ button to highlight the H-Size selection. Press the ► button to start adjusting the horizontal size of the picture. Use the ◄ or ► button to adjust the horizontal size EXIT button to exit the OSD completely. Version 6/2/2008 71 www.VIZIO.com - Vizio SV470XVT1A | SV470XVT HDTV User Manual - Page 72
VIZIO SV470XVT1A User Manual 4.15 PC Input Audio Adjustment The Audio Adjust menu operates in the same way for the PC Input as for the DTV / TV input in section 4.3. The menu difference is that there are no icons along the top for DTV / TV and Parental Control adjustments. 4.16 PC Input Setup The - Vizio SV470XVT1A | SV470XVT HDTV User Manual - Page 73
VIZIO SV470XVT1A User Manual 4.17 Understanding Viewing Features Your HDTV features the following viewing modes. You can switch viewing modes using the remote control, please follow the instructions in page 37. 4.17.1 Viewing Modes Normal Mode The original 4:3 aspect ratio (1.33:1 source) is - Vizio SV470XVT1A | SV470XVT HDTV User Manual - Page 74
VIZIO SV470XVT1A User Manual 4.17.2 Picture-In-Picture (PIP) Mode Your TV features PIP mode so you can watch two pictures at the same time. When PIP is turned on, you can display two pictures at one time. One picture is displayed as the full screen (main screen) and the other picture is displayed - Vizio SV470XVT1A | SV470XVT HDTV User Manual - Page 75
to work with up to four different pieces of equipment including your VIZIO SV470XVT1A. Listed below are the steps for programming your VCR, Cable Box and DVD Player. 4.17.4 Programming for VCR 1. Manually turn on the VCR. 2. Press the VCR button on the remote control. 3. Press and hold the SET - Vizio SV470XVT1A | SV470XVT HDTV User Manual - Page 76
search procedure. 4.18 Using a Cable or Satellite Remote Your VIZIO remote uses codes 000, 047, 050, 067, 329, 331 and 339 to work your LCD HDTV. To use a cable or satellite remote to work the LCD HDTV, refer to your cable or satellite remote user guide for more information on how to program the - Vizio SV470XVT1A | SV470XVT HDTV User Manual - Page 77
off. Press the Volume + (Up) key on your remote control Make sure that headphones are not connected If the screen is black. Check your input connections. Power is ON but no screen Make sure the video cable supplied with the TV is secured to the correct video Version 6/2/2008 77 www.VIZIO.com - Vizio SV470XVT1A | SV470XVT HDTV User Manual - Page 78
, make sure that H Size and V Position in the On Screen Display (OSD) are set correctly. If you are using TV, AV1, AV2 or Component with 480i input, use the WIDE button on the remote control to scroll through various screen modes. You can see a picture but you cannot hear sound. Make sure that the - Vizio SV470XVT1A | SV470XVT HDTV User Manual - Page 79
VIZIO SV470XVT1A User Manual Problem Solution Tips for Letterbox Content Users. Letterboxed (or "Widescreen") versions of DVD movies are most commonly formatted for standard 4:3 Televisions. The LCD HDTV has the capability of expanding this content so the entire screen is filled at the expense - Vizio SV470XVT1A | SV470XVT HDTV User Manual - Page 80
VIZIO SV470XVT1A User Manual 5.5 Compliance Caution: Always use a power cable that is properly grounded. Please use the AC cords listed below for each area. USA Canada Germany UK Japan UL CSA VDE BASE/BS Electric Appliance Control Act 5.6 FCC Class B Radio Interference Statement NOTE: This - Vizio SV470XVT1A | SV470XVT HDTV User Manual - Page 81
VIZIO SV470XVT1A User Manual Chapter 6 Miscellaneous Information 6.1 Specifications Specifications Panel 47" Diagonal, 16:9 Aspect Ratio Resolution 1920 x 1080 pixels Pixel (Dot) Pitch 0.5415 mm x 0.5415 mm Display Compatibility 1080P (Full HDTV) Colors Brightness 1.06 Billion 500 cd/m2 ( - Vizio SV470XVT1A | SV470XVT HDTV User Manual - Page 82
VIZIO SV470XVT1A User Manual 6.2 Glossary - Standard Definitions Analog TV: Today's TV system using radio frequency waves to transmit and display pictures and sound. Aspect Ratio (4x3): Traditional TV "aspect ratio", that is, the screen's width as compared to its height. For example, a "32 inch TV - Vizio SV470XVT1A | SV470XVT HDTV User Manual - Page 83
VIZIO SV470XVT1A User Manual 6.3 Index A Accessories, 5 Adjustments Closed Caption, 15 Selecting the Screen Size, 15, 37, 82 Stepping through TV Channels, 37 Volume, 10, 37, 77 Advanced Video Features Black Level Extender, 42 Color Temperature (Color Temperature, 43 CTI (Color Transient Improvement - Vizio SV470XVT1A | SV470XVT HDTV User Manual - Page 84
Set-Top Box, 75 Programming to work your VCR, 75 Using your Cable or Satellite Remote to Operate your VIZIO TV, 76 RGB Connecting your PC, 30 S Screen Size explanation, 73 S-Video Connecting your DVD Player, 26, 27 T Technical Specifications, 81 VIZIO SV470XVT1A User Manual Troubleshooting Guide - Vizio SV470XVT1A | SV470XVT HDTV User Manual - Page 85
displays which are less than thirty (30) inches generally will be performed at a VIZIO service center. Parts Repairs may be made with new or recertified parts, or the entire unit may be replaced with a new or recertified unit, at VIZIO's option and sole discretion. Replacement parts or replacement - Vizio SV470XVT1A | SV470XVT HDTV User Manual - Page 86
VIZIO SV470XVT1A User Manual levels, is not covered by this limited warranty. Installation, removal, transportation and reinstallation of a display, grant any other warranty on VIZIO's behalf. Owner's Responsibility To ensure warranty service, keep the dated bill or sales receipt as evidence of the - Vizio SV470XVT1A | SV470XVT HDTV User Manual - Page 87
Warranty for warranty terms and conditions. WARRANTY REPLACEMENT PROCEDURE Warranty Replacement generally is performed on displays which are determined to be economically unrepairable. If VIZIO Technical Support determines that a problem with a display unit may be within the terms and conditions - Vizio SV470XVT1A | SV470XVT HDTV User Manual - Page 88
VIZIO SV470XVT1A User Manual For displays forty-two inches (42") and larger, VIZIO will generally cover the transportation charges to perform an on-site swap of the original unit with the replacement unit. For displays under forty-two inches (42"), the customer is responsible for the transportation - Vizio SV470XVT1A | SV470XVT HDTV User Manual - Page 89
VIZIO SV470XVT1A User Manual Component Program Codes Setup Codes for VCRs ABS 458 Admiral Adventura Aiko 543 541 Emerson 542 549 550 551 552 556 558 559 573 577 578 Version 6/2/2008 89 www.VIZIO.com Setup Codes for VCRs ESA 470 Fisher 444 450 Fuji Fujitsu 442 449 538 555 542 Funai - Vizio SV470XVT1A | SV470XVT HDTV User Manual - Page 90
Center PC MEI 449 538 548 555 458 449 538 555 Version 6/2/2008 VIZIO SV470XVT1A User Manual Setup Codes for VCRs 444 445 446 449 450 452 456 459 460 461 462 559 449 463 479 481 Panasonic 497 514 521 531 90 www.VIZIO.com Setup Codes for VCRs 538 548 555 557 564 565 572 Penney Pentax Pentex - Vizio SV470XVT1A | SV470XVT HDTV User Manual - Page 91
560 578 449 546 562 564 442 455 458 459 464 467 471 472 Sony 473 489 492 522 535 538 555 568 576 Version 6/2/2008 VIZIO SV470XVT1A User Manual Setup Codes for VCRs Stack 458 Stack 9 458 STS 449 575 Superscan 512 515 449 452 459 488 500 504 512 515 Sylvania 532 538 541 - Vizio SV470XVT1A | SV470XVT HDTV User Manual - Page 92
Cable Converters 000 001 002 024 026 046 049 051 ABC 053 159 Adelphia 049 Admiral 160 Version 6/2/2008 VIZIO SV470XVT1A User Manual Setup Codes for Cable Converters Americast 031 Antronix 004 005 Archer 005 AT&T 042 Bell & Howell 002 Bell South 031 Cable Vision 038 039 Cabletenna - Vizio SV470XVT1A | SV470XVT HDTV User Manual - Page 93
014 U. S. Electronics Unika 053 004 005 United Cable Universal V2 Videotron View Star 024 004 005 030 038 012 014 Viewmaster 030 Vision 030 Version 6/2/2008 VIZIO SV470XVT1A User Manual Setup Codes for Cable Converters Vortex View Zenith Zentek 030 022 026 031 036 029 Setup - Vizio SV470XVT1A | SV470XVT HDTV User Manual - Page 94
325 018 017 095 287 Blue Parade 013 Version 6/2/2008 VIZIO SV470XVT1A User Manual Setup Codes for DVD Players BOSE 174 345 353 BOSS 288 DiamondVisi on Disney Dual Durabrand DVD2000 Eclipse Emerson Enterprise ESA Fisher Fun TV Funai Gateway GE Go Video Goldstar GPX 426 433 277 175 148 - Vizio SV470XVT1A | SV470XVT HDTV User Manual - Page 95
Codes for DVD Players 364 Marantz 012 149 150 162 Memorex 071 081 166 339 Microsoft 011 Mintek Mitsubishi 017 161 299 010 074 092 099 129 NAD 072 177 Nakamichi 179 Nesa 017 Next Base 433 012 036 016 Version 6/2/2008 VIZIO SV470XVT1A User Manual Setup Codes for DVD Players Prima 326 - Vizio SV470XVT1A | SV470XVT HDTV User Manual - Page 96
Setup Codes for Audio Tuners and Receivers Akai 073 Alco 058 Altec Lansing 072 Amphion Media Works AMW Anam Apex Arcam 142 143 203 304 153 157 206 077 060 304 Version 6/2/2008 VIZIO SV470XVT1A User Manual Setup Codes for Audio Tuners and Receivers Glory Horse GPX Gradiente Harman/Kar don - Vizio SV470XVT1A | SV470XVT HDTV User Manual - Page 97
Sound Classe Curtis Mathes Denon 007 016 017 001 035 036 Digital Audio Control 008 Durabrand 018 Elan 019 Fosgate 020 GE 000 Version 6/2/2008 VIZIO SV470XVT1A User Manual Setup Codes Setup Codes for TVs 888 517 Abex 019 Acer 376 Acura 511 97 www.VIZIO.com Setup Codes for TVs - Vizio SV470XVT1A | SV470XVT HDTV User Manual - Page 98
038 081 084 151 428 484 503 511 220 514 516 515 526 Candle 006 007 021 029 082 083 084 329 493 Version 6/2/2008 VIZIO SV470XVT1A User Manual Setup Codes for TVs Carnivale Carver Cascade CCE Celebrity Celera 029 082 083 493 031 527 511 051 217 509 003 492 040 ChangCheng Changfei 494 506 512 - Vizio SV470XVT1A | SV470XVT HDTV User Manual - Page 99
483 484 502 503 521 338 006 029 082 083 329 493 299 034 493 511 508 508 516 514 516 517 Version 6/2/2008 VIZIO SV470XVT1A User Manual Setup Codes for TVs Feiyue 514 516 Fenner 511 Fidelity 508 FIRST LINE Firstar Firstline Fisher Formenti Formenti/Ph oenix Fortress Frontech 511 503 508 509 - Vizio SV470XVT1A | SV470XVT HDTV User Manual - Page 100
508 511 511 021 015 031 527 JC Penney JCB 001 005 006 007 014 017 018 019 071 084 329 003 492 Version 6/2/2008 VIZIO SV470XVT1A User Manual Setup Codes for TVs Jean Jensen Jiahua JiaLiCai Jinfeng Jinque Jinta Jinxing Juhua 494 497 501 503 006 045 082 212 329 494 512 516 517 518 494 - Vizio SV470XVT1A | SV470XVT HDTV User Manual - Page 101
Mivar Monivision Montgomery Ward 407 493 498 500 502 503 504 508 024 025 524 002 Motorola 004 020 032 498 Version 6/2/2008 VIZIO SV470XVT1A User Manual Setup Codes for TVs MTC MuDan Multitech Multivision Murphy NAD Nanbao Nansheng National 005 006 017 029 042 071 082 083 084 329 493 496 508 - Vizio SV470XVT1A | SV470XVT HDTV User Manual - Page 102
311 312 334 335 341 343 447 458 460 476 511 Portland Price Club Prima Princeton Prism Profex 005 006 009 018 071 084 329 497 332 072 335 Pulsar Pymi 028 084 171 329 511 Version 6/2/2008 VIZIO SV470XVT1A User Manual Setup Codes for TVs Qingdao 512 514 517 Quasar 004 014 036 126 202 414 478 - Vizio SV470XVT1A | SV470XVT HDTV User Manual - Page 103
490 492 511 Soundesign Sowa 006 007 011 012 035 084 329 502 494 496 497 501 502 Squareview 034 Version 6/2/2008 VIZIO SV470XVT1A User Manual Setup Codes for TVs SSS Standard Starlite 011 035 082 329 509 511 011 035 Studio Experience 025 Sunkai 511 Sunwood 511 Superla 508 Superscan 032 - Vizio SV470XVT1A | SV470XVT HDTV User Manual - Page 104
Radio Waycon Weipai 508 033 501 516 Westinghous 037 050 067 273 e 287 294 441 VIZIO SV470XVT1A User Manual Setup Codes for TVs White Westinghous e 038 084 094 508 Xiahua 514 516 517 Xiangyang 517 Xiangyu 516 Zhuhai 375 400 419 479 484 497 502 516 Version 6/2/2008 104 www.VIZIO.com
-
 1
1 -
 2
2 -
 3
3 -
 4
4 -
 5
5 -
 6
6 -
 7
7 -
8
-
9
-
10
-
11
-
12
-
13
-
14
-
15
-
16
-
17
-
18
-
19
-
20
-
21
-
22
-
23
-
24
-
25
-
26
-
27
-
28
-
29
-
30
-
31
-
32
-
33
-
34
-
35
-
36
-
37
-
38
-
39
-
40
-
41
-
42
-
43
-
44
-
45
-
46
-
47
-
48
-
49
-
50
-
51
-
52
-
53
-
54
-
55
-
56
-
57
-
58
-
59
-
60
-
61
-
62
-
63
-
64
-
65
-
66
-
67
-
68
-
69
-
70
-
71
-
72
-
73
-
74
-
75
-
76
-
77
-
78
-
79
-
80
-
81
-
82
-
83
-
84
-
85
-
86
-
87
-
88
-
89
-
90
-
91
-
92
-
93
-
94
-
95
-
96
-
97
-
98
-
99
-
100
-
101
-
102
-
103
-
104
 |
 |
VIZIO SV470XVT1A User Manual
Version 6/2/2008
1
www.VIZIO.com
Dear VIZIO Customer,
Congratulations on your new VIZIO SV470XVT1A
LCD Television purchase. Thank you for your
support.
For maximum benefit of your set, please
read
these
instructions
before
making
any
adjustments, and retain them for future reference.
We hope you will experience many years of
enjoyment from your new VIZIO SV470XVT1A
Television.
For assistance
, please call (877) 698-4946
or e-
mail us at
.
To purchase or inquire about accessories and
installation services for your VIZIO LCD HDTV,
please visit our website at
www.vizio.com
or call
toll free at
888-VIZIOCE (888-849-4623).
We recommend you register your VIZIO
SV470XVT1A TV either at our website
www.vizio.com
or fill in your registration card
and mail it in.
For peace of mind and to protect
your investment beyond the standard warranty,
VIZIO offers on-site extended warranty service
plans.
These plans give additional coverage
during the standard warranty period.
Visit our
website or call us to purchase a plan.
Write down the serial number located on the back
of your SV470XVT1A.__
__ __ __ __ __ __ __ __
__ __ __ __ __
Purchase Date _____________________
VIZIO is a registered trademark of VIZIO, Inc. dba V, Inc.
HDMI logo and “High Definition Multimedia Interface” are
registered trademarks of HDMI Licensing LLC.
Manufactured under license from Dolby Laboratories.
Dolby and the double-D symbol are trademarks of Dolby Laboratories.
TruSurround, SRS and the symbol are trademarks of SRS Labs, Inc
THE TRADEMARKS SHOWN HEREIN ARE THE PROPERTY OF THEIR RESPECTIVE OWNERS; IMAGES USED ARE FOR
ILLUSTRATION PURPOSES ONLY. BRAVO, VIZIO AND THE V LOGO AND WHERE VISION MEETS VALUE AND OTHER
VIZIO TRADEMARKS ARE THE INTELLECTUAL PROPERTY OF VIZIO INC.
PRODUCT SPECIFICATIONS ARE SUBJECT TO
CHANGE WITHOUT NOTICE OR OBLIGATION. © 2008 VIZIO INC. ALL RIGHTS RESERVED.