Vizio SV470XVT1A SV470XVT HDTV User Manual - Page 59
CC Closed Caption
 |
UPC - 857380001413
View all Vizio SV470XVT1A manuals
Add to My Manuals
Save this manual to your list of manuals |
Page 59 highlights
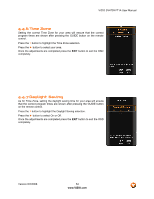
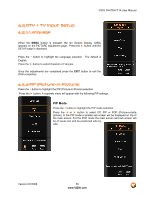
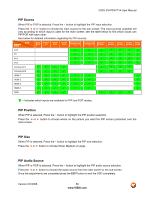
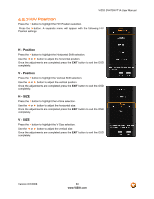
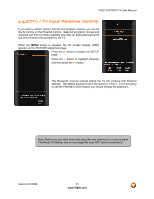
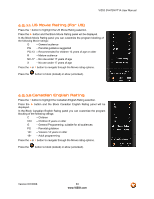
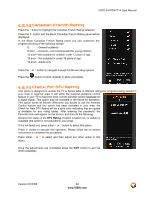
VIZIO SV470XVT1A User Manual 4.5.6 CC (Closed Caption) Press the ▼ button to highlight the CC (Closed Caption) selection. Press the ► button. A separate menu will appear with the following CC settings CC When watching regular analog (NTSC) TV, the CC feature is available in the Setup menu. Press the ▼button to highlight the CC selection. Press the ►button to select CC1, CC2, CC3 or CC4. Once the adjustments are completed press the EXIT button to exit the OSD completely. Closed Caption for regular TV is usually CC1 or CC2. Digital Closed Caption Style When watching DTV, the Digital CC Style feature is available in the Setup menu. Press the ▼ button to highlight the Digital CC Style selection. Press the ► button to go to the next screen. Press either ◄ or ► button to toggle between the two options; As Broadcaster and Custom. If Custom is selected then you will have the way of customize the way Closed Caption will be displayed by changing these different parameters to your like: Font Size (letters size), Font Color (letters color) Font Opacity (transparency of the letters), Background Color (color of the background area where Closed Caption is going to be displayed), Background Opacity (allows to either see through at the scene being played or it could be a solid screen), Window Color (it gives the color to the area where characters will be displayed on) and finally Window Opacity (allows the area of the characters to be changed). There are no recommendations of setting these parameters since you, the user would have your own taste or like of them. Once the adjustments are completed press the EXIT button to exit the OSD completely. Version 6/2/2008 59 www.VIZIO.com
-
 1
1 -
2
-
3
-
4
-
5
-
6
-
7
-
8
-
9
-
10
-
11
-
12
-
13
-
14
-
15
-
16
-
17
-
18
-
19
-
20
-
21
-
22
-
23
-
24
-
25
-
26
-
27
-
28
-
29
-
30
-
31
-
32
-
33
-
34
-
35
-
36
-
37
-
38
-
39
-
40
-
41
-
42
-
43
-
44
-
45
-
46
-
47
-
48
-
49
-
50
-
51
-
52
-
53
-
 54
54 -
 55
55 -
 56
56 -
 57
57 -
 58
58 -
 59
59 -
 60
60 -
 61
61 -
 62
62 -
 63
63 -
 64
64 -
65
-
66
-
67
-
68
-
69
-
70
-
71
-
72
-
73
-
74
-
75
-
76
-
77
-
78
-
79
-
80
-
81
-
82
-
83
-
84
-
85
-
86
-
87
-
88
-
89
-
90
-
91
-
92
-
93
-
94
-
95
-
96
-
97
-
98
-
99
-
100
-
101
-
102
-
103
-
104
 |
 |
