Vizio VMT37-60S User Manual - Page 6
Secure Wall Plate to Wall - manual
 |
View all Vizio VMT37-60S manuals
Add to My Manuals
Save this manual to your list of manuals |
Page 6 highlights
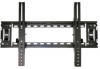
VIZIO VMT37-60S User Manual Secure Wall Plate to Wall Caution: This product is not designed for use in metal stud walls Wood Stud Walls Note: You must attach your TV wall mount to a wall that has at least 2" x 4" wood studs to avoid property damage or injury. A B A. Locate wall studs 1. Using a stud finder, locate two wood studs that are 16" to 24" apart. 2. With a pencil, mark the location of the studs. B. Mark and drill holes 1. Tape the included Wall Mount Template to the wall so the holes align with the studs. Hold the wall plate [1] up to the Wall Mount Template and use the built-in level to make sure the Wall Mount Template is level. Put the wall plate [1] aside. C 2. Drill 4 holes with the 3/16" drill bit, 2-1/2" deep. Remove the Wall Mount Template. C. Anchor mount to wall 1. Using a 1/2" wrench or socket, attach the wall plate [1] to the wall with the supplied lag bolts and washers [3] & [4]. 2. Use the level before tightening bolts. Note: It is important to make sure the wall plate is level. Note: Do not over-tighten lag bolts. Tighten only until they are firmly against the wall plate. OR 6 www.VIZIO.com
-
 1
1 -
 2
2 -
 3
3 -
 4
4 -
 5
5 -
 6
6 -
 7
7 -
 8
8 -
 9
9 -
 10
10 -
 11
11 -
 12
12 -
13
 |
 |
