Vizio XMF1000 Quick Installation Guide - Page 15
Snap on the leveler
 |
View all Vizio XMF1000 manuals
Add to My Manuals
Save this manual to your list of manuals |
Page 15 highlights
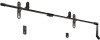
7. Remove 3 lag bolts and 3 washers from the pouch labeled LAG. Place the other bracket (part A) against the wall as shown, and use a wrench to insert the lag bolts and washers into the anchors. Do not insert the lag bolts completely. Leave 1/2" of the bolts showing. 8. Push the bar through the openings in each bracket (part A) as shown. Snap on the leveler (part E) and verify that the bar is level. Make any small adjustments, then use a wrench to tighten the 4 lag bolts completely. The bar can be inserted from right to left or left to right, depending on the end of the bar to which you would like the handle attached. 7 Level Bar Tighten Bolts 8 13
-
 1
1 -
2
-
3
-
4
-
5
-
6
-
7
-
8
-
9
-
 10
10 -
 11
11 -
 12
12 -
 13
13 -
 14
14 -
 15
15 -
 16
16 -
 17
17 -
 18
18 -
 19
19 -
 20
20 -
21
-
22
-
23
-
24
 |
 |

7
7. Remove
3 lag bolts
and
3 washers
from the pouch
labeled
LAG
.
Place the other bracket (
part
A
) against the wall as shown, and
use a wrench to insert the lag bolts and washers into the
anchors. Do not insert the lag bolts completely. Leave 1/2” of the
bolts showing.
8. Push the bar through the openings in each bracket (
part
A
) as
shown.
Snap on the leveler (
part E
) and verify that the bar is level.
Make any small adjustments, then use a wrench to tighten the 4
lag bolts completely.
13
8
Level Bar
Tighten Bolts
The bar can be inserted from right to left or left to right,
depending on the end of the bar to which you would like
the handle attached.