Vtech Create-A-Story Reading System User Manual - Page 2
Care And Maintenance, Technical Support, In Tv Mode, Other Information, Warning, Troubleshooting, - canada
 |
View all Vtech Create-A-Story Reading System manuals
Add to My Manuals
Save this manual to your list of manuals |
Page 2 highlights
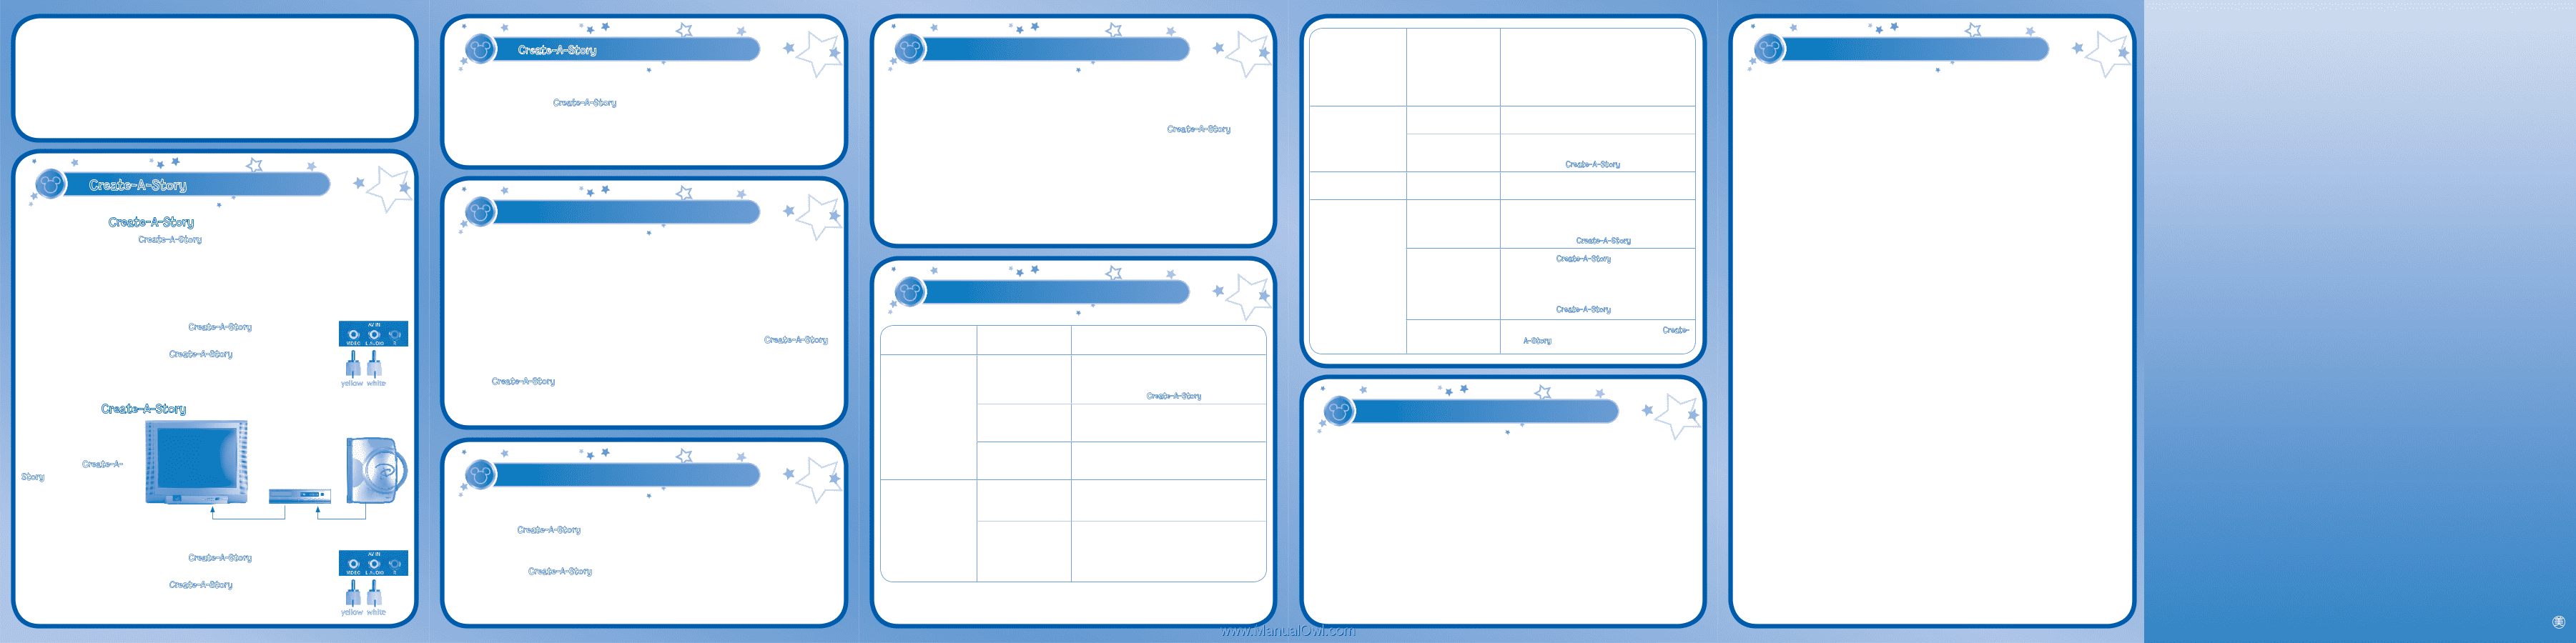
Standard Guidelines for Adaptor Toys • This toy is not intended for use by children under 3 years old. • Only use the recommended adaptor with the toy. • The transformer is not a toy. • Never clean a plugged-in toy with liquid. • Never use more than one adaptor. • Do not leave the toy plugged in for extended periods of time. Create-A-Story™ in TV Mode CONNECTING Create-A-Story™ TO A TV Note: Before you connect Create-A-Story™ to a TV, please check and make sure that the console is working. Insert the AV cable into the AV jack. Once you have turned the console on, the TV Mode signal will glow. If this does not occur, please check the adaptor or batteries, and ensure the AV cable is properly connected. Make sure that your TV and the console are both turned off before you being making any connections. AUDIO INPUT CONNECTION • Connect the yellow plug on the Create-A-Story™ cable to the yellow video input terminal on your TV. • Connect the white plug on the Create-A-Story™ cable to the white audio input terminal on your TV. yellow white CONNECTING Create-A-Story™ TO A VCR If there is no video IN and audio IN terminal on your TV set, you can connect Create-AStory™ to a VCR. • Connect the yellow plug on the Create-A-Story™ cable to the yellow video input terminal on your VCR. • Connect the white plug on the Create-A-Story™ cable to the white audio input terminal on your VCR. yellow white 6 Create-A-Story™ in On-the-Go Mode Two Ways to Play You can also play with Create-A-Story™ without a TV set. Listen to your favorite Disney stories through the speaker when you are playing in the On-the-Go Mode. You can carry it along during travel! TO BEGIN PLAY TO BEGIN PLAY • Make sure the console is turned OFF. • Insert a cartridge into the slot at the top of the console. The side with the label needs to be facing up. The cartridge should lock into place securely. Please use care when removing the cartridge from the slot. • Turn on your TV. • Set your TV input mode to accept input from the port to which Create-A-Story™ is connected. In many cases this will involve setting the TV to a "video" mode; however, since all TVs vary, refer to your TV or VCR manual for further details. • Turn Create-A-Story™ on by sliding the switch to the ON position. CARE AND MAINTENANCE CARE AND MAINTENANCE • Keep your Create-A-Story™ clean by wiping it with a slightly damp cloth. Never use solvents or abrasives. • Keep it out of direct sunlight and away from direct sources of heat. • Always keep Create-A-Story™ away from water, sand and dirt. • Avoid dropping it. Never try to dismantle it. 7 WARNING WARNING A very small percentage of the public, due to an existing condition, may experience epileptic seizures or momentary loss of consciousness when viewing certain types of flashing colors or patterns, especially on television. While Create-A-Story™ does not contribute to any additional risks, we do recommend that parents supervise their children while they play games on a TV. If your child experiences dizziness, altered vision, disorientation, or convulsions, discontinue use immediately and consult your physician. Please note that focusing on a television screen at close range for a prolonged period of time may cause fatigue or discomfort. We recommend that children take a 15minute break for every hour of play. TROUBLESHOOTING Problem The TV Mode signal does not glow when the switch is in the ON position. The TV Mode signal is ON, but there is no picture on the TV screen. Possible Reason Solution 1. Incorrect or missing power connection 2. Program needs to be reset 3. AV cable is not connected to the AV jack 1. Incorrect TV connection 1. Check if the new batteries are correctly installed, or an AC/DC adaptor (9V 300mA, center-position) is properly connected to Create-A-Story™. 2. Disconnect all power supplies (batteries and adaptor), then reconnect power supplies. 3. Make sure that the AV cable is firmly inserted into the AV jack at the top of the console. 1. Make sure that the yellow plug of the console is connected to the video IN terminal (usually yellow) of the TV. 2. Incorrect TV Mode 2. Make sure that the TV is set to "video" selected mode. Some TVs have several video inputs so please make sure you have selected the video input that matches the video port connected to the console. 8 The TV Mode signal is ON, but there is no picture (or picture looks fuzzy) and switching to OFF has no response. 1. Program needs to be reset The TV picture is black and white. 1. Non-matching color system 2. Cable connection problem There is a picture on the TV, but no sound. There is no sound when using the Onthe-Go Mode. 1. TV setting 1. Incorrect or missing power connection 2. Program needs to be reset 3. Headphone is connected 1.1 Switch to the OFF position and unlock the cartridge. 1.2 Remove the cartridge and then re-insert it. 1.3 Disconnect all power supplies (batteries and adaptor), and then reconnect power supplies. 1. Make sure the TV is set to the correct TV system. (E.g. NTSC or Auto) 2. Make sure that the video cable is firmly connected to the video input of the TV and AV jack of Create-A-Story™. 1. Increase the volume of the TV, and make sure it is not set to "Mute". 1. Check if the new batteries are correctly installed, or an AC/DC adaptor (9V 300mA, center-position) is properly connected to Create-A-Story™. 2.1 Turn off Create-A-Story™. 2.2 Disconnect all power supplies (batteries and adaptor), then reconnect power supplies. 2.3 Turn on Create-A-Story™. 3. Remove the Headphone jack from CreateA-Story™. TECHNICAL SUPPORT TECHNICAL SUPPORT If you have a problem that cannot be solved by using this manual, we encourage you to visit us online or contact our Consumer Services Department with any problems and/or suggestions that you might have. A support representative will be happy to assist you. Before requesting support, please be ready to provide or include the information below: • The name of your product or model number (the model number is typically located on the back or bottom of your product). • The actual problem you are experiencing. • The actions you took right before the problem occurred. Internet: www.vtechkids.com Phone: 1-800-521-2010 in the U.S. or 1-877-352-8697 in Canada 9 OTHER INFORMATION OTHER INFORMATION DISCLAIMER AND LIMITATION OF LIABILITY VTech® Electronics North America, L.L.C. and its suppliers assume no responsibility for any damage or loss resulting from the use of this handbook. VTech® Electronics North America, L.L.C. and its suppliers assume no responsibility for any loss or claims by third parties that may arise through the use of this software. VTech® Electronics North America, L.L.C. and its suppliers assume no responsibility for any damage or loss caused by deletion of data as a result of malfunction, dead battery, or repairs. Be sure to make backup copies of important data on other media to protect against data loss. Company: VTech® Electronics North America, L.L.C. Address: 1155 West Dundee Rd., Suite 130, Arlington Heights, IL 60004 USA Phone: 1-800-521-2010 in the U.S. or 1-877-352-8697 in Canada NOTICE: This equipment has been tested and found to comply with the limits for a Class B digital device, pursuant to Part 15 of the FCC Rules. These limits are designed to provide reasonable protection against harmful interference in a residential installation. This equipment generates, uses and can radiate radio frequency energy and, if not installed and used in accordance with the instructions, may cause harmful interference to radio communications. However, there is no guarantee that interference will not occur in a particular installation. If this equipment does cause harmful interference to radio or television reception, which can be determined by turning the equipment off and on, the user is encouraged to try to correct the interference by one or more of the following measures: -- Reorient or relocate the receiving antenna. -- Increase the separation between the equipment and receiver. -- Connect the equipment into an outlet on a circuit different from that to which the receiver is connected. -- Consult the dealer or an experienced radio/TV technician for help. Caution: Changes or modifications not expressly approved by the party responsible for compliance could void the user's authority to operate the equipment. 10 2008 © VTech Printed in China 91-002311-000-000
-
 1
1 -
 2
2
 |
 |