Install the parent unit battery
The parent unit runs on rechargeable battery or AC power. To continuously monitor your
baby, make sure you use both battery and AC power at the same time. With the battery
alone, the parent unit can cordlessly run for a short time only.
NOTES
NOTE
•
Use only the battery supplied with this product.
•
If the parent unit will not be used for a long time, disconnect and remove the battery to prevent possible leakage.
Replace the battery
To replace the battery, unplug the battery connector from the socket, and then pull the
battery out of the battery compartment. Follow the steps above to install the battery.
Connect the baby monitor
NOTES
NOTE
•
Use only the power adapters supplied with this product.
•
Make sure the baby monitor is not connected to an electric outlet that is controlled by a switch.
•
The power adapters’ prongs are not designed to hold the weight of your baby monitor. Make sure
you connect the adapters to wall outlets that are in vertical or floor mount position. Do not connect
them to undermount and ceiling outlets. Otherwise, your baby monitor would fall out of the outlets.
•
Make sure the parent unit, the baby unit and the power adapter cords are out of reach of children.
• With audio reminder feature preset to
ON
, the parent unit plays an audio reminder when it is
connected to a baby unit.
Charge the parent unit battery
When you have connected the parent unit and installed its battery for the first time or after
power outage, the parent unit powers on automatically. The battery icon indicates the
battery status (see the following table).
THIS SIDE UP
Caution
•
T
he default volume of your parent unit is level 3. If you experience high-pitched screeching noise from
your baby monitor while positioning:
-
Make sure your baby unit and parent unit are more than
3 feet (1 meter)
apart, OR
-
Turn down the volume of your parent unit.
Operating range
The operating range of the baby monitor is up to 1,000 feet (300 meters) outdoors or 160 feet
(50 meters) indoors. The actual operating range may vary depending on the environmental
conditions, and other interferences such as walls, doors, and other obstructions.
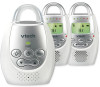
1 set for DM221;
2 sets for DM221-2
User’s manual
DM221
DM221-2
Digital Audio Monitor
Go to
www.vtechphones.com
to register your product for enhanced
warranty support and the latest VTech
product news.
Congratulations
on purchasing your new VTech product. Before using this product, please read
Important safety
instructions
.
This manual has all the feature operations and troubleshooting necessary to install and operate
your new VTech product. Please review this manual thoroughly to ensure proper installation and
operation of this innovative and feature-rich VTech product.
For support, shopping, and everything new at VTech, visit our website at
www.vtechphones.com
.
What’s in the box
1
Connect and charge the battery
N
N
Notes
•
The parent unit battery is fully charged after 11 hours of continuous charging.
•
It takes longer to charge the battery when the parent unit is turned on. To shorten the charging time,
turn the parent unit off while charging.
•
The standby time varies depending on the sensitivity level you set, your actual use and the age of the battery.
Battery indicators
Battery status
Action
The battery icon is off.
No battery is installed but
operates using AC power.
Install the parent unit battery.
Charge without interruption (at least
30 minutes).
The screen displays
LOW
BATTERY
and
.
The
light
flashes.
The battery has very little
charge and may be
used
for only a short time.
Charge
without interruption
(about
30 minutes).
The battery icon becomes
solid
.
The battery is fully charged.
To keep the battery charged, connect
it to AC power when not in use.
Note
•
This baby monitor is intended as an aid. It is not a substitute for proper adult supervision, and
should not be used as such.
Test your baby monitor
You may test the baby monitor before initial use, and at regular times thereafter.
Caution
•
For hearing protection, make sure the parent unit is more than 3
feet (1 meter) away from the baby unit. If you hear any
high-pitched noise, move the parent unit further until the noise
stops. You can also press
VOLUME
on the parent unit to lower
or mute the noise.
1. Make sure your baby unit and parent unit are on.
2. Speak towards the microphone of the baby unit. You
will hear the sound at the parent unit, and see the visual
sound indicators light up.
Note
•
When the parent unit displays
NOT LINKED
and
flashes, move the parent unit closer to the baby unit
(observe the minimum distance of 3 feet/ 1 meter). You can also check if the baby monitor is connected
to a live power socket and switched on.
Tip
•
Increase the speaker volume of the parent unit if you cannot hear the sounds transmitted from the
baby unit.
Positioning the baby monitor
Caution
•
Keep the baby units out of the reach of your baby. Never place or mount the baby units inside the
baby’s crib or playpen.
1. Place the baby units more than 3 feet (1 meter) away from your baby.
2. Place the parent unit more than 3 feet (1 meter) away from the baby unit to avoid
screeching noise.
2
Before use
1
2
3
Using the baby monitor
Power on or off the baby unit
•
Press
to power on the baby unit. The
power light turns on
.
•
Press and hold
to power off the baby unit. The
power light
turns off.
Power on or off the parent unit
•
Press and hold
to power on the parent unit. The screen turns on.
•
Press and hold
again to power off the parent unit. The screen
turns off.
Note
•
The parent unit powers on automatically once it is connected to power
socket or battery installed. The baby unit also powers on automatically once
connected to power socket.
Adjust the speaker volume for baby unit
•
Press
VOLUME
on the baby unit at any time.
Note
•
The speaker of baby unit cannot be muted.
Adjust the speaker volume for parent unit
You can adjust the speaker volume from
VOLUME 1
to
VOLUME 5
, or turn it off. The
speaker volume is preset to
VOLUME 3
.
•
Press
VOLUME
when the parent unit is not in use.
When the speaker volume is set to
VOLUME OFF
, the screen displays
.
Adjust the sound sensitivity of the baby unit
You can choose to hear sounds from the baby unit all the time, or to hear sounds that
exceed a certain level. You can use the parent unit to adjust the microphone sensitivity
of your baby unit. The higher the sensitivity level, the more sensitive the baby unit is in
detecting sounds for transmitting to the parent unit. The VOX sensitivity level is preset to
HIGHEST
.
VOX
Sensitivity
level
HIGHEST
HIGH
MEDIUM
LOW
LOWEST
Description
The parent
unit speaker
is constantly
on, and you
will hear
all sounds
(including
background
noises) from
your baby’s
room.
The parent
unit speaker
turns on for
soft babbling
and louder
sounds from
your baby. It
remains quiet
when your
baby sleeps
soundly.
The parent
unit speaker
turns on
for loud
babbling
and louder
sounds from
your baby. It
remains quiet
when your
baby makes
soft sounds.
The parent
unit speaker
turns on
for crying
and louder
sounds from
your baby. It
remains quiet
when your
baby makes
soft sounds.
The parent
unit speaker
turns on for
loud crying
or screeching
sounds from
your baby. It
remains quiet
when your
baby makes
soft sounds.
1. Press
MENU
when the parent unit is not in use.
2. Press
SELECT
to select
VOX LEVEL
.
3.
Press
or
to choose the desired sensitivity level.
4. Press
SELECT
to confirm your selection. The screen displays
SAVED
and you hear a
confirmation tone.
Note
•
To enter the
VOX LEVEL
menu of the parent unit, the baby unit must be turned on.
Sound alert
If you want the parent unit alerts you with sound, especially when the baby unit detects loud
sounds, you can turn on the sound alert feature. This feature is preset to
OFF
.
Once this feature is on,
is shown on LCD display. When the visual sound indicator hits
the red light range, i.e. the baby unit detects loud sounds, your parent unit beeps and
flashes.
1. Press
MENU
when the parent unit is not in use.
2. Press
or
to choose
SOUND ALERT
, then press
SELECT
.
3.
Press
or
to choose
ON
or
OFF
.
4. Press
SELECT
to confirm your selection. The screen displays
SAVED
and you hear a
confirmation tone.
Note
•
The sound alert setting on each parent unit is independent.
Vibration alert
You can set your parent unit to vibrate and alert you, whenever the baby unit detects loud
sounds. This feature is preset to
OFF
.
Once this feature is on,
is shown on LCD display. When the visual sound indicator hits the red
light range, i.e. the baby unit detects loud sounds, your parent unit vibrates and
flashes.
1.
Press
MENU
when the parent unit is not in use.
2. Press
or
to choose
VIBE ALERT
, then press
SELECT
.
3.
Press
or
to choose
ON
or
OFF
.
4. Press
SELECT
to confirm your selection. The screen displays
SAVED
and you hear a
confirmation tone.
Notes
•
Each time you set the vibration alert to
ON
, the parent unit vibrates briefly after you press
SELECT
.
•
The vibration alert setting on each parent unit is independent.
Nightlight
Both your parent unit(s) and baby unit allow you to turn on or off the nighlight on the baby unit.
Turn on/off the nightlight using the baby unit:
1. Press
to turn on the nightlight.
2. Press
again to turn off the nightlight.
Turn on/off the nightlight using the parent unit:
1. Press
MENU
when the parent unit is not in use.
2. Press
or
to choose
NIGHTLIGHT
, then press
SELECT
.
3.
Press
or
to choose
ON
or
OFF
.
4. Press
SELECT
to confirm your selection. The screen displays
SAVED
and you hear
a confirmation tone.
Notes
•
When the nightlight is turned on, the parent unit displays
.
•
The nightlight on baby unit operates even when the parent unit battery is out of charge or has been turned off.
•
If the parent unit lost link, the nightlight icon on its LCD display will disappear, regardless of the nightlight status.
Language
You can select a language (
English
,
Spanish
or
French
) to be used in all screen displays. The
language is preset to
English
.
1. Press
MENU
when the parent unit is not in use.
2. Press
or
to choose
LANGUAGE
, then press
SELECT
.
3.
Press
or
to choose
ENGLISH
,
ESPANOL
,
or
FRANCAIS
.
4. Press
SELECT
to confirm your selection. The screen displays
SAVED
and you hear
a confirmation tone.
Note
•
The language setting on each parent unit is independent.
Turn on or off the audio reminder
With audio reminder feature preset to
ON
, the parent unit plays an audio reminder when
it is connected to a baby unit. It reminds you to place the baby unit at least 3 feet (1 meter)
away from your baby, and keep the cords out of the reach of children.
1. Press
MENU
when the parent unit is not in use.
2. Press
or
to choose
REMINDER
, then press
SELECT
.
3.
Press
or
to choose
ON
or
OFF
.
4. Press
SELECT
to confirm your selection, and you hear a confirmation tone.
Notes
•
You can press
or
to adjust the volume when the parent unit is playing the reminder.
•
If the speaker volume of the parent unit is turned off, it will change to the default volume level when the
parent unit plays the reminder.
Set default
Use this feature to restore to the default settings. Restoring the default settings on one
parent unit will also reset the shared settings for VOX sensitivity level of the other parent
unit.
1. Press
MENU
when the parent unit is not in use.
2. Press
or
to choose
SET DEFAULT
, then press
SELECT
.
3.
Press
or
to choose
YES
or
NO
.
4. When you choose
YES
, press
SELECT
to confirm your selection. The screen displays
SAVED
and you hear a confirmation tone.
-OR-
When you choose
NO
, press
SELECT
to confirm your selection. The screen displays the
previous menu.
Talk to the baby unit
You can broadcast messages from a parent unit to the baby unit and the other parent unit.
If you have two parent units, you can use both of them at the same time to talk to the baby
unit.
1. Press and hold
TALK
on the side of the parent unit. The screen displays
TALK
when the
voice connection to the baby unit is made.
2. Speak towards the
MIC
on the parent unit. Your voice is broadcast to the baby unit and
the other parent unit.
Notes
•
If you have two parent units, and you use one of them to talk to you baby, your voice will broadcast to
both the baby unit and the other parent unit. The other parent unit displays
TALKBACK
. However, no
sound will transmit from the baby unit to any parent unit during broadcasting.
•
If speaker volume of the parent unit has been turned off before the talk, it will change to default
volume level after the talk finished.
Find/page the parent unit
Use this feature to locate misplaced parent units.
1. Press
PAGE
on the baby unit. All idle parent units ring and display
PAGING
.
2.
To end paging, press any key on the parent unit, or press
PAGE
on the baby unit.
Notes
•
Paging rings all parent units even if the speaker volume of parent unit is set to
VOLUME OFF
.
•
The baby unit cannot page any parent unit that is turned off, out of range, or talking to the baby unit.
3
Using the baby monitor (
Con’t
)
Frequency control
Crystal controlled PLL synthesizer
Transmit frequency
Baby uni
t: 1921.536-1928.448 MHz
Parent unit: 1921.536-1928.448
MHz
Channels
5
LCD
35 (x) x 21.2 (y) mm B&W LCD
Nominal effective range
Maximum power allowed by FCC and IC. Actual operating range may vary
according to environmental conditions at the time of use.
Power requirement
Parent unit: 2.4 V Ni-MH battery
Baby unit power adapter:
Output: 6V DC 400mA
Parent unit power adapter:
Output: 6V DC 400mA
Technical specifications
Specifications are subject to change without notice.
© 2019 VTech Communications, Inc.
All rights reserved. 03/19. DM221-X_CIB_V10
Document order number: 91-007075-090-100
>
1m (3ft)
LINKED
>
1m (3ft)
>
1m (3ft)
<
1m (3ft)
1
2
3
N
N
Note
Make sure the label
THIS SIDE UP
is facing
up while inserting the
battery.
4
 1
1 2
2

