Vtech DS6151 Quick Start Guide (DS6151 Quick Start Guide) - Page 1
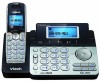
Vtech DS6151 - 6.0 Expandable Cordless Phone Manual
 |
UPC - 735078016584
View all Vtech DS6151 manuals
Add to My Manuals
Save this manual to your list of manuals |
Page 1 highlights
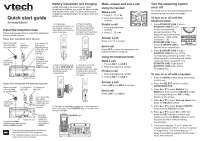
Quick start guide for model DS6151 Install the telephone base Follow the figures below to install the telephone base as shown below: Figure One: Installation with 2-line jack Electrical outlet not controlled by a wall switch L1+L2 telephone wall jack Telephone base power adapter If you have DSL high-speed Internet service, a DSL filter (not included) is required. Connect the black telephone line cord to jack labeled LINE 1/L1+L2. Telephone base Figure Two: Installation with separate line jacks Electrical outlet not controlled by a wall switch L1 telephone L2 telephone wall jack wall jack Telephone base power adapter If you have DSL high-speed Internet service, a DSL filter (not included) is required. Battery installation and charging Install the battery as shown below. After installing the battery, you might be able to make and receive short calls. For best performance, charge the handset battery for at least 16 hours before use. 1. If the battery compartment cover is on the handset, press the indentation and slide the cover to remove. 2. Plug the battery connector securely into the socket inside the handset battery compartment, matching the color-coded label. 3. Place the battery with the label THIS SIDE UP facing up and the wires inside the battery compartment. 4. Align the cover flat against the battery compartment, then slide it towards the center of the handset until it clicks into place. 5. Charge the handset by placing it in the telephone base or charger. The CHARGE light is on when the handset charges. Make, answer and end a call Using the handset: Make a call 1. Press , , or . 2. Enter the telephone number. Predial a call 1. Enter the telephone number.� 2. Press , or . Answer a call Press or to answer. End a call Press OFF or return the handset to the telephone base to hang up. Using the telephone base: Make a call 1. Press LINE 1 or LINE 2. 2. Enter the telephone number. Predial a call 1. Enter the telephone number. 2. Press LINE 1 or LINE 2. Answer a call Press LINE 1 or LINE 2 to answer. End a call Press LINE 1 or LINE 2. Telephone base Connect the clear telephone line cord to jack labeled LINE 1/L1+L2. Connect the black telephone line cord to jack labeled LINE 2. CHARGE light • Use only the power adapter and battery supplied with this VTech telephone. • For complete feature instructions, please refer to your user's manual. Turn the answering system on or off You must turn on the answering system for answering and recording messages. To turn on or off with the telephone base: 1. Press /ON/OFF LINE 1 and/or /ON/OFF LINE 2 to turn on the corresponding answering system. The telephone base announces and shows, "Calls will be answered." The /ON/OFF LINE 1 light and/or /ON/OFF LINE 2 light will be on respectively. 2. Press /ON/OFF LINE 1 and/or /ON/OFF LINE 2 to turn off the corresponding answering system. The telephone base announces and shows, "Calls will not be answered." The /ON/OFF LINE 1 light and/or /ON/OFF LINE 2 light will be off respectively. To turn on or off with a handset: 1. Press the MENU softkey when the handset is not in use. 2. Press the SELECT softkey to select ANSWERING SYS. 3. Press or to select Mailbox 1 or Mailbox 2, then press the SELECT softkey. The corresponding icon, 1 or 2, flashes on the screen. 4. Press or to select Ans sys setup, then press the SELECT softkey. 5. Press or to select Answer ON/OFF, then press the SELECT softkey. 6. Press or to select On or Off, then press the SET softkey to confirm your setting or press the BACK softkey to exit to the previous menu without making any changes. 7. The screen displays or AnS1 ON AnS ON2 when the answering system of line 1 or line 2 is turned on respectively. The screen displays AnS1 ON2 when the answering systems of both lines 1 and 2 are turned on.
-
 1
1 -
 2
2
 |
 |
