Vtech DigiArt Creative Easel Pink User Manual - Page 6
Step 3, Step 4, Chalkboard/dry-erase, Board, Supplies Tray B.
 |
View all Vtech DigiArt Creative Easel Pink manuals
Add to My Manuals
Save this manual to your list of manuals |
Page 6 highlights
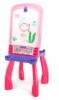
ASSEMBLY INSTRUCTIONS Step 3: Tighten the center screw by pushing it in and turning it clockwise to fix it in position. Step 4: Insert two LEGS into part A2 of the CHALKBOARD/DRY-ERASE BOARD (A) and two LEGS into the bottom of the SUPPLIES TRAY (B). The LEGS will lock into place. 6
-
 1
1 -
 2
2 -
 3
3 -
 4
4 -
 5
5 -
 6
6 -
 7
7 -
 8
8 -
 9
9 -
 10
10 -
 11
11 -
 12
12 -
13
-
14
-
15
-
16
-
17
 |
 |

6
Step 3:
Tighten the center screw by pushing it in and turning it clockwise to fix
it in position.
Step 4:
Insert two
LEGS
into part
A2
of the
CHALKBOARD/DRY-ERASE
BOARD
(A)
and two
LEGS
into the bottom of the
SUPPLIES TRAY (B).
The
LEGS
will lock into place.
ASSEMBLY INSTRUCTIONS