Vtech Go Go Smart Wheels Ultimate Amazement Park Playset Kohls Exclusive User - Page 13
Finish the Assembly
 |
View all Vtech Go Go Smart Wheels Ultimate Amazement Park Playset Kohls Exclusive manuals
Add to My Manuals
Save this manual to your list of manuals |
Page 13 highlights
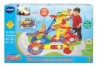
5. Finish the Assembly Insert the rocking platform, mini ramp track, flip-down platform and the electronic pit stop into the holes on the tower as shown until you hear them click into place. Insert the start piece into the slot on the top of the launcher and place the last short curved track at the end of the loop base. Finally, attach the flipping board to the gate, then insert the gate into the slots on the long curved track. ASSEMBLY INSTRUCTIONS Once you've completed the above steps, you are ready to play! Using the included track pieces, you can configure the Go! Go! Smart Wheels® Ultimate Amazement Park™ in different ways! You can also connect these track pieces to other Go! Go! Smart Wheels®, Go! Go! Smart Animals® and select Go! Go! Smart Friends® playsets. (Each sold separately.) For optimal performance, please play with your Ultimate Amazement Park Playset™ on a sturdy and smooth surface. 12
-
 1
1 -
2
-
3
-
4
-
5
-
6
-
7
-
 8
8 -
 9
9 -
 10
10 -
 11
11 -
 12
12 -
 13
13 -
 14
14 -
 15
15 -
 16
16 -
 17
17 -
 18
18 -
19
-
20
-
21
-
22
-
23
-
24
 |
 |
