Vtech Sunny Face Smart Gym User Manual - Page 5
Assembly Instructions - equipment
 |
View all Vtech Sunny Face Smart Gym manuals
Add to My Manuals
Save this manual to your list of manuals |
Page 5 highlights
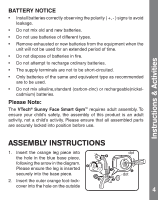
Instructions & Activities BATTERY NOTICE • Install batteries correctly observing the polarity ( +, - ) signs to avoid leakage. • Do not mix old and new batteries. • Do not use batteries of different types. • Remove exhausted or new batteries from the equipment when the unit will not be used for an extended period of time. • Do not dispose of batteries in fire. • Do not attempt to recharge ordinary batteries. • The supply terminals are not to be short-circuited. • Only batteries of the same and equivalent type as recommended are to be used. • Do not mix alkaline,standard (carbon-zinc) or rechargeable(nickelcadmium) batteries. Please Note: The VTech® Sunny Face Smart Gym™ requires adult assembly. To ensure your child's safety, the assembly of this product is an adult activity, not a child's activity. Please ensure that all assembled parts are securely locked into position before use. ASSEMBLY INSTRUCTIONS 1. Insert the orange leg piece into the hole in the blue base piece, dot 6 following the arrow in the diagram. 4 Please ensure the leg is inserted securely into the base piece. 1 5 dot 2. Insert the outer orange foot-lock- 3 2 cover into the hole on the outside 4
-
 1
1 -
 2
2 -
 3
3 -
 4
4 -
 5
5 -
 6
6 -
 7
7 -
 8
8 -
 9
9 -
 10
10 -
 11
11 -
12
 |
 |
