Waring BB150S Instruction Manual - Page 2
Important - blender
 |
View all Waring BB150S manuals
Add to My Manuals
Save this manual to your list of manuals |
Page 2 highlights
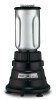
Blender One Quart Capacity Specifications • Ratings 120 VAC - 50/60Hz - Single Phase 230 VAC - 50Hz - Single Phase • Motors Permanently lubricated series-wound universal type • Timer Selective timer cycle from 1 to 180 seconds for automatic continuous running • Bases Zinc die casting with epoxy enamel finish or polished stainless steel • Containers Stainless steel, borosilicate glass, polycarbonate or san plastic • Cord 6 foot - 18 gauge - three conductor grounded cord with strain relief • UL Listed 120 models only Grounding Instructions • For your protection, Waring Commercial Blenders are equipped with a 3-conductor cordset. • 120 Volt units are supplied with a molded 3-prong grounding-type plug and should be used in combination with a properly connected grounding-type outlet If a grounding-type outlet is not available, an adapter, shown in Figure 2, may be obtained to enable a 2-slot wall outlet to be used with a 3-prong plug. Referring to Figure 3, the adapter must be grounded by attaching its grounding lug under the screw of the outlet cover plate. Caution: Before using an adapter, it must be determined that the outlet cover plate screw is properly grounded. If in doubt, consult a licensed electrician. Never use an adapter unless you are sure it is properly grounded. Note: Use of an adapter is not permitted in Canada. Green/Yellow: Earth Ground Blue: Neutral Brown: Live Operation This piece of equipment is designed for the high speed blending, pulping, mixing or reducing of animal tissue, vegetables, foodstuffs, plant materials and other substances. A typical operating sequence is as follows: 1. Add materials to be processed to container. 2. Place cover on container. 3. With the power switch on OFF position, place container on blender. Be sure container is fully seated and the drive coupling is properly engaged. 4. Set power switch to ON, Low or High position. 5. When finished processing, set power switch to OFF position. 6. Allow motor to come to a complete stop before removing container from blender. Note: Containers with removable bottoms have left-handed threads. To tighten, turn in direction of molded arrow on underside of removable bottom. When reassembling, be sure rubber gasket is positioned between the container and the flange on the blade assembly. Important HOT BLENDING INSTRUCTIONS To minimize possibility of scalding when blending hot materials, the following precautions and procedures must be observed. 1. Limit amount of material processed to 1/2 pint. 2. Completely remove the center portion of the two-piece container lid before starting motor. (This will allow venting of the rapidly heated and expanding air present inside container when blender is running.) 3. Always start blending lowest speed setting, then progress to desired speed. 4. Never stand directly over blender when it is being started or while it is running. To Operate Timer Model Only
-
 1
1 -
 2
2 -
 3
3 -
 4
4
 |
 |
