Waring WMO90 Instruction Manual - Page 9
Setting Up Your Oven
 |
View all Waring WMO90 manuals
Add to My Manuals
Save this manual to your list of manuals |
Page 9 highlights
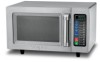
SETTING UP YOUR OVEN Remove the oven and all materials from the carton and inside the oven cavity. Your oven comes with an Instruction Manual. Please keep it for reference. C D B E A) Control Panel B) Observation Window C) Door Assembly D) Safety Interlock System E) Ceramic Surface 1 CONTROL PANEL 1) Power Keys 2) Time Entry Key 2 3) X2 Key 3 4) Stop/Reset Key 5) Start Key 4 6) Number Keys 5 7) LED Display Screen 9 A 7 6
-
 1
1 -
2
-
3
-
 4
4 -
 5
5 -
 6
6 -
 7
7 -
 8
8 -
 9
9 -
 10
10 -
 11
11 -
 12
12 -
 13
13 -
 14
14 -
15
-
16
-
17
-
18
-
19
-
20
-
21
-
22
-
23
-
24
-
25
-
26
-
27
-
28
-
29
-
30
-
31
-
32
-
33
-
34
-
35
-
36
-
37
-
38
-
39
-
40
-
41
-
42
-
43
-
44
-
45
-
46
-
47
-
48
-
49
-
50
-
51
-
52
-
53
-
54
-
55
-
56
-
57
-
58
-
59
-
60
 |
 |

9
SETTING UP YOUR OVEN
Remove the oven and all materials from the carton and inside the
oven cavity. Your oven comes with an Instruction Manual. Please
keep it for reference.
A) Control Panel
B) Observation Window
C) Door Assembly
D) Safety Interlock System
E) Ceramic Surface
CONTROL PANEL
1) Power Keys
2) Time Entry Key
3) X2 Key
4) Stop/Reset Key
5) Start Key
6) Number Keys
7) LED Display Screen
C
B
E
D
1
2
3
4
5
6
7
A