Waring WW250BX Instruction Manual - Page 4
Tips For Making Perfect Belgian Waffles, Instructions For Use
 |
View all Waring WW250BX manuals
Add to My Manuals
Save this manual to your list of manuals |
Page 4 highlights
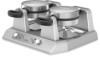
INSTRUCTIONS FOR USE 1. Before using your Waring® Commercial Waf e Maker for the rst time, remove any dust from shipping by wiping the plates with a damp cloth. Remove all protective paper and wrapping. 2. Plug cord into 120V AC, 20 Amp (NEMA 5-20) wall outlet (for WW250X) or 208V AC wall outlet (for WW250BX & WW300BX). Each waf e unit works independently. You can use one at a time or both at the same time. Switch the toggle switch or switches to the ON position. The red light(s) will go on to signal power. The waf e unit(s) will now begin the preheating process. This should take about 3-4 minutes. Each unit will sound 6 beeps and the green indicator light(s) will go on to signal the unit is ready for baking. Season the waf e grids by spraying with cooking spray or brushing with a avorless oil. For initial use, it is important that the waffle maker is preheated before seasoning with cooking spray or oil. NOTE: The first time you use your waffle maker, it may have a slight odor and may smoke a bit. This is normal, and common to heating appliances. 3. Preheat your Waring® Commercial Waf e Maker on setting #4 or preferred setting (green indicator lights will be illuminated when preheated). For best results, do not open waf e maker during cooking process. Doing so will interfere with the timing mechanism. 4. Fill measuring cup to Belgian Waf e ll line (top line on batter cup) marking or to top of measuring cup, depending on the recipe. (For loose batters, ll to the ll line; for thicker batters, ll to the top) and pour batter evenly into the center of the waf e grids. Use a heat-proof spatula to spread the batter evenly over the grids. Close the lid and rotate the unit 180° to the right. 5. When the waf e is completely baked, the waf e maker will sound 3 beeps. Baking time is determined by browning level. Choose a setting on the browning control dial. For golden brown waf es, we recommend using setting #4. 6. Once the waf e(s) are ready and the waf e maker has beeped 3 times, rotate the waf e maker 180° to the left, open the lid and remove waf e(s) by gently loosening the edges with a heatproof plastic spatula. Never use metal utensils, as they may damage the nonstick coating. 6 17wc027935_ww250x_bx_ww300bx_ib_final.indd 6-7 7. For WW300BX, 1 or 2 waf es can be baked at a time on a unit. For one waf e, follow previous instructions. For two waf es at once, pour batter onto the top grid, then rotate 180°. You will now be able to open the other grid. Pour batter onto the grid and rotate another 180° in the other direction. Both waf es will now bake. There are individual green ready lights that will illuminate when each waf e is ready. 8. Always disconnect the plug from the wall outlet, once baking has been completed. NOTE: Thermal protection - If power is lost during operation, unplug and let coll down for 10 minutes. Plug in and continue use. TIPS FOR MAKING PERFECT BELGIAN WAFFLES We recommend setting #4 when using commercial pancake/waf e mixes. We recommend setting #4 for Belgian waf e recipes. If you prefer crisper, darker Belgian waf es, increase the browning control. For evenly lled waf es, pour the batter into the center of the lower grid and spread out evenly to the edges. The entire lower grid should be lled. For best results, we recommend using the Belgian waf e ll line (top line on batter cup) on the batter cup or use enough batter to ll the entire lower grid. For added convenience while baking waf es, hang measuring scoop on bowl with handle hanging on outside of bowl and scoop on inside of bowl until the next baking cycle. To measure our, stir the our rst to aerate it, since it settles when it sits. Then spoon it into a measuring cup, leveling off the top with the back of a knife - do not pack down into measuring cup. These quick steps will help you avoid heavy waf es. Belgian waf es taste best when made to order, but baked Belgian waf es may be kept warm in a 200˚F oven. Place in a baking pan or wrap in foil while in the oven. Waf es wrapped in foil may lose their crispness. Baked waf es may be frozen. Allow to cool completely, and then place in plastic food storage bag. Use waxed paper to keep waf es separated. Reheat in an oven, toaster or toaster oven when ready to use. 7 5/2/17 2:17 PM
-
 1
1 -
 2
2 -
 3
3 -
 4
4 -
 5
5 -
 6
6 -
 7
7 -
 8
8 -
 9
9 -
 10
10 -
11
-
12
-
13
-
14
-
15
 |
 |
