Weber Ducane Affinity S5400 NG Owner Manual - Page 21
Helpful Hints
 |
View all Weber Ducane Affinity S5400 NG manuals
Add to My Manuals
Save this manual to your list of manuals |
Page 21 highlights
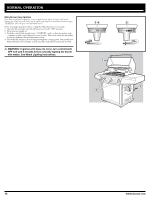
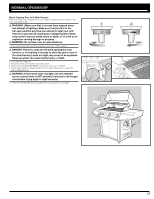
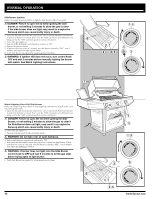
HELPFUL HINTS ƽ WARNING: Setup the rotisserie with food before lighting Rotisserie Burner. Operating the Rotisserie 1. Remove rotisserie shaft from grill. 2. Loosen and remove right side bearing, the counterbalance and right side spit fork. 3. Push the rotisserie shaft through the center of the food. 4. Slide the right side spit fork back onto the shaft. Insert the tines of both spit forks into the food. The food should be centered on the shaft. Tighten spit fork thumb screws. 5. Place left side bearing (welded in place) groove into the left side spit rod mount cutout. 6. Place the right side bearing onto the spit rod and insert the pointed end of the spit rod into the rotisserie motor. 7. Line up both the groove on the right side bearing with the right side spit rod mount cut-out, and slide the motor over the motor mounting bracket flange and push down. Note: The thumbscrew is only tightened when the rotisserie is not in use. Do not tighten the thumbscrew when using so that the spit rod can rotate freely. 8. The rotisserie shaft should rotate so that the heavy side of the meat or poultry rotates down to the bottom. Large cuts of meat may require the removal of the cook grates to allow full rotation of the spit rod. Note: Remount the food and/or use the counterbalance if necessary for better balance on the spit rod. The counterbalance can be mounted after Step 5 above. 9. Plug the motor in and turn it on. 10.Follow Lighting Instructions. Cooking with the Rotisserie • When using the rotisserie, the lid must be closed except when basting. • Meats (except poultry and ground meat) should be brought to room temperature before cooking. (20 to 30 minutes should be adequate for most foods. If frozen defrost completely before cooking.) • Tie meat or poultry with a string, if necessary, to make the shape as uniform as possible before putting it on the spit. • Remove cooking grates and warming rack to allow food to turn freely. • Follow Lighting Instructions for Rotisserie Burner under Lighting Your Grill section. • Set Rotisserie Burner on "med-high" based on outside air temperatures. • Place food within area of burner. • If you wish to save drippings for gravy, place a drip pan directly under the food on top of the heat distribution plates. • Food preparation steps are the same for rotisserie cooking as for regular cooking. NOTE: When using the Rotisserie Burner, grill thermometer will not reflect the temperature inside the cooking box. Flare Ups Any time you cook fatty foods over an open flame, you can expect flare ups. Flare ups are caused by the flash which occurs when the natural juices fall on the heat distribution plates. Controlled flare ups give foods their delicious outdoor flavor and appearance. Excessive flare ups may occur when your grill is not level or when cooking fatty foods such as spare ribs and chicken parts, especially if the cooking temperature is set too high. These flare ups should be controlled or your food will burn, although it will not burn nearly as much as you might think even in the direct flame. ƽ WARNING: Do not spray or pour any liquid into the cooking box to control flare ups. Doing so will void your warranty and may damage the grill. To help control flare ups, we suggest using leaner cuts of meats and trimming excess fat from the meats to be grilled. Also, your grill should be level. If flare ups do occur, use the "Low" control setting and relocate the meat on the cooking grid until the flare ups have subsided. 1. To prevent food from sticking to the grid, preheat the cooking surface with the hood down for 10 minutes. Place the meat product on the grid and allow it to remain there for at least half of the suggested grilling time. 2. It is unnecessary to keep flipping meat products- allow them to sear and seal in their juices, then halfway through the cooking period, with a spatula, flip the meat product onto its other side. When grilling chicken, always place the meat side on the grill first. 3. A light coating of oil applied to any of the meat products prior to grilling will also help. The use of a commercial spray cooking product is also helpful. This spray should only be used prior to lighting your grill but never during the cooking period. Use of spray cooking product can leave a black stain on areas of your cook grate. This is not harmful and does not affect cooking; however, if this becomes an appearance problem, the best way to remove the discoloration is by placing the cook grate in a self-cleaning oven during the clean cycle. When Using the Rotisserie ƽ WARNING: The rotisserie motor must be stored indoors when not in use. Do not leave it mounted on the grill. 1. When using the rotisserie, the hood must be closed except when basting. 2. Important: Always light rotisserie burner with the hood in the full open position. 3. It is important to evenly balance the meat on the spit rod. This can be difficult especially with a turkey. Proper balancing will lead to more even cooking and prolong the life of the rotisserie motor. 4. Pliers may be used to tighten thumb screws on meat forks when larger cuts of meat are being rotissed. 5. Use twine to secure the meat on the spit rod, especially fowl or other cuts of meat that require tying. Rotisserie Bracket (Motor Bracket Side) When mounting the spit rod motor onto the motor bracket (right side burner box), the ears of the motor bracket must be fully inserted into the spit motor slots. Accomplish this by sliding the spit motor down to the stops of the spit motor bracket. The spit rod should not be making surface contact with the slot in the spit motor bracket. See Assembly Guide for more information. Shelf/Shelves Do not use shelf or shelves as a cutting board. Clean with soap and water. Moving Portable Grills When your grill is not in use and you wish to relocate it, we recommend you push the grill by the side shelf. ƽ CAUTION: If your grill is portable and you are using a gas tank, make sure you turn the appliance control knobs first, and then the gas supply tank. On permanent installations, it is strongly recommended that the inline field installed cutoff valve also be turned off when the grill is not in use. Storing Natural Gas Grills After you have finished cooking and have cleaned your grill, (see Maintenance section - for cleaning), turn your grill off at your appliance control knob. It is strongly recommended that the inline field installed cutoff valve also be turned off when the grill is not in use. When the portable grill is to be stored indoors, the connection between the hose and the gas supply line must be broken. While the special fitting will stop the gas flow when the hose connection is removed, it is highly recommended you turn the gas supply off prior to disconnecting the hose assembly. To protect the gas fitting, it is necessary to insert the plastic plug (supplied with 10' hose package) into the female quick connect. The male end of the hose must be protected by placing the plastic cap (supplied with 10' hose package) over the brass fitting on the end of the hose. Gas Valve Orifice ƽ WARNING: Any alteration made to the orifice(s) such as drilling it out, will void your warranty and may result in serious bodily injury or death, or in a fire or an explosion causing damage to property. 21
-
 1
1 -
2
-
3
-
4
-
5
-
6
-
7
-
8
-
9
-
10
-
11
-
12
-
13
-
14
-
15
-
 16
16 -
 17
17 -
 18
18 -
 19
19 -
 20
20 -
 21
21 -
 22
22 -
 23
23 -
 24
24 -
 25
25 -
 26
26 -
27
-
28
-
29
-
30
-
31
-
32
-
33
-
34
-
35
-
36
-
37
-
38
-
39
-
40
-
41
-
42
-
43
-
44
-
45
-
46
-
47
-
48
-
49
-
50
-
51
-
52
-
53
-
54
-
55
-
56
-
57
-
58
-
59
-
60
-
61
-
62
-
63
-
64
 |
 |
