Weider Pro 255 L Bench English Manual - Page 7
Insert the two Pad Tubes 10 into the Front Leg - press
 |
View all Weider Pro 255 L Bench manuals
Add to My Manuals
Save this manual to your list of manuals |
Page 7 highlights
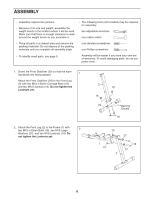
3. Orient the Rear Leg (3) as shown. Attach the Rear Stabilizer (4) to the Rear Leg (3) with two M10 x 63mm Carriage Bolts (18) and two M10 Locknuts (19). Do not tighten the Locknuts yet. 3 18 4. Attach the Rear Leg (3) to the Frame (1) with two M10 x 20mm Bolts (25) and two M10 4 Washers (20). See steps 1-3. Tighten the M10 Locknuts (19). 4 19 19 3 3 1 20 20 25 25 5. Insert the two Pad Tubes (10) into the Front Leg (2). 5 Wet the ends of the Pad Tubes (10) with soapy water, and slide two Foam Pads (9) onto each Pad Tube. Then, press a Pad Cap (11) into each Foam Pad (9). 10 9 10 11 9 11 9 11 2 7
-
 1
1 -
 2
2 -
 3
3 -
 4
4 -
 5
5 -
 6
6 -
 7
7 -
 8
8 -
 9
9 -
 10
10 -
 11
11 -
 12
12
 |
 |

7
3.
Orient the Rear Leg (3) as shown.
Attach the Rear Stabilizer (4) to the Rear Leg
(3) with two M10 x 63mm Carriage Bolts (18)
and two M10 Locknuts (19).
Do not tighten the
Locknuts yet.
4.
Attach the Rear Leg (3) to the Frame (1) with
two M10 x 20mm Bolts (25) and two M10
Washers (20).
See steps 1–3. Tighten the M10 Locknuts
(19).
3
19
19
4
18
3
4
20
20
25
25
3
1
5.
Insert the two Pad Tubes (10) into the Front Leg
(2).
Wet the ends of the Pad Tubes (10) with soapy
water, and slide two Foam Pads (9) onto each
Pad Tube.
Then, press a Pad Cap (11) into each Foam
Pad (9).
2
9
11
11
10
10
11
9
9
5