Weider Pro 256 Bench User Manual - Page 11
Warning
 |
View all Weider Pro 256 Bench manuals
Add to My Manuals
Save this manual to your list of manuals |
Page 11 highlights
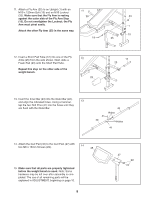
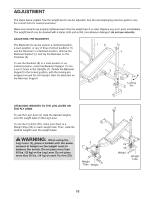
ATTACHING WEIGHTS TO THE BARBELL Slide the same amount of Weight (38, 44) onto both ends of the barbell. Slide the two Lock Collars (42) against the Weights, and tighten them fully. WARNING: Always secure Weights (38, 44) on the barbell with the Lock Collars (42). Never use the barbell with more than 100 lbs. (45 kg). 38 44 42 Barbell 38 44 42 ATTACHING THE CURL PAD For some exercises, the Curl Pad (45) must be attached to the weight bench. First, remove the 30mm Square Inner Cap (22) from the Front Leg (8). Next, insert the Curl Post (27) into the Front Leg, and align an adjustment hole in the Curl Post with the adjustment hole in the Front Leg. Then, secure the Curl Post with the Curl Knob (31). When the Curl Pad (45) is not being used, store it away from the weight bench, and insert the 30mm Square Inner Cap (22) into the Front Leg (8). 45 27 Hole 22 31 Adjustment Hole 8 11
-
 1
1 -
2
-
3
-
4
-
5
-
 6
6 -
 7
7 -
 8
8 -
 9
9 -
 10
10 -
 11
11 -
 12
12 -
 13
13 -
 14
14 -
 15
15 -
 16
16
 |
 |
