Weslo Cadence 70 Treadmill Uk Manual - Page 7
Attach the Latch Housing 46 to the Left Upright 47
 |
View all Weslo Cadence 70 Treadmill manuals
Add to My Manuals
Save this manual to your list of manuals |
Page 7 highlights
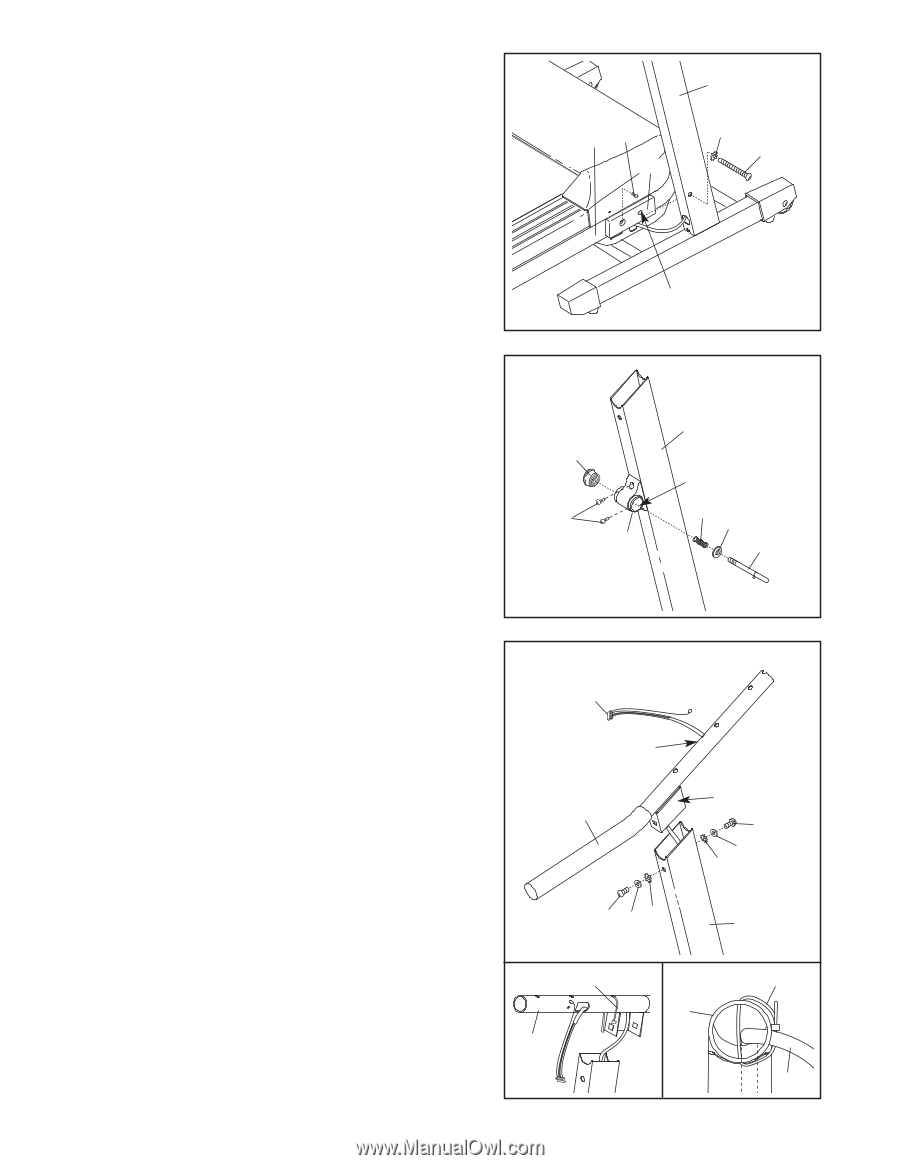
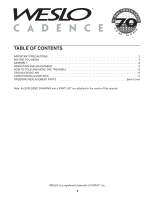
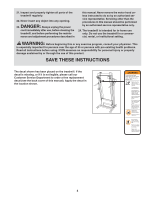
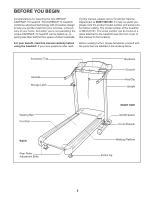
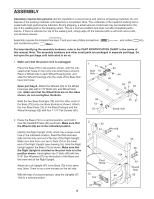
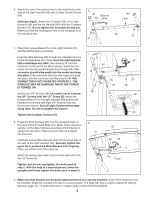
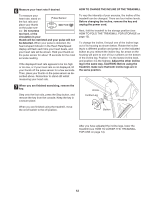
3. Open part bag B. Hold an Upright Spacer (59) against 3 one side of the Frame (96) as shown. Insert a 3 1/2" Bolt (54) into the indicated hole in the Upright Spacer and the Frame. Next, tighten a 3/4" Tek Screw (9) into the Upright Spacer and the Frame. Remove the 3 1/2" Bolt. Repeat on the other side of the Frame. Have a second person lift the front end of the Frame (96). Insert a 3 1/2" Bolt (54) with a 3/8" Star Washer (55) into the Right Upright (104) and the right Upright Spacer (59), and tighten the Bolt into the Frame. Do not overtighten the Bolt. Repeat on the left side of the Frame. 96 9 59 104 55 54 Hole 4. Attach the Latch Housing (46) to the Left Upright (47) with two 3/4" Screws (38). Make sure that the large hole in the Latch Housing is on the side shown. Remove the Latch Knob (48) from the Latch Pin (52). Make sure that the Latch Pin Collar (49) and the Spring (50) are on the Latch Pin. Insert the Latch Pin into the Latch Housing (46), and then tighten the Latch Knob back onto the Latch Pin. 4 48 38 46 47 Large Hole 50 49 52 5. Feed the Wire Harness (65) up into the bracket on one of 5 the Handrails (40) and out of the large hole in the left side. (Note: It may be helpful to use needlenose pliers to pull the Wire Harness out of the hole.) Remove any plas- tic ties from the bracket. Insert the bracket on the Handrail (40) into the upper end of the Right Upright (104). Attach the Handrail with two 1" Bolts (43), two 1/4" Washers (44), and two 1/4" Star Washers (45) as shown. Do not tighten the Bolts yet. See drawing 5a. Insert the included nylon tie through the indicated hole in the Handrail (40). 65 Large Hole 40 Bracket 43 44 45 See drawing 5b. Look into the Handrail (40) and make sure that the Wire Harness (65) is secured to the side shown. Tighten the nylon tie and cut the excess off the end. Attach the other Handrail (not shown) in the same way. Note: There is not a wire harness on the other side. 43 44 45 104 5a Tie 5b Tie 40 40 65 7
-
 1
1 -
 2
2 -
 3
3 -
 4
4 -
 5
5 -
 6
6 -
 7
7 -
 8
8 -
 9
9 -
 10
10 -
 11
11 -
 12
12 -
13
-
14
-
15
-
16
-
17
-
18
-
19
-
20
-
21
-
22
-
23
 |
 |