Weslo Cadence 930 English Manual - Page 8
OOO OOO, while, operating, RIPMF9R, tralnir, pones, mocked, control, reduce, console..
 |
View all Weslo Cadence 930 manuals
Add to My Manuals
Save this manual to your list of manuals |
Page 8 highlights
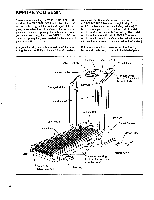
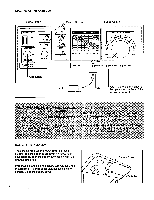
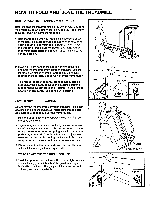
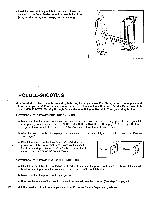
DIAGRAM OF THE CONSOLE Incline Button Monitor Displays Speed Control PCWER INCLINE /-\ V THUMB PULSE DISTANCE • rt I CALOR Pews lomm iv Imola Soler WELD ON/RESET SPM HEART RATE TRAINING ZONES 'MCCl Of= MGM 0MIMI OO it41O O -i,..-144,04.V I 1Auk kriw iiiiiiiiiiiii C=Not: WE OOO OO ACM • OOO OOO D.O Aga 20 30 40 50 60 70 so SPEED TRAINING ZONES 1 1.')934 0 SLOW RESET FAST POWER • OPERATION 0 INSERT KEY 0 RESIT SPUD 0 UT SPUD Pulse Sensor Clip Key Note: If there is a thin sheet of clear plastic on the face of the console, remove it. MTN Ile,rea star !ore9 yp e:co owing POcau ng belt w trclurnmg Always wear thi li see drawing POPY.P while operating' he'treadmill When the key is: oved from, sole .eiwa :tieltif0 dlust the speed RIPMF9R The:tralnir g pones mocked control are,:general u el nes 1o'r1b6 See a - 14 and 15 for,tnae.fP gr To , reduce t.he poss ibility Ott et sht the.conSOW r 11: console.. Use.only hseal04...waterbottic BATTERY INSTALLATION The console requires two "AA" batteries (not included); alkaline batteries are recommended. To install batteries, open the battery cover as shown in the drawing at the right. Press two batteries into the battery compartment, with the negative (-) ends of the batteries touching the springs. Close the battery cover. 8 Battery Cover Batteries
-
 1
1 -
2
-
 3
3 -
 4
4 -
 5
5 -
 6
6 -
 7
7 -
 8
8 -
 9
9 -
 10
10 -
 11
11 -
 12
12 -
 13
13 -
14
-
15
-
16
-
17
-
18
 |
 |
