Weslo Momentum 700 English Manual - Page 6
Assembly - front stabilizer
 |
View all Weslo Momentum 700 manuals
Add to My Manuals
Save this manual to your list of manuals |
Page 6 highlights
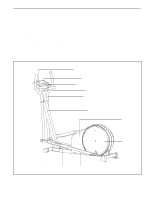
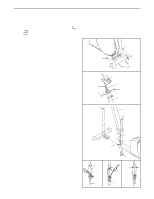
ASSEMBLY Assembly requires two people. Place all parts of the elliptical in a cleared area and remove the packing materials. Do not dispose of the packing materials until assembly is completed. Assembly requires a phillips screwdriver mallet . , two adjustable wrenches , and a rubber 1. Attach the Rear Stabilizer (33) to the Frame (1) with 1 two M10 x 75mm Carriage Bolts (47) and two M10 Nylon Locknuts (29). 29 29 1 33 2. Hold the Console Bracket (45) near the Upright (3) 2 and insert the Resistance Cable (26) down through the Upright. Feed the Extension Wire (62) up through the Console Bracket. Attach the Console Bracket (45) to the Upright (3) with two M6 x 16mm Button Screws (54) and two M6 Split Washers (38). Make sure not to pinch the Resistance Cable (26) or the Extension Wire (62). 26 54 38 47 45 62 54 38 3 3. Making sure that the Reed Switch Wire (25) and the Resistance Cable (58) are in the indicated slot in the 3 29 3 Frame (1), slide the Front Stabilizer (34) into the Frame. Do not allow the Wire or the Cable to get pinched. 29 While a second person holds the Upright (3) near the Frame (1), connect the Reed Switch Wire (25) to the Extension Wire (62). Next, connect the Resistance Cable (26) to the Lower Cable (58) in the following way: • Refer to drawing A. Pull up on the metal bracket, and insert the tip of the Resistance Cable (26) into the wire clip on the Lower Cable (58) as shown. 62 26 25 58 34 • Refer to drawing B. Firmly pull the Resistance Cable (26) and slide it into the metal bracket on the Lower Cable (58) as shown. Slot 1 • Refer to drawing C. Using pliers, squeeze the prongs on the upper end of the metal bracket together. A 60 B C Pull any slack Resistance Cable (26) out of the top of the Upright (3). Attach the Upright to the Front Stabilizer (34) with two M10 Nylon Locknuts (29). Attach the Upright to the Frame (1) with two M10 x 68mm Carriage Bolts (60) and two M10 Nylon Locknuts (29). Metal Bracket 26 58 Metal 26 Bracket 58 6
-
 1
1 -
 2
2 -
 3
3 -
 4
4 -
 5
5 -
 6
6 -
 7
7 -
 8
8 -
 9
9 -
 10
10 -
 11
11 -
 12
12 -
13
-
14
-
15
-
16
 |
 |
