WestBend 56901TL Instruction Manual - Page 3
Save These Instructions
 |
View all WestBend 56901TL manuals
Add to My Manuals
Save this manual to your list of manuals |
Page 3 highlights
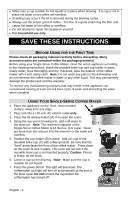
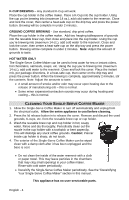
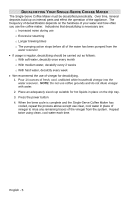
• Make sure a cup suitable for hot liquids is in place when brewing. If a cup is not in place hot water or hot coffee will overflow. • Scalding may occur if the lid is removed during the brewing cycles. • Always use the proper grind of coffee. Too fine of a grind could clog the filter and cause hot water or hot coffee to overflow. • Do not attempt to repair this appliance yourself. • For household use only. SAVE THESE INSTRUCTIONS BEFORE USING FOR THE FIRST TIME Please check all packaging material carefully before discarding. Many accessory parts are contained within the packaging material. Before using your Single-Serve Coffee Maker, clean the entire appliance according to the cleaning instructions. Wash the reusable brew cup and cup holder in warm, soapy water, rinse thoroughly and dry. If desired, wipe the exterior of the coffee maker with a soft, damp cloth. Note: Do not wash any parts in the dishwasher and do not immerse the coffee maker in water or any other liquid. This may permanently damage the product and void the warranty. To remove any manufacturing residues that may reside in the appliance, we recommend running at least one full brew cycle of water and discarding the water when complete. USING YOUR SINGLE-SERVE COFFEE MAKER 1. Place the appliance on dry, level, heat-resistant A surface, away from any edge. 2. Plug cord into a 120-volt, AC electric outlet only. 3. Press the lid release button (A) in to open the cover. 4. Using the cup you're brewing into, add cold water to the reservoir. Note: The maximum capacity of the Single-Serve Coffee Maker is 14 fluid oz. (1¾ cups). Never B put more than this amount into the reservoir or the water will overflow. 5. Position the cup holder (B) in place. Add a K-cup or the reusable brew cup (C) with coffee grounds. Be sure that the "front" arrow faces the front of the coffee maker. Press down on the cover to lock in place. The cover will not lock if the reusable brew cup is not inserted properly. Caution: Piercer is sharp, do not touch. 6. Center a cup on the drip tray. Note: Make sure the cup is C suitable for hot liquids. 7. Press the power button. The light will illuminate. The coffeemaker and light will turn off automatically at the end of the brew cycle. Do not remove the cup before the coffeemaker has turned off. English - 3
-
 1
1 -
 2
2 -
 3
3 -
 4
4 -
 5
5 -
 6
6 -
 7
7 -
 8
8 -
 9
9 -
10
-
11
-
12
-
13
-
14
-
15
-
16
-
17
-
18
-
19
-
20
 |
 |
