WestBend IT500L Instruction Manual - Page 4
Using Your Iced Tea Maker
 |
View all WestBend IT500L manuals
Add to My Manuals
Save this manual to your list of manuals |
Page 4 highlights
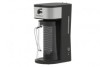
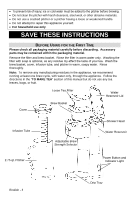
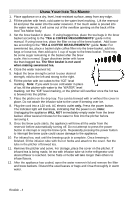
USING YOUR ICED TEA MAKER 1. Place appliance on a dry, level, heat-resistant surface, away from any edge. 2. Fill the pitcher with fresh, cold water to the water level marking. Lift the reservoir lid and pour the water into the water reservoir. If too much water is poured into the water reservoir, it will come out of the overflow opening on the back of the Iced Tea Maker body. 3. Set the brew basket in place. If using bagged tea, place the tea bags in the brew basket according to the "TEA & COFFEE MEASUREMENTS" guide in this manual. If using loose tea, place the filter on top of the brew basket. Add loose tea according to the "TEA & COFFEE MEASUREMENTS" guide. Note: For sweetened tea, place a basket-style coffee filter into the brew basket, add tea bags or loose tea, then add up to 1 cup of sugar to the brew basket. There may be some sugar remaining in the basket after the brew cycle, this is normal. Sugar dissolves better with loose tea than bagged tea. The filter basket is not used when making sweetened tea. 4. Close the water reservoir lid. 5. Adjust the brew strength control to your desired strength, mild to the left and strong to the right. 6. Fill the pitcher with ice cubes to the "ICE" level marking. Note: If you want to use cold water in place of ice, fill the pitcher with water to the "WATER" level marking, not the "ICE" level marking, or the pitcher will overflow once the hot tea is brewed into the pitcher. 7. Place the pitcher on the drip tray. Tea can be brewed with or without the cover in place. Do not attach the infusion tube to the cover if brewing over ice. 8. Plug the cord into a 120 volt, AC electric outlet only. Press the power button. The indicator light will illuminate, indicating that the power is on. Note: Unplugging the appliance WILL NOT immediately empty water from the brew basket. Allow several minutes for the water to flow into the pitcher before removing it. 9. Once the brew cycle starts, the appliance will brew all the water from the reservoir before automatically turning off. Do not attempt to press the power button to interrupt or stop the brew cycle. Repeatedly pressing the power button to interrupt the brew cycle could cause damage to the appliance. 10. For infused tea, wait until the brewing cycle is complete. Once brewing is finished, fill the infusion tube with fruit or herbs and attach to the cover. Set the tube in the pitcher of brewed tea. 11. Remove the pitcher and serve. For storage, place the cover on the pitcher. If infused tea is being made, let tea with infusion tube sit in the refrigerator until desired flavor is reached. Some fruits or herbs will take longer than others to infuse flavors. 12. After the appliance has cooled, open the water reservoir lid and remove the filter and brew baskets. Discard the used leaves or bags and rinse thoroughly in warm water. English - 4
-
 1
1 -
 2
2 -
 3
3 -
 4
4 -
 5
5 -
 6
6 -
 7
7 -
 8
8 -
 9
9 -
 10
10 -
11
-
12
-
13
-
14
-
15
-
16
-
17
-
18
-
19
-
20
-
21
-
22
-
23
-
24
 |
 |
