WestBend NS1000 Instruction Manual - Page 6
Juicer, Setup
 |
View all WestBend NS1000 manuals
Add to My Manuals
Save this manual to your list of manuals |
Page 6 highlights
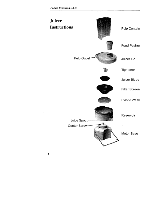
Nutri Sources Juicer Setup & Use 1. Place the motor base on a flat table or counter. Be sure the base is dry and clean, with no residue on the surface. 2. Place the reservoir on the motor base and align the three tabs with recesses on the motor base. 3. Place the plastic washer over the center screw. 4. Place the filter screen over the center screw and align with the rectangular hole. 5. Place the juicer blade onto the center screw and tighten it with the tightener (be sure to remove the tightener). 6. Place the juicer lid onto the reservoir. 7. Using both hands, pull up the handle so that it aligns with the recesses on the sides of the lid. 8. Place the pulp container below the large pulp outlet on the back of the juicer. 9. Place a container below the juice spout at the front. 10. Turn the motor switch to on. 11. After running the motor for at least 10 seconds, slowly add fruit & vegetables through the opening on the top of the juicer lid. Use the food pusher to push small pieces down to the juicer blade. 12. Before shutting off the motor, juice all fruit or vegetables still in the juicing area. Soft or over-ripe fruit tends to clog the juicer. If this happens, simply stop and clean the motor base, reservoir, screen, and blade, then resume juicing. IMPORTANT: Never put fingers or utensils into the opening on the top of the juicer lid.Always use the food pusher.
-
 1
1 -
 2
2 -
 3
3 -
 4
4 -
 5
5 -
 6
6 -
 7
7 -
 8
8 -
 9
9
 |
 |
