Western Digital My Book Live User Manual - Page 42
Creating Drive Settings, Using Windows 8 File History, File History
 |
View all Western Digital My Book Live manuals
Add to My Manuals
Save this manual to your list of manuals |
Page 42 highlights
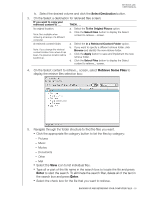
MY BOOK LIVE USER MANUAL Setting the Preferences (Auto Update) Option When enabled, each time you reconnect your My Book Live drive to your network, the Preferences option checks for software updates. This ensures that you are always using the most recent software version. To enable or disable the Preferences option: 1. On the Software Settings screen, click the Preferences button to display the Set Preferences screen: 2. Select or clear the Automatically check for WD SmartWare software updates check box to enable or disable the Preferences option. If selected, WD SmartWare links you to the WD web page where the download is available. Creating Drive Settings Click the Set Up Drive button to open WD Quick View Dashboard for details on how to manage your My Book Live drive settings. (See "Using the My Book Live Dashboard" on page 54.) Using Windows 8 File History If you choose not to use WD SmartWare software for backing up files to the My Book Live device, you can use File History. File History File History automatically backs up media files, documents, email, and other personal files to your My Book Live drive. If you lose files or your system crashes, you can easily restore the files to your PC. For more information on Windows 8 File History, consult Microsoft's documentation. Windows 8 File History 1. From the Start Menu, click Desktop 2. In the Toolbar, click File Explorer. 3. Select Computer. 4. In the Ribbon (top of page) select Computer>Open Control Panel. 5. Under System and Security, select Save backup copies of your files with File History. 6. On the File History screen, ensure that File History is On. If File History is Off, click the Turn On button. 7. In the right panel, select Select Drive. File History will detect your My Book Live device and list it in the Select a File History drive list. BACKING UP AND RETRIEVING YOUR COMPUTER FILES - 37
-
 1
1 -
2
-
3
-
4
-
5
-
6
-
7
-
8
-
9
-
10
-
11
-
12
-
13
-
14
-
15
-
16
-
17
-
18
-
19
-
20
-
21
-
22
-
23
-
24
-
25
-
26
-
27
-
28
-
29
-
30
-
31
-
32
-
33
-
34
-
35
-
36
-
 37
37 -
 38
38 -
 39
39 -
 40
40 -
 41
41 -
 42
42 -
 43
43 -
 44
44 -
 45
45 -
 46
46 -
 47
47 -
48
-
49
-
50
-
51
-
52
-
53
-
54
-
55
-
56
-
57
-
58
-
59
-
60
-
61
-
62
-
63
-
64
-
65
-
66
-
67
-
68
-
69
-
70
-
71
-
72
-
73
-
74
-
75
-
76
-
77
-
78
-
79
-
80
-
81
-
82
-
83
-
84
-
85
-
86
-
87
-
88
-
89
-
90
-
91
-
92
-
93
-
94
-
95
-
96
-
97
-
98
-
99
-
100
-
101
-
102
-
103
-
104
-
105
-
106
-
107
-
108
-
109
-
110
-
111
-
112
-
113
-
114
-
115
-
116
-
117
-
118
-
119
-
120
-
121
-
122
-
123
-
124
-
125
-
126
-
127
-
128
-
129
-
130
-
131
-
132
-
133
-
134
-
135
-
136
-
137
-
138
-
139
-
140
-
141
-
142
-
143
-
144
-
145
-
146
 |
 |
