Western Digital My Passport Essential SE User Manual - Page 13
Continue to Settings, WD SmartWare, Install WD SmartWare, Continue, Install
 |
View all Western Digital My Passport Essential SE manuals
Add to My Manuals
Save this manual to your list of manuals |
Page 13 highlights
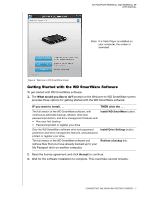
MY PASSPORT ESSENTIAL AND ESSENTIAL SE USER MANUAL 4. After the software installation completes: IF you clicked . . . at step 1, THEN the WD SmartWare software displays . . . Install WD SmartWare The initial Backup screen for performing your first backup (see Figure 5 on page 9). Here you can either: • Run your first backup-See "Backing Up Your Computer Files" on page 15 before clicking Start Backup and then proceed to step 5. • Skip the backup for now and display the WD SmartWare initial Drive Settings screen (Figure 6 on page 10)-See "Password Protecting the Drive" on page 26 and "Registering the Drive" on page 35 before clicking Skip Backup and then skip to step 6. Note: In this case, the WD SmartWare initial Drive Settings screen includes a Return to Backup button for returning to the initial Backup screen. Install Drive Settings The drive management initial Drive Settings screen for securing and registering your drive (Figure 6 on page 10). a. See: • "Password Protecting the Drive" on page 26 • "Registering the Drive" on page 35 b. Skip to step 7 on page 9. Retrieve a backup The WD SmartWare Home screen for accessing all WD SmartWare functions: a. See Figure 7 on page 10 and "Retrieving Backed Up Files" on page 22. b. This completes the getting started procedure after selecting Retrieve a backup. Note: The initial Backup and Drive Settings screens only appear one time-the first time you install the WD SmartWare software on your computer. After that, launching the software displays the Home screen so you can choose what you want to do. 5. After running your first backup: a. Click Continue to Settings to display the WD SmartWare initial Drive Settings Screen screen (Figure 6 on page 10). b. See "Password Protecting the Drive" on page 26 and "Registering the Drive" on page 35 before clicking Continue to display the WD SmartWare Home screen (Figure 7 on page 10). This completes the getting started procedure after selecting Install WD SmartWare and running your first backup. 6. After password protecting or registering your drive, click Continue to close the WD SmartWare initial Drive Settings screen and display the WD SmartWare Home Screen (Figure 7 on page 10). This completes the getting started procedure after selecting Install WD SmartWare CONNECTING THE DRIVE AND GETTING STARTED - 8
-
 1
1 -
2
-
3
-
4
-
5
-
6
-
7
-
 8
8 -
 9
9 -
 10
10 -
 11
11 -
 12
12 -
 13
13 -
 14
14 -
 15
15 -
 16
16 -
 17
17 -
 18
18 -
19
-
20
-
21
-
22
-
23
-
24
-
25
-
26
-
27
-
28
-
29
-
30
-
31
-
32
-
33
-
34
-
35
-
36
-
37
-
38
-
39
-
40
-
41
-
42
-
43
-
44
-
45
-
46
-
47
-
48
-
49
-
50
-
51
-
52
-
53
-
54
-
55
-
56
-
57
-
58
-
59
-
60
-
61
-
62
-
63
-
64
-
65
-
66
-
67
-
68
-
69
-
70
-
71
-
72
-
73
-
74
-
75
 |
 |
