Western Digital WD1600B008 User Manual (pdf) - Page 13
Connecting the Cables, Powering Up the Drive
 |
View all Western Digital WD1600B008 manuals
Add to My Manuals
Save this manual to your list of manuals |
Page 13 highlights
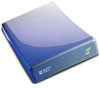
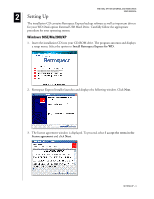
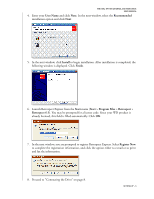
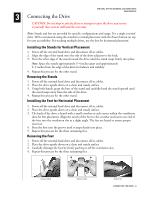
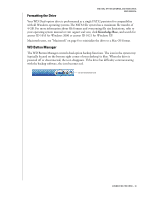
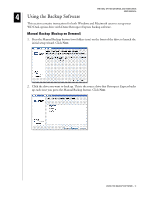
Connecting the Cables WD DUAL-OPTION EXTERNAL USB HARD DRIVE USER MANUAL 1. Connect the AC adapter cord to the DC power supply socket on the back of the drive. 2. Connect one end of the power cord to the AC adapter. 3. Connect the other end of the power cord to an electrical outlet. 4. Connect one end of the USB 2.0 cable to the USB 2.0 port on the back of the drive. 5. Connect the other end of the USB 2.0 cable to an available USB port on your computer. KENSINGTON® SECURITY LOCK CONNECTION DC POWER SUPPLY SOCKET USB 2.0 PORT USB 2.0 CABLE AC ADAPTER CORD USB 2.0 CABLE TO USB 2.0 PORT ON COMPUTER BUTTONS POWER/SAFE SHUTDOWN™ MANUAL BACKUP (TWO FOLDERS ICON) AUTOMATIC BACKUP (CLOCK ICON) Note: Depending on your system configuration, your computer may attempt to boot from your WD Dual-option drive. Refer to your system's motherboard BIOS setting documentation to disable this feature or visit support.wdc.com, click Knowledge Base, and search for answer ID 1201. For more information about booting from external drives, refer to your system documentation or contact your system manufacturer. Powering Up the Drive Press the Power button to turn on the drive. Your operating system automatically detects the external USB drive. The area surrounding the Power button illuminates blue and flashes to indicate drive activity. A new hard drive icon appears in the My Computer window for PC users or on the desktop for Mac users. Your drive is preformatted as a single FAT32 partition and is now ready to use. NEW HARD DRIVE ICON CONNECTING THE DRIVE - 9
-
 1
1 -
2
-
3
-
4
-
5
-
6
-
7
-
 8
8 -
 9
9 -
 10
10 -
 11
11 -
 12
12 -
 13
13 -
 14
14 -
 15
15 -
 16
16 -
 17
17 -
 18
18 -
19
-
20
-
21
-
22
-
23
-
24
-
25
-
26
-
27
-
28
-
29
-
30
 |
 |