Western Digital WD1600B015 Quick Install Guide (pdf) - Page 3
Using the 8-in-1 Memory Card Reader Media Center, Using the Backup Software - manual
 |
View all Western Digital WD1600B015 manuals
Add to My Manuals
Save this manual to your list of manuals |
Page 3 highlights
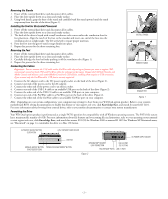
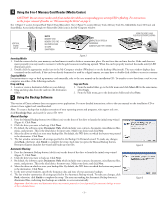
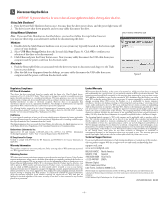
4 Using the 8-in-1 Memory Card Reader (Media Center) CAUTION: Do not remove media cards from media slots while a corresponding green activity LED is flashing. For instructions on the proper removal of media, see "Disconnecting the Drive" on page 4. Slot 1 (Figure 3) accepts CompactFlash Types I/II and Microdrive. Slot 2 (Figure 3) accepts Memory Stick, Memory Stick Pro, MultiMedia Card, SD Card, and SmartMedia. Access media through two Removable Disks icons in the My Computer window. VERTICAL STAND SETUP SLOT 2 MEMORY STICK MEMORY STICK PRO MULTIMEDIA CARD SD CARD SMARTMEDIA SLOT 1 COMPACTFLASH TYPES I/II MICRODRIVE (COMPACTFLASH TYPE I SHOWN) USING THE USB 2.0 HUB (USB FLASH PEN DRIVE SHOWN) Figure 3 Inserting Media 1. Find the correct slot for your memory card and insert it until it clicks or secures into place. Do not force the card into the slot. If the card does not insert properly, you may need to re-insert it with the gold connector end facing upward. When the card is properly inserted, the media activity LED illuminates green. 2. Double-click the appropriate media icon in the My Computer window (Windows) or on the desktop (Macintosh). The next window displays data contained on the card/stick. If the card was directly formatted or used by a digital camera, you may have to double-click a folder to access its contents. Copying Media For instructions to copy or back up memory cards manually, refer to the user manual on the installation CD. To transfer or save data from a card to your computer, use either of the following methods: Drag and Drop Copy and Paste 1. Locate or create a destination folder on your desktop. 1. From the media folder, go to the Edit menu and click Select All. In the same menu, 2. Drag and drop data from the card into the destination select Copy. folder. 2. From the Edit menu, go to the destination folder and select Paste. 5 Using the Backup Software This version of Dantz software does not support server applications. For more detailed instructions, refer to the user manual on the installation CD or obtain it from support.wdc.com/download. Note: To create a backup that includes restoration of your operating system and programs, visit support.wdc.com, click Knowledge Base, and search for answer ID 1270 Manual Backup 1. Press the Manual Backup button (two folders icon) on the front of the drive to launch the initial setup wizard (Figure 4). Click Next. 2. Click the drive you want to back up. Click Next. 3. By default, the software copies Documents Only, which includes your contacts, documents, miscellaneous files, music, and pictures. This is the ideal choice for most users. Make your choice and click Next. 4. Select the drive on which to store your backup files. By default, the WD drive on which the button was pressed is the destination. Click Next. 5. The last window summarizes all settings specified in the Backup On Demand wizard. To make any changes, click Back, otherwise, click Finish to complete the setup. Each time you press the Manual Backup button, Retrospect Express launches the wizard and backs up your files. Figure 4 Automatic Backup 1. Press the Automatic Backup button (clock icon) on the front of the drive to launch the initial setup wizard (Figure 5). Click Next. 2. Click the drive you want to back up. Click Next. 3. By default, the software copies Documents Only, which includes your contacts, documents, miscellaneous files, music, and pictures. This is the ideal choice for most users. Make your choice and click Next. 4. Select the drive on which to store your backup files. By default, the WD drive on which the button was pressed is the destination. Click Next. 5. In the next several windows, specify the frequency, day, and time of your automatic backups. 6. The last window summarizes all settings specified in the Automatic Backup wizard. To make any changes, click Back; otherwise, click Finish to complete the setup. The area surrounding the Automatic Backup button is illuminated blue, indicating that backups are schedule to occur automatically. Figure 5 Important: Both the source and destination drives must remain powered on (not sleep mode) for automatic backups to occur at their scheduled times. - 3 -
-
 1
1 -
 2
2 -
 3
3 -
 4
4
 |
 |