Western Digital WD307AA User Manual (pdf) - Page 12
Con the System BIOS
 |
View all Western Digital WD307AA manuals
Add to My Manuals
Save this manual to your list of manuals |
Page 12 highlights
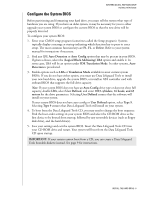
WESTERN DIGITAL EIDE HARD DRIVE INSTALLATION GUIDE Configure the System BIOS Before partitioning and formatting your hard drive, you must tell the system what type of hardware you are using. If you have an older system, it may be necessary for you to either upgrade your system BIOS or configure the current BIOS so that the new drive will be properly detected. To configure your system BIOS: 1. Enter your CMOS setup program (sometimes called the Setup program). Systems typically display a message at startup indicating which function key to press to enter setup. The most common function keys are F1, F2, or Delete. Refer to your system manual for instructions if necessary. 2. Find any IDE Auto Detection or Auto Config option that may be present in your BIOS. If given a choice, select the (Logical Block Addressing) LBA option and enable it. In some cases, LBA will be an option under IDE Translation Mode. In other systems, Auto Detection is preselected. 3. Enable options such as LBA or Translation Mode available in most current system BIOSs. If you do not have either option, you must use Data Lifeguard Tools to install your new hard drive, upgrade the system BIOS, or install an ATA controller card with onboard BIOS that supports the full drive capacity. Note: If your system BIOS does not have an Auto Config drive type or does not show full capacity, disable LBA, select User Defined, and enter 1023 cylinders, 16 heads, and 63 sectors for the drive parameters. Selecting User Defined ensures that the software will install on your system. If your system BIOS does not have auto config or User Defined option, select Type 9. Selecting Type 9 ensures that Data Lifeguard Tools will install on your system. 4. To boot from the Data Lifeguard Tools CD, you may need to change the boot sequence. Find the boot order settings in your system BIOS and select the CD-ROM drive as the first device to be booted from startup, followed by any removable devices (such as floppy disk drive), and the hard drive(s). 5. Save your settings and exit the system BIOS. Insert the Data Lifeguard Tools CD into your CD-ROM drive and restart. Your system will boot from the Data Lifeguard Tools CD upon startup. IMPORTANT: If your system cannot boot from a CD, you can create a Data Lifeguard Tools bootable diskette instead. See page 9 for instructions. INSTALL THE HARD DRIVE - 8
-
 1
1 -
2
-
3
-
4
-
5
-
6
-
 7
7 -
 8
8 -
 9
9 -
 10
10 -
 11
11 -
 12
12 -
 13
13 -
 14
14 -
 15
15 -
 16
16 -
 17
17 -
18
-
19
-
20
-
21
-
22
-
23
-
24
-
25
-
26
-
27
-
28
-
29
-
30
-
31
-
32
-
33
-
34
-
35
-
36
 |
 |