Western Digital WD800B015 Quick Install Guide (pdf) - Page 2
Formatting the Drive, Removing the Stands, Installing the Feet for Horizontal Placement, Removing - power cable
 |
View all Western Digital WD800B015 manuals
Add to My Manuals
Save this manual to your list of manuals |
Page 2 highlights
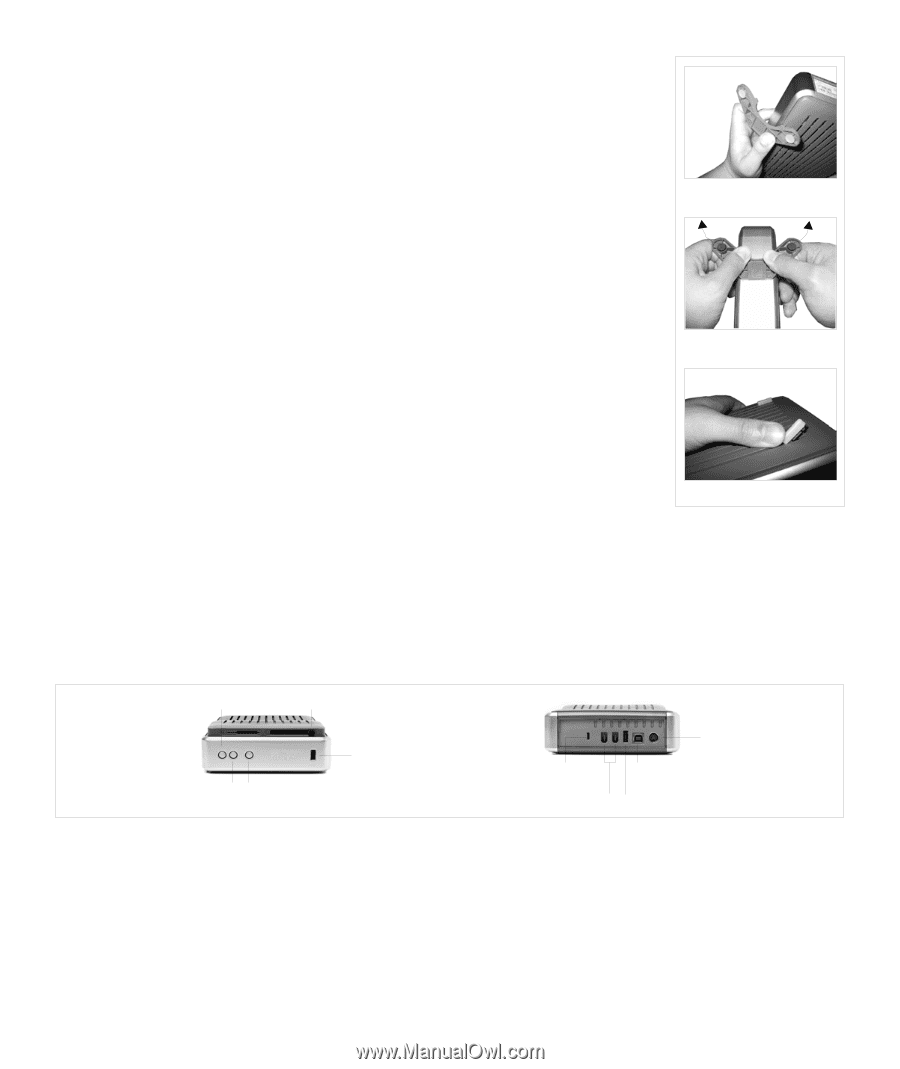
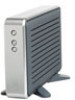
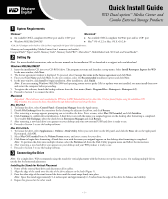
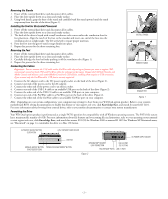
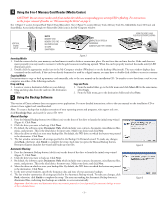
Removing the Stands 1. Power off the external hard drive and disconnect all its cables. 2. Place the drive upside down on a clean and steady surface. 3. Using both hands, grasp the base of the stand and carefully bend the stand upward until the stand snaps away from the side of the drive (Figure 1). Installing the Feet for Horizontal Placement 1. Power off the external hard drive and disconnect all its cables. 2. Place the drive upside down on a clean and steady surface. 3. The back of the drive is keyed with a small crossbar at each corner within the ventilation slots for feet placement. Align the notch of the foot to the crossbar and insert one end of the foot into the ventilation slot at a slight angle. The feet are keyed to ensure proper insertion. 4. Press the foot into the groove until it snaps firmly into place. 5. Repeat this process for the three remaining feet. INSTALL STANDS Removing the Feet 1. Power off the external hard drive and disconnect all its cables. 2. Place the drive upside down on a clean and steady surface. 3. Carefully dislodge the foot by firmly pushing it off the ventilation slot (Figure 1). 4. Repeat this process for the three remaining feet. Connecting the Cables Important: You can connect the USB cable and/or FireWire cable depending on features you want to support. WD recommends connecting both USB and FireWire cables for optimum performance. Because the USB hub (Combo and Media Center) and memory card reader (Media Center) are USB devices, enabling them requires a USB connection. If you connect only the FireWire cable, USB devices are not supported. REMOVE STANDS 1. Connect the AC adapter cord to the DC power supply socket on the back of the drive (Figure 2). 2. Connect one end of the power cord to the AC adapter. 3. Connect the other end of the power cord to an electric outlet. 4. Connect one end of the USB 2.0 cable to an available USB port on the back of the drive (Figure 2). 5. Connect the other end of the USB 2.0 cable to an available USB port on your computer. 6. Connect one end of the FireWire cable to a FireWire port on the back of the drive (Figure 2). 7. Connect the other end of the FireWire cable to an available FireWire port on your computer. REMOVE FEET Figure 1 Note: Depending on your system configuration, your computer may attempt to boot from your WD Dual-option product. Refer to your system's motherboard BIOS setting documentation to disable this feature or visit support.wdc.com, click Knowledge Base, and search for answer ID 1201. For more information about booting from external drives, refer to your system documentation or contact your system manufacturer. Formatting the Drive Your WD Dual-option product is preformatted as a single FAT32 partition for compatibility with all Windows operating systems. The FAT32 file system has a maximum file transfer of 4 GB. For more information about file formats and overcoming file size limitations, refer to your operating system manual or visit support.wdc.com, click Knowledge Base, and search for answer ID 1053 for Windows 2000 or answer ID 1021 for Windows XP. Macintosh users, see "Macintosh" on page 1 to reinitialize the drive to a Mac OS format. AUTOMATIC BACKUP BUTTON (CLOCK ICON) 8-IN-1 MEMORY CARD READER USB HUB MANUAL BACKUP BUTTON POWER/SAFE SHUTDOWN™ BUTTON (TWO FOLDERS ICON) KENSINGTON® SECURITY LOCK CONNECTION USB 2.0 PORT (TO SYSTEM) TWO FIREWIRE PORTS USB 2.0 PORT Figure 2 DC POWER SUPPLY SOCKET - 2 -
-
 1
1 -
 2
2 -
 3
3 -
 4
4
 |
 |