Western Digital WDBAAF6400EBK User Manual - Page 12
On Windows XP with AutoRun AutoPlay disabled, click to open the My Book, the Welcome - drivers
 |
View all Western Digital WDBAAF6400EBK manuals
Add to My Manuals
Save this manual to your list of manuals |
Page 12 highlights
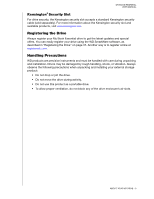
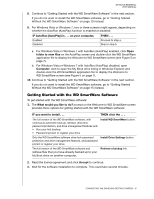
MY BOOK ESSENTIAL USER MANUAL Note: If you have reformatted the drive for use on a Mac computer, skip the rest of this procedure and see "Connecting the Drive and Getting Started" on page 44 instead. 4. Verify that the new My Book drive appears under My Computer in Windows Explorer. 5. If a Found New Hardware screen appears, click Cancel to close it. The WD SmartWare software that is on the drive installs the proper driver for your My Book drive. 6. Several different screens might also appear, depending on your computer's operating system: IF your operating system is . . . THEN . . . Windows XP Windows Vista or Windows 7 Proceed to step 7. Skip to step 9 on page 8. 7. For Windows XP, one or two screens might appear, depending on whether the AutoRun (AutoPlay) function is enabled or disabled: IF AutoRun (AutoPlay) is . . . on your computer, THEN . . . Enabled Disabled Proceed to step a. Skip to step b. a. On Windows XP with AutoRun (AutoPlay) enabled, the Welcome to WD SmartWare screen displays (see Figure 5). b. On Windows XP with AutoRun (AutoPlay) disabled, click to open the My Book drive listing in Windows Explorer and double-click the WD SmartWare application file to display the Welcome to WD SmartWare screen (see Figure 5). Note: If a Flash Player is installed on your computer, the screen is animated. Figure 5. Welcome to WD SmartWare Screen CONNECTING THE DRIVE AND GETTING STARTED - 7
-
 1
1 -
2
-
3
-
4
-
5
-
6
-
 7
7 -
 8
8 -
 9
9 -
 10
10 -
 11
11 -
 12
12 -
 13
13 -
 14
14 -
 15
15 -
 16
16 -
 17
17 -
18
-
19
-
20
-
21
-
22
-
23
-
24
-
25
-
26
-
27
-
28
-
29
-
30
-
31
-
32
-
33
-
34
-
35
-
36
-
37
-
38
-
39
-
40
-
41
-
42
-
43
-
44
-
45
-
46
-
47
-
48
-
49
-
50
-
51
-
52
-
53
-
54
-
55
-
56
-
57
-
58
-
59
-
60
-
61
-
62
-
63
-
64
-
65
-
66
-
67
-
68
-
69
-
70
-
71
-
72
-
73
-
74
-
75
-
76
-
77
-
78
 |
 |