Western Digital WDBACB0020HBK User Manual - Page 11
Expand the Network with Additional WD Livewire Devices, Connect the Network Devices and Computers
 |
View all Western Digital WDBACB0020HBK manuals
Add to My Manuals
Save this manual to your list of manuals |
Page 11 highlights
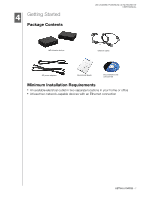
Installation Procedures WD LIVEWIRE POWERLINE AV NETWORK KIT USER MANUAL Important: Plug the devices directly into a wall socket. Do not plug the devices into a power strip, surge protector, or similar power extension. Connect the Network Devices and Computers 1. Connect the power cables to the power jacks on each device, then plug the opposite ends into AC power outlets in separate locations (one location must be close to your modem or router). 2. Be sure that the power switch on each device is set to the On position. The power LED on both devices illuminates. Location 1 Location 2 3. Connect your router (with modem and other devices/computers connected) and up to three more devices or computers to the Ethernet ports in one location. 4. Connect up to four more devices or computers in the other location. 5. Make sure the power switch on all powerline devices is set to ON. 6. See "Sharing Internet Access on the Livewire Network" on page 4 and "Sample Livewire Home Network" on page 5 for possible configurations. Expand the Network with Additional WD Livewire Devices Note: WD Livewire devices can be added to an existing powerline network with one or more non-WD devices if the devices are HomePlug Alliance AV Certified. Go to www.homeplug.org for further information. Connect a power cable to each device, then plug the opposite end into an AC power outlet in the desired location. The power LED illuminates on each additional device. Press the Sync button on ALL devices (WD Livewire and other powerline adapters) within 2 minutes of installation to join an existing powerline network that includes other manufacturers' Homeplug Alliance AV certified devices. GETTING STARTED - 8
-
 1
1 -
2
-
3
-
4
-
5
-
 6
6 -
 7
7 -
 8
8 -
 9
9 -
 10
10 -
 11
11 -
 12
12 -
 13
13 -
 14
14 -
 15
15 -
 16
16 -
17
-
18
-
19
-
20
-
21
-
22
-
23
-
24
-
25
-
26
 |
 |
