Western Digital WDBHDK5000ABK User Manual - Page 16
Important, Volume, HFS+J, ExFAT, I understand, Con
 |
View all Western Digital WDBHDK5000ABK manuals
Add to My Manuals
Save this manual to your list of manuals |
Page 16 highlights
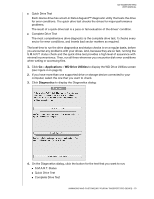
MY PASSPORT PRO USER MANUAL 5. On the volume dialog: a. If you want to change the name of a volume, type over the name in the Volume Name box. b. If you are converting to individual drives, select the option to specify the file format for each volume: HFS+J ExFAT Note: If you want to use an individual drive as a backup disk with Time Machine, then you must select the HFS+J format option for it. Time Machine does not work with exFAT-formatted drives. c. Read the warning about the loss of data when you change the device configuration and select the I understand check box to signify that you accept the risk and activate the Configure button: Important: If you want to save any of the data that is on the device drives, back it up to another storage device before continuing with the configuration change. d. Click Configure. 6. When prompted, type your password and click OK to continue: 7. During the configuration change, the WD Drive Utilities software: Displays a status bar to show the progress of the conversion Clears and then redisplays the Finder listing and desktop icon display to support the new device mode MANAGING AND CUSTOMIZING YOUR MY PASSPORT PRO DEVICE - 13
-
 1
1 -
2
-
3
-
4
-
5
-
6
-
7
-
8
-
9
-
10
-
 11
11 -
 12
12 -
 13
13 -
 14
14 -
 15
15 -
 16
16 -
 17
17 -
 18
18 -
 19
19 -
 20
20 -
 21
21 -
22
-
23
-
24
-
25
-
26
-
27
-
28
 |
 |
