Western Digital WDXC1200JB Quick Install Guide (pdf) - Page 1
Western Digital WDXC1200JB - Combo Manual
 |
View all Western Digital WDXC1200JB manuals
Add to My Manuals
Save this manual to your list of manuals |
Page 1 highlights
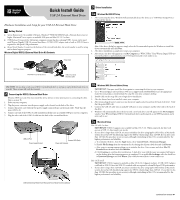
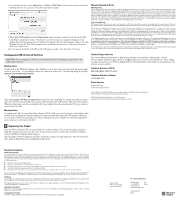
Quick Install Guide USB 2.0 External Hard Drive 3 Driver Installation 3a Windows Me/2000/XP Setup 1. After connecting the drive, Windows will automatically detect the device as a "USB Mass Storage Device" and install the drivers. Hardware Installation and Setup for your USB 2.0 External Hard Drive 1 Getting Started System Requirements: An available USB port, Windows® 98SE/Me/2000/XP, and a Pentium II processor or higher. Macintosh® users require an available USB port and Mac OS 9.2.2 or later. USB Backward Compatibility: All current computer systems that have existing USB 1.1 ports can be used with Western Digital's USB 2.0 external hard drive. A USB 2.0 PCI adapter card or built-in USB 2.0 host is required for Hi-Speed USB performance. Record Serial Number: Located on the bottom of the external hard drive, the serial number is used for setup and technical support purposes. Western Digital USB 2.0 External Hard Drive Kit Contents Note: If the above dialog box appears, simply select the Recommended option for Windows to install the drivers automatically and click Next. 2. After driver installation is completed, restart your computer. 3. After restart, the drive will appear in your My Computer as "WDC USB2." Your Western Digital USB 2.0 external hard drive is preformatted as one FAT32 partition and is now ready to use. Power Cord AC Power Supply 7200 RPM External Hard Drive USB 2.0 Certified Interface Cable CAUTION: Do not drop or jolt your USB 2.0 external hard drive or attempt to open the drive and service it yourself. These actions will void the warranty. 2 Connecting the USB 2.0 External Hard Drive Windows 98SE users only: You must install the device drivers on your system prior to connecting the drive. Skip to section 3b. 1. Power on your computer. 2. Plug the power connector into the power supply socket located on the back of the drive. 3. Connect the power cord (with the AC power supply connected) into an electrical outlet. Verify that the power LED is lit. 4. Connect one end of the USB 2.0 cable (included in the kit) into an available USB port on your computer. 5. Plug the other end of the USB 2.0 cable into the back of the external hard drive. 3b Windows 98SE (Second Edition) Setup IMPORTANT: You must install the drivers prior to connecting the drive to your computer. 1. Go to Western Digital's software library Web site at support.wdc.com/download, locate the appropriate model for your product, and download the setup file onto your computer desktop. 2. Double-click on the setup file icon to begin driver installation. 3. After the drivers have been installed, restart your computer. 4. After restart, plug the power connector into the power supply socket located on the back of the drive. Verify that the power LED is lit. 5. Connect the USB 2.0 cable into an available USB port on your computer and the other end to the back of the drive. 6. Windows will automatically detect the device and a new hard drive icon will appear in the My Computer window. Your Western Digital USB 2.0 external hard drive is preformatted as one FAT32 partition and is now ready to use. USB 2.0 Port Power Supply Socket Access LED (Red) Power LED (Green) 3c Macintosh Setup Mac OS v9.2.2 or later IMPORTANT: USB 2.0 support is not available on Mac OS v9.2.2. When connected, the drive will operate at USB 1.1 data transfer rate speeds. 1. If your drive is larger than 128 GB, you must reinitialize the drive using Apple's Disk Utility as Macintosh systems do not have 48-bit addressing support for FAT32 volumes larger than 128 GB. If your drive is less than 128 GB, this procedure is not necessary, although reinitializing in Mac OS is recommended for the highest performance and reliability. a. To reinitialize the drive, from the Apple menu, select Control Panels > Extensions Manager. b. Disable File Exchange from the extensions list by clearing the adjacent check box and click Restart. c. After restart, a message appears asking you to initialize the drive. Enter a name and select Mac OS Extended from the menu and click Initialize. d. Click Continue to confirm drive initialization. A hard drive icon with the name you assigned will appear on the desktop after the formatting process is completed. To re-enable File Exchange, select the check box in Extensions Manager and click Restart. Your newly formatted drive is now ready to use. Mac OS X v10.X IMPORTANT: USB 2.0 support is available on Mac OS X v10.2 (Jaguar) and later. A USB 2.0 PCI adapter card/built-in USB 2.0 host and USB 2.0 certified cable are required to obtain Hi-Speed USB performance. 1. If your drive is larger than 128 GB, you must reinitialize the drive using Apple's Disk Utility as Macintosh systems do not have 48-bit addressing support for FAT32 volumes larger than 128 GB. If your drive is less than 128 GB, this procedure is not necessary, although reinitializing in Mac OS is recommended for the highest performance and reliability. USB 2.0 External Hard Drive Rear and Front Panel with Installation continued on reverse
-
 1
1 -
 2
2
 |
 |
