Westinghouse DPF-1411 User Manual - Page 3
Quick Start - manual
 |
UPC - 882777014110
View all Westinghouse DPF-1411 manuals
Add to My Manuals
Save this manual to your list of manuals |
Page 3 highlights
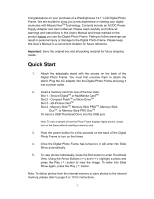
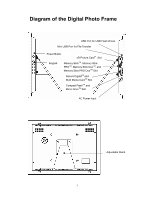
Congratulations on your purchase of a Westinghouse 14.1" LCD Digital Photo Frame. We are excited to bring you a new experience in viewing your digital memories with MosaicViewTM Technology. Contents include an AC/DC Power Supply Adapter and User's Manual. Please read carefully and follow all warnings and instructions in this User's Manual and those marked on the product before you use the Digital Photo Frame. Failing to follow warnings can result in personal injury or damage to the Digital Photo Frame. Please keep this User's Manual in a convenient location for future reference. Important: Save the original box and all packing material for future shipping needs. Quick Start 1. Attach the adjustable stand with the screws on the back of the Digital Photo Frame. You must first unscrew them to attach the stand. Plug the AC adapter into the Digital Photo Frame and plug it into a power outlet. 2. Insert a memory card into one of the four slots: Slot 1 - Secure DigitalTM or MultiMedia CardTM Slot 2 - Compact FlashTM or Micro DriveTM Slot 3 - xD-Picture CardTM Slot 4 - Memory StickTM, Memory Stick PROTM, Memory Stick DuoTM, or Memory Stick PRO DuoTM Or insert a USB Thumbnail Drive into the USB port. Note: To view a sample of how the Photo Frame displays digital photos, simply turn on the frame without inserting a memory card. 3. Push the power button for a few seconds on the back of the Digital Photo Frame to turn on the frame. 4. Once the Digital Photo Frame has turned on, it will enter into Slide Show automatically. 5. To view photos individually, press the Exit button to enter Thumbnail View. Using the Arrow Buttons (), highlight a photo and press the Play (4) button to view the image. To enter into Slide Show again, press the Play (4) button. Note: To delete photos from the internal memory or save photos to the internal memory, please refer to page 9 or 10 for instructions. 2
-
 1
1 -
 2
2 -
 3
3 -
 4
4 -
 5
5 -
 6
6 -
 7
7 -
 8
8 -
 9
9 -
10
-
11
-
12
-
13
-
14
-
15
-
16
-
17
-
18
 |
 |