Whirlpool G9CE3675XS Installation Instructions - Page 8
Attach Cooktop to Countertop, Complete Installation
 |
UPC - 883049225609
View all Whirlpool G9CE3675XS manuals
Add to My Manuals
Save this manual to your list of manuals |
Page 8 highlights
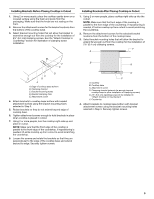
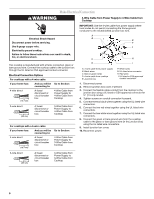
3-Wire Cable from Power Supply to 3-Wire Cable from Cooktop IMPORTANT: Use the 3-wire cable from power supply where local codes permit connecting the frame-ground conductor to the neutral (white) junction box wire: A E B F G Attach Cooktop to Countertop NOTE: This section applies only if you are using clamping brackets. G A B F E H C I D A. 3-wire cable from power supply B. Red wires C. Green or bare ground wire (from cooktop) D. 3-wire cable from cooktop E. Junction box F. White wire (from power supply) G. UL listed wire connector H. Black wires I. UL listed or CSA approved conduit connector 1. Disconnect power 2. Remove junction box cover, if present. 3. Connect the flexible cable conduit from the cooktop to the junction box using a UL listed or CSA approved conduit connector. 4. Tighten screws on conduit connector if present. 5. Connect the two black wires together using the UL listed wire connectors. 6. Connect the two red wires together using the UL listed wire connectors. 7. Connect the green or bare cooktop cable wires to the white (neutral) wire in the junction box using the UL listed wire connectors. 8. Install junction box cover. 9. Reconnect power. D C A. Glass cooktop B. Cooktop base C. Attachment screw D. Clamping bracket (extends far enough beyond cooktop base to allow installation of clamping screws) E. 2½" (6.4 cm) clamping screw F. Countertop G. Foam seal 1. Place the 2½" (6.4 cm) clamping screws into the outermost hole in the clamping bracket. 2. Use a screwdriver to tighten the screws against the countertop. Do not overtighten. Complete Installation 1. Check that all parts are now installed. If there is an extra part, go back through the steps to see which step was skipped. 2. Check that you have all your tools. 3. Dispose of/recycle all packaging materials. 4. Use a mild solution of liquid household cleaner and warm water to clean cooktop before use. Dry thoroughly with a soft cloth. For more information, see the "Cooktop Care" section of the Use and Care Guide. 5. Read the "Cooktop Use" section in the cooktop Use and Care Guide. 6. Reconnect power. NOTE: If the cooktop does not work after turning on the power, check that a circuit breaker has not tripped or a household fuse has not blown. See "Troubleshooting" section in the Use and Care Guide for further information. If you need Assistance or Service: Please reference the "Assistance or Service" section of the Use and Care Guide or contact the dealer from whom you purchased your cooktop. 8
-
 1
1 -
2
-
 3
3 -
 4
4 -
 5
5 -
 6
6 -
 7
7 -
 8
8 -
 9
9 -
 10
10 -
 11
11 -
 12
12 -
 13
13 -
14
-
15
-
16
 |
 |
