Whirlpool GBS277PDB Technical Guide - Page 47
Diagnosis & Troubleshooting
 |
View all Whirlpool GBS277PDB manuals
Add to My Manuals
Save this manual to your list of manuals |
Page 47 highlights
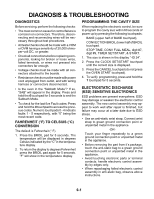
DIAGNOSIS & TROUBLESHOOTING DIAGNOSTICS Before servicing, perform the following checks: • The most common cause for control failure is corrosion on connectors. Therefore, disconnecting and reconnecting wires will be necessary throughout test procedures. • All tests/checks should be made with a VOM or DVM having a sensitivity of 20,000 ohmsper-volt DC, or greater. • Check all connections before replacing components, looking for broken or loose wires, failed terminals, or wires not pressed into connectors far enough. • Voltage checks must be made with all connectors attached to the boards. • Resistance checks must be made with power cord unplugged from outlet, and with wiring harness or connectors disconnected. • Is the oven in the "Sabbath Mode"? If so, "SAB" will appear in the display. Press and hold the 6 touchpad for 5 seconds to end the Sabbath Mode. • To check for the last five Fault codes: Press and hold the 0 touchpad to access the previous codes. Numeric touchpads 0 - 4 indicate faults 1 - 5 respectively, with "0" being the most recent code. FAHRENHEIT (°F) TO CELSIUS (°C) CONVERSION The default is Fahrenheit (° F). 1. Press the BROIL pad for 5 seconds. The temperature will be displayed in degrees Celsius indicated by the "C" in the temperature display. 2. To return the display to degrees Fahrenheit press the BROIL pad again for 5 seconds. "F" will show in the temperature display. PROGRAMMING THE CAVITY SIZE When replacing the electronic control, be sure to program the cavity size within 60 seconds of power up by pressing the following touchpads: BAKE (upper half of BAKE touchpad), CONVECTION BROIL (lower half of BROIL touchpad. STOP TIME, CONV FULL MEAL, digit #7, digit #9, TIMER SET/START, & START. 1. The size is shown in the display "-ID 24". 2. Press the CLOCK SET/START touchpad until the correct size is displayed. 3. Press the CANCEL touchpad (do not press the OVEN START touchpad). 4. To verify programming, press and hold the 1 touchpad for 5 seconds. ELECTROSTATIC DISCHARGE (ESD) SENSITIVE ELECTRONICS ESD problems are present everywhere. ESD may damage or weaken the electronic control assembly. The new control assembly may appear to work well after repair is finished, but failure may occur at a later date due to ESD stress. • Use an anti-static wrist strap. Connect wrist strap to green ground connection point or unpainted metal in the appliance -OR- Touch your finger repeatedly to a green ground connection point or unpainted metal in the appliance. • Before removing the part from it's package, touch the anti-static bag to a green ground connection point or unpainted metal in the appliance. • Avoid touching electronic parts or terminal contacts; handle electronic control assembly by edges only. • When repackaging failed electronic control assembly in anti-static bag, observe above instructions. 6-1
-
 1
1 -
2
-
3
-
4
-
5
-
6
-
7
-
8
-
9
-
10
-
11
-
12
-
13
-
14
-
15
-
16
-
17
-
18
-
19
-
20
-
21
-
22
-
23
-
24
-
25
-
26
-
27
-
28
-
29
-
30
-
31
-
32
-
33
-
34
-
35
-
36
-
37
-
38
-
39
-
40
-
41
-
 42
42 -
 43
43 -
 44
44 -
 45
45 -
 46
46 -
 47
47 -
 48
48 -
 49
49 -
 50
50 -
 51
51 -
 52
52 -
53
-
54
-
55
-
56
-
57
-
58
-
59
-
60
 |
 |