Whirlpool GT4175SPQ Installation Instructions - Page 3
Electrical Requirements, Microwave Oven Preparation, Bottom Duct Assembly, Side Duct and Upper Duct
 |
UPC - 882780528703
View all Whirlpool GT4175SPQ manuals
Add to My Manuals
Save this manual to your list of manuals |
Page 3 highlights
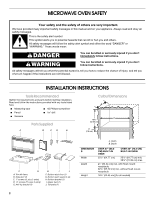
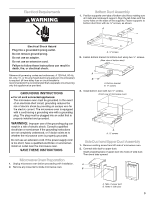
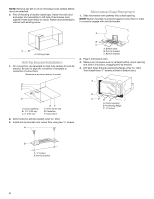
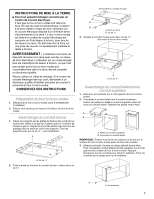
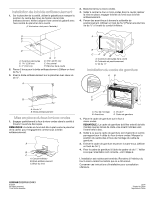
Electrical Requirements WARNING Bottom Duct Assembly 1. Position supports over tabs of bottom duct floor, making sure all 3 tabs are inside each support. Align the tab holes with the screw holes on the sides of the supports. Fasten supports to bottom duct floor with six ¹⁄₂" screws, as shown. A Electrical Shock Hazard Plug into a grounded 3 prong outlet. Do not remove ground prong. Do not use an adapter. Do not use an extension cord. Failure to follow these instructions can result in death, fire, or electrical shock. Observe all governing codes and ordinances. A 120-Volt, 60-Hz, AC-only, 15- or 20-amp fused electrical supply (or circuit breaker) is required. (A time-delay fuse or circuit breaker is recommended.) It is recommended that a separate circuit serving only this appliance be provided. GROUNDING INSTRUCTIONS s For all cord connected appliances: The microwave oven must be grounded. In the event of an electrical short circuit, grounding reduces the risk of electric shock by providing an escape wire for the electric current. The microwave oven is equipped with a cord having a grounding wire with a grounding plug. The plug must be plugged into an outlet that is properly installed and grounded. WARNING: Improper use of the grounding plug can result in a risk of electric shock. Consult a qualified electrician or serviceman if the grounding instructions are not completely understood, or if doubt exists as to whether the microwave oven is properly grounded. Do not use an extension cord. If the power supply cord is too short, have a qualified electrician or serviceman install an outlet near the microwave oven. SAVE THESE INSTRUCTIONS Microwave Oven Preparation 1. Unplug microwave oven before proceeding with installation. 2. Remove any loose items inside microwave oven. A. ¹⁄₂" screws 2. Fasten bottom bracket to bottom duct using two ¹⁄₂" screws. (Rear view of bottom duct) A B A. Bottom bracket B. ¹⁄₂" screws 3. Install bottom duct with two ¹⁄₂" screws. (Front view of microwave oven) A A. ¹⁄₂" screws Side Duct and Upper Duct Assembly 1. Remove existing screw from left side of microwave oven. 2. Connect side duct to upper duct: Insert projecting tabs of upper duct into holes of side duct. Then bend tabs upward. A B A. Tabs of upper duct B. Holes in side duct 3
-
 1
1 -
 2
2 -
 3
3 -
 4
4 -
 5
5 -
 6
6 -
 7
7 -
 8
8
 |
 |