Whirlpool GX900QPPT Owners Manual - Page 8
Raised Panel, Trimless Panel with Handle, Dimensions, Installation - washers
 |
UPC - 050946974569
View all Whirlpool GX900QPPT manuals
Add to My Manuals
Save this manual to your list of manuals |
Page 8 highlights
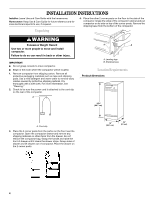
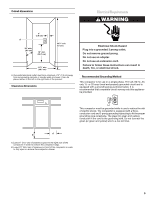
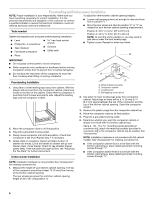
Raised Panel: The outer section of panel must be 5.6 mm) thick to fit into the trim. Use the dimensions shown when designing raised panel sections. 5.6 mm) 14⁵⁄₈" (37.2 mm) 1¹⁄₄" (32 mm) Installation 1. Remove the mounting screws attaching the foot pedal to the compactor. Remove foot pedal. A A 23 B (60.5 cm) 8 mm) both sides 8 mm) A. Raised panel or decorative trim B. Outer section of panel Trimless Panel with Handle Dimensions Use these dimensions drawings to create a custom panel for use without a trim kit. The panel should be ¹⁄₂" to 13 mm to 16 mm) thick. NOTE: A thicker panel may need rounded front corners and a cutout for access to the handle. A B A. Mounting screws B. Foot pedal 2. Remove mounting screws attaching the toe guard to the compactor. Remove toe guard. 3. Remove the mounting screws attaching the decorative panel to the compactor. Remove decorative panel and discard mounting screws. 4. Align the bottom of the custom panel with the bottom of the drawer front. 5. Secure the panel from the back using four #8 x 1" wood screws as shown. 6. Reinstall the toe guard using the existing screws and ¹⁄₂" washer. Then, reinstall the foot pedal. A B C 23 C (60.5 mm) 15" (38.1 mm) D E F A. Handle B. Custom panel C. Panel screw locations D. Toe guard E. Washer F. Toe guard screw 8
-
 1
1 -
2
-
 3
3 -
 4
4 -
 5
5 -
 6
6 -
 7
7 -
 8
8 -
 9
9 -
 10
10 -
 11
11 -
 12
12 -
 13
13 -
14
-
15
-
16
 |
 |
