Whirlpool KDRP407HSS Installation Instructions - Page 11
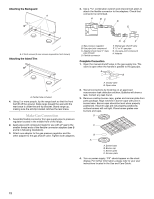
Attach Backguard or Island Trim
 |
View all Whirlpool KDRP407HSS manuals
Add to My Manuals
Save this manual to your list of manuals |
Page 11 highlights
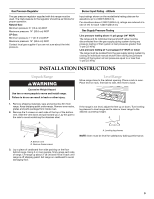
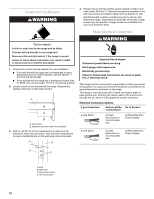
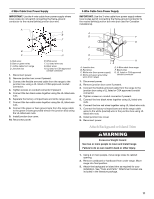
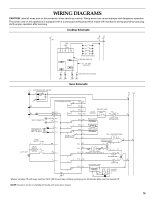
4-Wire Cable from Power Supply IMPORTANT: Use the 4-wire cable from power supply where local codes do not permit connecting the frame-ground conductor to the neutral (white) junction box wire. A D E F B G C H A. Red wires B. Bare or green wires C. 4-Wire cable from range D. Junction box E. White wires F. UL listed wire nuts G. Black wires H. UL listed or CSA approved conduit connector 1. Disconnect power. 2. Remove junction box cover if present. 3. Connect the flexible armored cable from the range to the junction box using a UL listed or CSA approved conduit connector. 4. Tighten screws on conduit connector if present. 5. Connect the two black wires together using the UL listed wire nuts. 6. Separate the factory-crimped bare and white range wires. 7. Connect the two white wires together using the UL listed wire nuts. 8. Connect the green or bare ground wire from the range cable to the green or bare grounded wire (in the junction box) using the UL listed wire nuts. 9. Install junction box cover. 10. Reconnect power. 3-Wire Cable from Power Supply IMPORTANT: Use the 3-wire cable from power supply where local codes permit connecting the frame-ground conductor to the neutral (white) junction box wire (not used for Canadian installations). A B F G C D E H A. Junction box B. Red wires C. White wire (from power supply) D. White and green grounding wires (from range) E. 4-Wire cable from range F. Black wires G. UL listed or CSA approved conduit connector 1. Disconnect power. 2. Remove junction box cover if present. 3. Connect the flexible armored cable from the range to the junction box using a UL listed or CSA approved conduit connector. 4. Tighten screws on conduit connector if present. 5. Connect the two black wires together using UL listed wire nuts. 6. Connect the two red wires together using UL listed wire nuts. 7. Connect the factory-crimped bare and white range cable wires to the white (neutral) wire in the junction box using UL listed wire nuts. 8. Install junction box cover. 9. Reconnect power. Attach Backguard or Island Trim WARNING Excessive Weight Hazard Use two or more people to move and install range. Failure to do so can result in back or other injury. 1. Using 2 or more people, move range close to cabinet opening. 2. Remove cardboard or hardboard from under range. Move range into final position. 3. Attach the backguard or island trim as required for your installation. See "Tools and Parts." Attachment screws are included in the literature package. 11
-
 1
1 -
2
-
3
-
4
-
5
-
 6
6 -
 7
7 -
 8
8 -
 9
9 -
 10
10 -
 11
11 -
 12
12 -
 13
13 -
 14
14 -
 15
15 -
 16
16 -
17
-
18
-
19
-
20
-
21
-
22
-
23
-
24
-
25
-
26
-
27
-
28
 |
 |
