Whirlpool LER8648PW Installation Instructions
Whirlpool LER8648PW Manual
 |
View all Whirlpool LER8648PW manuals
Add to My Manuals
Save this manual to your list of manuals |
Whirlpool LER8648PW manual content summary:
- Whirlpool LER8648PW | Installation Instructions - Page 1
" (73.7 CM) ELECTRIC DRYER INSTALLATION INSTRUCTIONS INSTRUCCIONES DE INSTALACIÓN PARA LA SECADORA ELÉCTRICA DE 29" (73,7 CM) Table of Contents / Índice DRYER SAFETY ...1 INSTALLATION INSTRUCTIONS ...2 Tools and Parts ...2 Location Requirements ...2 Electrical Requirements ...4 Electrical Connection - Whirlpool LER8648PW | Installation Instructions - Page 2
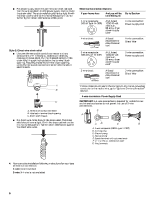
is greater than 1" [2.5 cm], install Extended Dryer Feet Kit, Part Number 279810.) Clothes may not tumble properly and models with automatic sensor cycles may not operate correctly if dryer is not level. s s Parts needed: Check local codes. Check existing electrical supply and venting and see - Whirlpool LER8648PW | Installation Instructions - Page 3
spacing allowed. s Additional spacing should be considered for ease of installation and servicing. s Dryer Dimensions 43 ³⁄₈" (110cm) 15¼" (38.74cm) 43 ³⁄₈" (110cm Title 24 CFR, Part 3280 (formerly the Federal Standard for Mobile Home Construction and Safety, Title 24, HUD Part 280). Mobile home - Whirlpool LER8648PW | Installation Instructions - Page 4
If your outlet looks like this: s s 3-wire receptacle (10-30R) Electrical Connection To properly install your dryer, you must determine the type of electrical connection you will be using and follow the instructions provided for it here. s This dryer is manufactured ready to install with a 3-wire - Whirlpool LER8648PW | Installation Instructions - Page 5
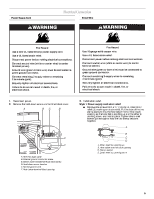
Wire WARNING WARNING Fire Hazard Use a new UL listed 30 amp power supply cord. Use a UL listed strain relief. Disconnect power before making electrical connections. Connect neutral wire (white or center wire) to center terminal (silver). Ground wire (green or bare wire) must be connected to green - Whirlpool LER8648PW | Installation Instructions - Page 6
fit with the dryer cabinet and be in a horizontal position. Do not further tighten strain relief screws at this point. Electrical Connection Options If G. Ring terminals 4. Now complete installation following instructions for your type of electrical connection: 4-wire (recommended) 3-wire (if - Whirlpool LER8648PW | Installation Instructions - Page 7
of 3-wire connections. Direct wire cable must have 5 ft (1.52 m) of extra length so dryer can be moved if needed. Strip 5" (12.7 cm) of outer covering from end of cable cover into slot of dryer rear panel. Secure cover with hold-down screw. 7. You have completed your electrical connections. Now go to - Whirlpool LER8648PW | Installation Instructions - Page 8
: Direct Wire 5. Tighten strain relief screws. 6. Insert tab of terminal block cover into slot of dryer rear panel. Secure cover with hold-down screw. 7. You have completed your electrical connections. Now go to "Venting Requirements." 3-wire connection: Power Supply Cord Use where local codes - Whirlpool LER8648PW | Installation Instructions - Page 9
electrician 4. Tighten strain relief screw. 5. Insert tab of terminal block cover into slot of dryer rear panel. Secure cover with hold-down screw. 6. You have completed your electrical connections. Now go to "Venting Requirements." 3. Connect the other wires to outer terminal block screws - Whirlpool LER8648PW | Installation Instructions - Page 10
dryer MUST BE EXHAUSTED OUTDOORS. IMPORTANT: Observe all governing codes and ordinances. The dryer heavy metal vent. Review Vent system chart. Whirlpool Parts and Accessories. For more information, see the "Assistance or Service" section of the Dryer User Instructions and supported when the dryer is - Whirlpool LER8648PW | Installation Instructions - Page 11
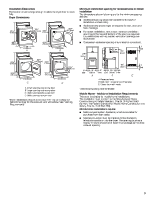
clearance alternate installations are available for purchase. Please see the "Assistance or Service" section of the Dryer User Instructions. s Over-the-Top Installation: Part Number 4396028 s B C D A E F G B H A. Dryer B. Elbow C. Wall D. Exhaust hood E. Clamps F. Rigid metal or flexible metal vent - Whirlpool LER8648PW | Installation Instructions - Page 12
a 4" (10.2 cm) clamp. 2. Move dryer into its final position. Do not crush or kink vent. 3. (On gas models) Check to be sure there are no kinks until top screws in cabinet are in large part of hinge slot. Pull door forward off screws. Set door on top of dryer. Remove top screws from cabinet. 4. Use - Whirlpool LER8648PW | Installation Instructions - Page 13
that all parts are now installed. If there is an extra part, go dryer. 8. Read "Dryer Use" in the Dryer User Instructions. 9. Wipe the dryer drum interior thoroughly with a damp cloth to remove any dust. 10. Set the dryer on a full heat Dryer is plugged into an outlet and/or electrical supply is on - Whirlpool LER8648PW | Installation Instructions - Page 14
) SEGURIDAD DE LA SECADORA Su seguridad y la seguridad de los demás es muy importante. Hemos incluido muchos mensajes importantes de seguridad en este manual y en su electrodoméstico. Lea y obedezca siempre todos los mensajes de seguridad. Este es el símbolo de advertencia de seguridad. Este símbolo - Whirlpool LER8648PW | Installation Instructions - Page 15
INSTRUCCIONES DE INSTALACIÓN Herramientas y piezas Reúna las herramientas y piezas necesarias antes de comenzar la instalación. Lea y siga las instrucciones provistas con cualquiera de las herramientas enlistadas aquí. s s s Requisitos de ubicación ADVERTENCIA Destornillador de cuchilla plana - Whirlpool LER8648PW | Installation Instructions - Page 16
molduras de la puerta y del piso. Para la instalación en clóset, con una puerta, se requieren aberturas de ventilación mínimas en la parte superior e inferior de la puerta. Se aceptan puertas tipo persianas con aberturas de ventilación equivalentes. s Proveer el suministro eléctrico requerido de - Whirlpool LER8648PW | Installation Instructions - Page 17
Conexión eléctrica Para instalar su secadora adecuadamente, usted debe determinar el tipo de conexión eléctrica que va a usar y seguir las instrucciones que aquí se proveen para el caso. s Esta secadora ha sido manufacturada lista para ser instalada en una conexión de suministro de energía eléctrica - Whirlpool LER8648PW | Installation Instructions - Page 18
Conexión eléctrica Cable de suministro eléctrico Cable directo ADVERTENCIA ADVERTENCIA Peligro de Incendio Use un cable de suministro eléctrico nuevo de 30 amperes que esté en la lista de UL. Use un protector de cables que esté en la lista de UL. Desconecte el suministro eléctrico antes de hacer - Whirlpool LER8648PW | Installation Instructions - Page 19
s Haga pasar el cable de suministro de energía a través del protector de cables. Asegúrese de que el aislamiento de cables del cable de suministro de energía esté dentro del protector de cables. El protector de cables deberá encajar bien con el gabinete de la secadora y estar en posición horizontal - Whirlpool LER8648PW | Installation Instructions - Page 20
1. Saque el tornillo central del bloque de terminal. 2. Saque el hilo de tierra neutro del aparato del tornillo conductor de tierra externo. Conecte el hilo neutro de puesta a tierra y el hilo neutro (hilo blanco o central) del cable de suministro de energía debajo del tornillo central de color - Whirlpool LER8648PW | Installation Instructions - Page 21
3. Conecte el hilo de tierra (verde o desnudo) del cable de suministro eléctrico al tornillo del conductor de tierra externo. Apriete el tornillo. A B C 1. Afloje o saque el tornillo central del bloque de terminal. 2. Conecte el hilo neutro (hilo blanco o central) del cable de suministro elé - Whirlpool LER8648PW | Installation Instructions - Page 22
1. Afloje o saque el tornillo central de color plateado del bloque de terminal. 2. Coloque el extremo en forma de gancho del hilo neutro (hilo blanco o central) del cable de suministro eléctrico debajo del tornillo central del bloque de terminal (con el gancho mirando hacia la derecha). Apriete y - Whirlpool LER8648PW | Installation Instructions - Page 23
de metal pesado de 4" (10,2 cm) Los productos de ventilación DURASAFE™ pueden adquirirse con su distribuidor o llamando a Whirlpool Parts and Accessories (Piezas y accesorios de Whirlpool). Para más información, vea la sección "Ayuda o servicio técnico" en las instrucciones para el usario de la - Whirlpool LER8648PW | Installation Instructions - Page 24
la casa y de salud. A B Planificación del sistema de ventilación Seleccione su tipo de instalación de ventilación A. Instalación en la parte superior (también está disponible con un codo de desviación) B. Instalación de periscopio Instalaciones recomendadas de escape Las instalaciones típicas - Whirlpool LER8648PW | Installation Instructions - Page 25
de la secadora. Coloque el cartón debajo de todo el borde posterior de la secadora. 2. Sujete con firmeza el cuerpo de la secadora (no la parte superior o el panel de la consola). Coloque la secadora cuidadosamente sobre el cartón. Vea la ilustración. Acortarán la vida de la secadora. Reducirán el - Whirlpool LER8648PW | Installation Instructions - Page 26
(no extraiga) los tornillos superiores de las bisagras del lado del gabinete. 3. Levante la puerta hasta que los tornillos inferiores del gabinete estén en la parte grande de la ranura de la bisagra. Tire de la puerta hacia adelante para separarla de los tornillos. Coloque la puerta (con el lado de - Whirlpool LER8648PW | Installation Instructions - Page 27
, revise lo siguiente: s s 7. Fije las bisagras de la puerta a la puerta de la secadora de manera que el orificio más grande quede en la parte inferior de la bisagra. Que los controles estén fijados en una posición de funcionamiento o encendido ("On"). Que se ha presionado con firmeza el botón de - Whirlpool LER8648PW | Installation Instructions - Page 28
8577188 © 2005. All rights reserved. Todos los derechos reservados. Benton Harbor, Michigan 49022 TM DURASAFE is a trademark of Whirlpool, U.S.A. TM DURASAFE es una marca de comercio de Whirlpool, EE.UU. 7/05 Printed in U.S.A. Impreso en EE.UU.
-
 1
1 -
 2
2 -
 3
3 -
 4
4 -
 5
5 -
 6
6 -
 7
7 -
8
-
9
-
10
-
11
-
12
-
13
-
14
-
15
-
16
-
17
-
18
-
19
-
20
-
21
-
22
-
23
-
24
-
25
-
26
-
27
-
28
 |
 |

29" (73.7 CM) ELECTRIC DRYER
INSTALLATION INSTRUCTIONS
INSTRUCCIONES DE INSTALACIÓN PARA LA SECADORA
ELÉCTRICA DE 29" (73,7 CM)
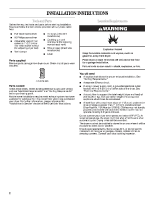
DRYER SAFETY
TableofContents/Índice
DRYER SAFETY
........................................................
1
INSTALLATION INSTRUCTIONS
............................
2
Tools and Parts
......................................................
2
Location Requirements
.........................................
2
Electrical Requirements
.........................................
4
Electrical Connection
.............................................
5
Venting Requirements
..........................................
10
Plan Vent System
.................................................
11
Install Vent System
...............................................
12
Install Leveling Legs
.............................................
12
Connect Vent
.......................................................
12
Level Dryer
...........................................................
12
Reverse Door Swing (Optional)
............................
12
Complete Installation
...........................................
13
SEGURIDAD DE LA SECADORA
...........................
14
INSTRUCCIONES DE INSTALACIÓN
....................
15
Herramientas y piezas
...........................................
15
Requisitos de ubicación
.......................................
15
Requisitos eléctricos
.............................................
16
Conexión eléctrica
................................................
18
Requisitos de ventilación
......................................
23
Planificación del sistema de ventilación
...............
24
Instalación del sistema de ventilación
..................
25
Instalación de las patas niveladoras
.....................
25
Conexión del ducto de escape
.............................
26
Nivelación de la secadora
.....................................
26
Cómo invertir el cierre de la puerta (opcional)
......
26
Complete la instalación
.........................................
27
You can be killed or seriously injured if you don't immediately
You
can be killed or seriously injured if you don't follow
All safety messages will tell you what the potential hazard is, tell you how to reduce the chance of injury, and tell you what can
happen if the instructions are not followed.
Your safety and the safety of others are very important.
We have provided many important safety messages in this manual and on your appliance. Always read and obey all safety
messages.
This is the safety alert symbol.
This symbol alerts you to potential hazards that can kill or hurt you and others.
All safety messages will follow the safety alert symbol and either the word “DANGER” or “WARNING.”
These words mean:
follow instructions.
instructions.
DANGER
WARNING
8577188